Te treści nie są jeszcze zoptymalizowane pod kątem urządzeń mobilnych.
Dla maksymalnej wygody odwiedź nas na komputerze, korzystając z linku przesłanego e-mailem.
Overview
In this lab, you will open a Dataflow project, use pipeline filtering, and execute the pipeline locally and on the cloud.
Open Dataflow project
Pipeline filtering
Execute the pipeline locally and on the cloud
Objective
In this lab, you learn how to write a simple Dataflow pipeline and run it both locally and on the cloud.
Setup a Python Dataflow project using Apache Beam
Write a simple pipeline in Python
Execute the query on the local machine
Execute the query on the cloud
Setup
For each lab, you get a new Google Cloud project and set of resources for a fixed time at no cost.
Sign in to Google Skills using an incognito window.
Note the lab's access time (for example, 1:15:00), and make sure you can finish within that time.
There is no pause feature. You can restart if needed, but you have to start at the beginning.
When ready, click Start lab.
Note your lab credentials (Username and Password). You will use them to sign in to the Google Cloud Console.
Click Open Google Console.
Click Use another account and copy/paste credentials for this lab into the prompts.
If you use other credentials, you'll receive errors or incur charges.
Accept the terms and skip the recovery resource page.
Check project permissions
Before you begin your work on Google Cloud, you need to ensure that your project has the correct permissions within Identity and Access Management (IAM).
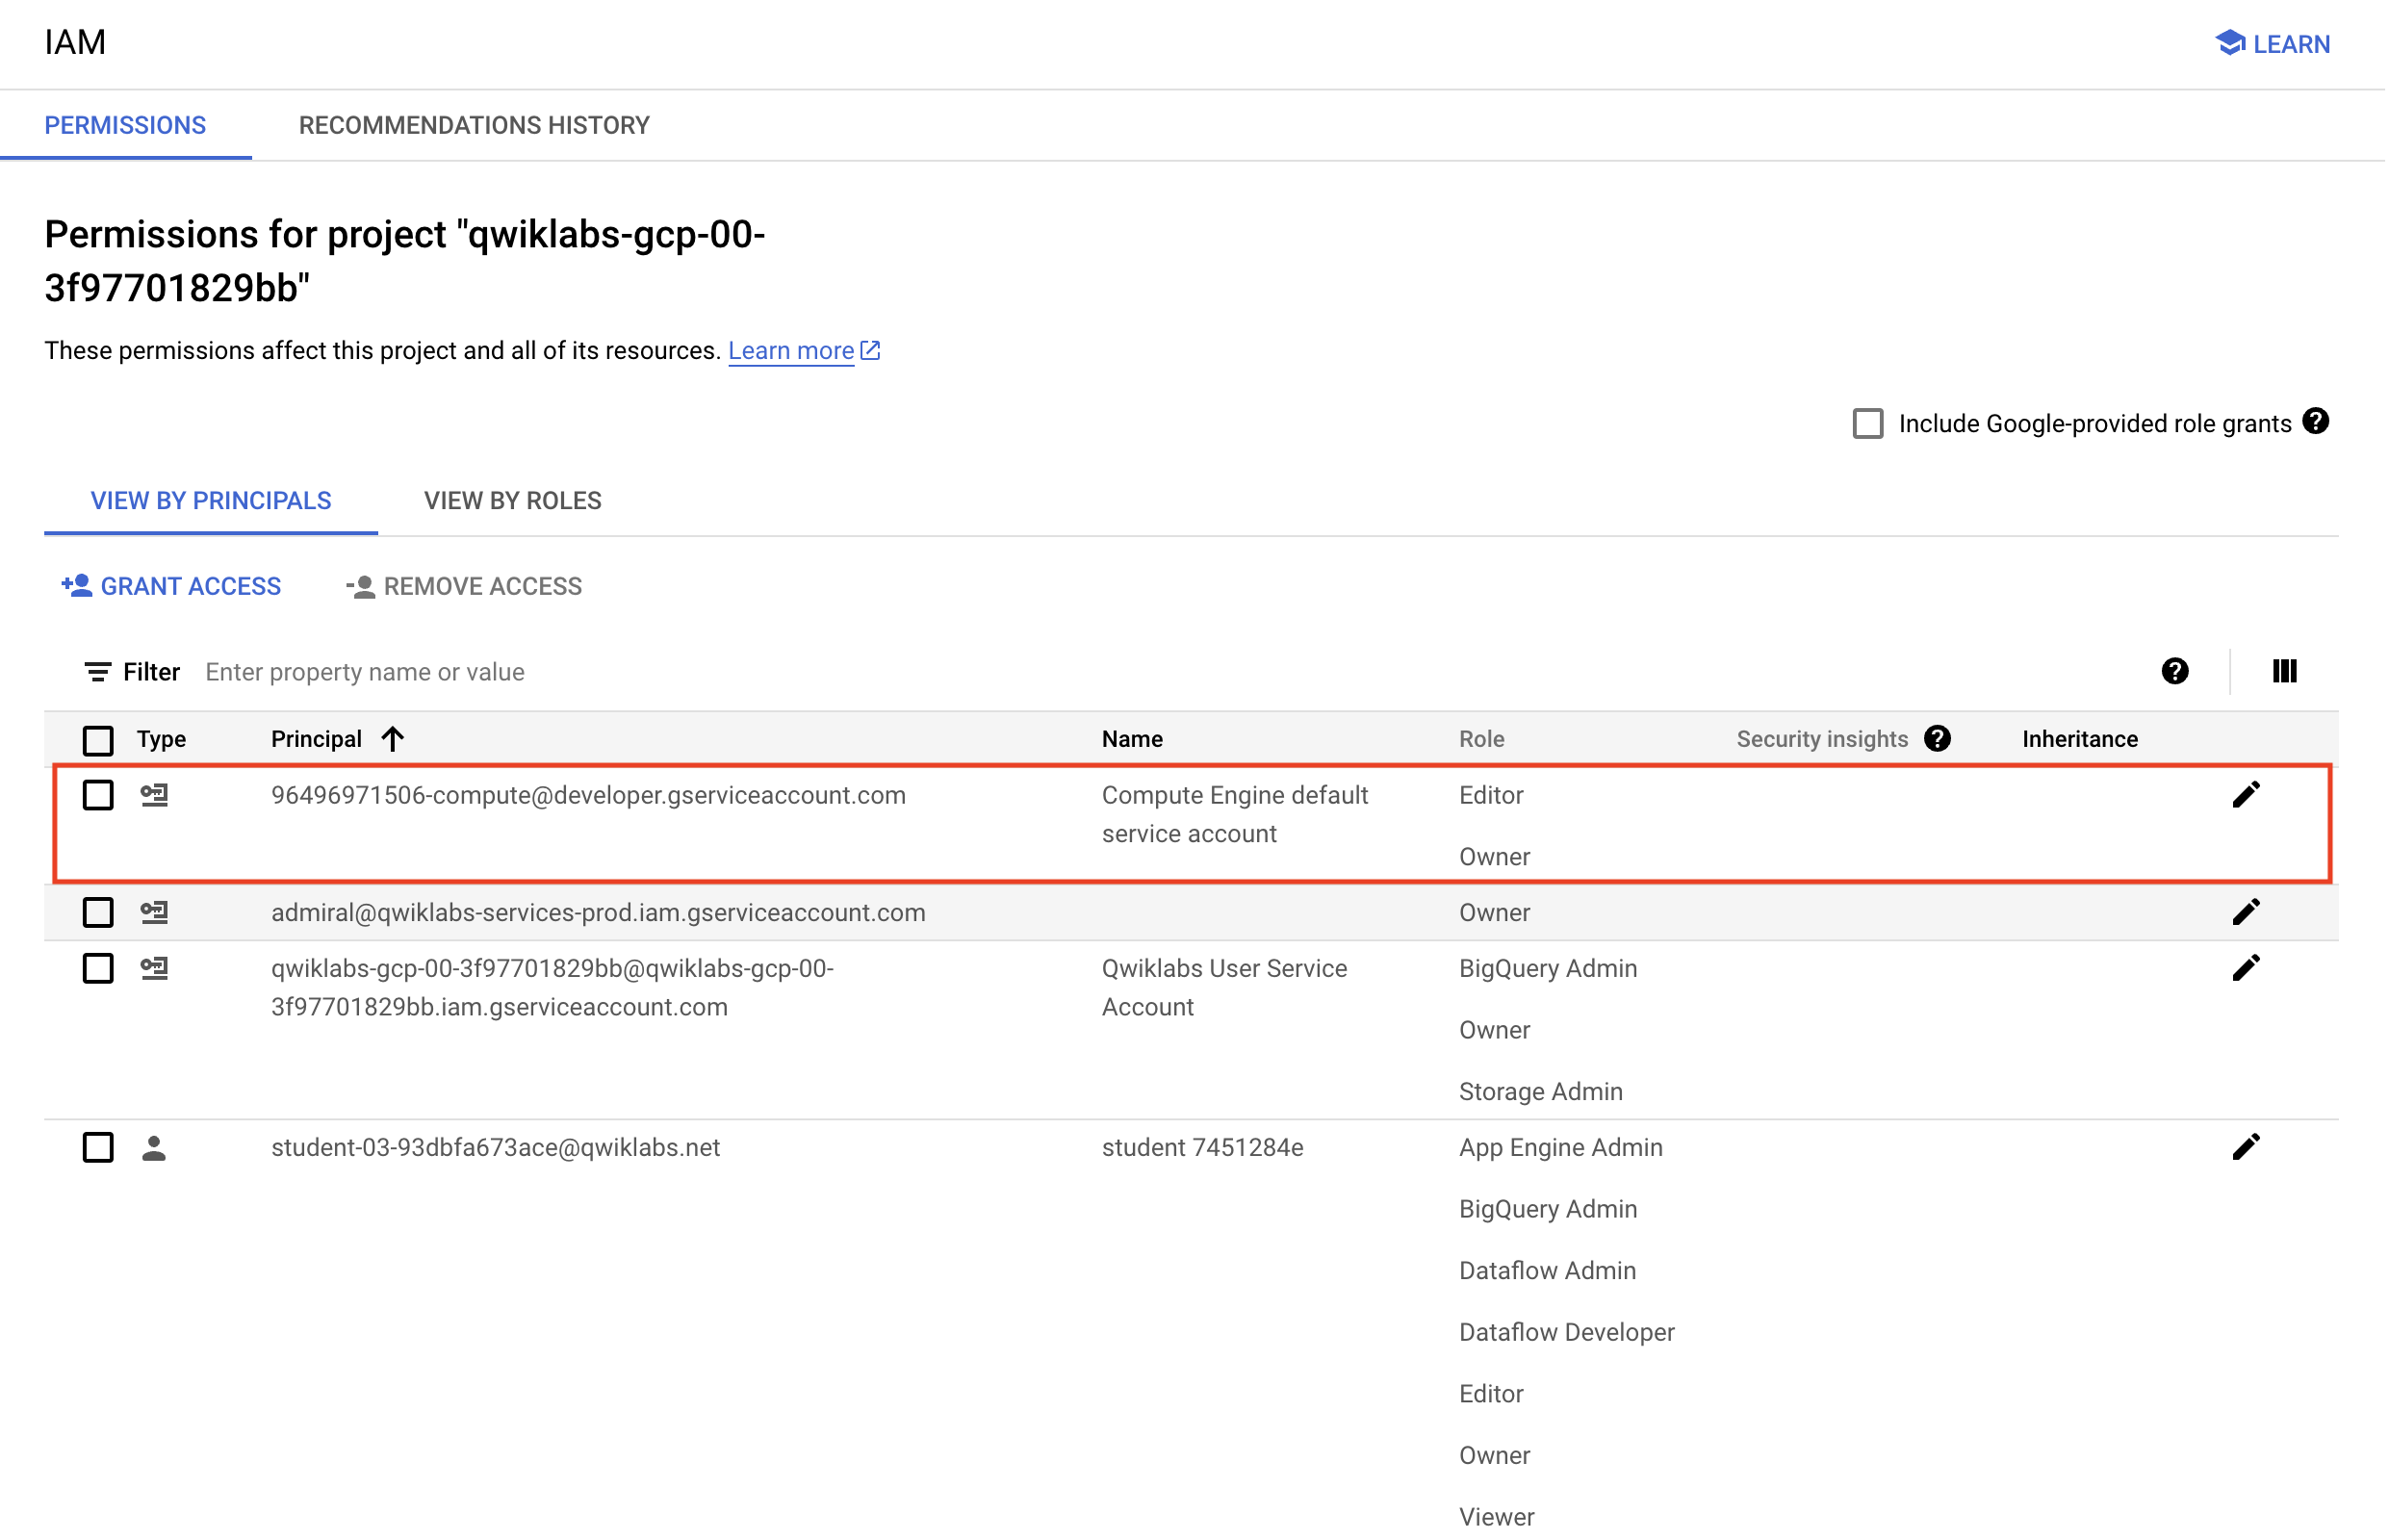
In the Google Cloud console, on the Navigation menu (), select IAM & Admin > IAM.
Confirm that the default compute Service Account {project-number}-compute@developer.gserviceaccount.com is present and has the editor role assigned. The account prefix is the project number, which you can find on Navigation menu > Cloud Overview > Dashboard.
Note: If the account is not present in IAM or does not have the editor role, follow the steps below to assign the required role.
In the Google Cloud console, on the Navigation menu, click Cloud Overview > Dashboard.
Copy the project number (e.g. 729328892908).
On the Navigation menu, select IAM & Admin > IAM.
At the top of the roles table, below View by Principals, click Grant Access.
Replace {project-number} with your project number.
For Role, select Project (or Basic) > Editor.
Click Save.
Task 1. Ensure that the Dataflow API is successfully enabled
To ensure access to the necessary API, restart the connection to the Dataflow API.
In the Cloud Console, enter Dataflow API in the top search bar.
Click on the result for Dataflow API.
Click Manage.
Click Disable API.
If asked to confirm, click Disable.
Click Enable.
Task 2. Preparation
Open the SSH terminal and connect to the training VM
You will be running all code from a curated training VM.
In the Console, expand the Navigation menu ()and select Compute Engine > VM instances.
Locate the line with the instance called training-vm.
On the far right, under Connect, click on SSH to open a terminal window.
In this lab, you will enter CLI commands on the training-vm.
Download code repository
Next you will download a code repository for use in this lab. In the training-vm SSH terminal enter the following:
git clone https://github.com/GoogleCloudPlatform/training-data-analyst
Note: If you receive an error -bash: git: command not found, try by running the command sudo apt-get update and then, sudo apt-get -y install git
Create a Cloud Storage bucket
Follow these instructions to create a bucket.
In the Console, on the Navigation menu, click Cloud overview.
Select and copy the Project ID.
For simplicity you will use the Google Skills Project ID, which is already globally unique, as the bucket name.
In the Console, on the Navigation menu, click Cloud Storage > Buckets.
Click Create.
Specify the following, and leave the remaining settings as their defaults:
Property
Value (type value or select option as specified)
Name
<your unique bucket name (Project ID)>
Location type
Multi-Region
Location
<Your location>
Click Create.
Record the name of your bucket. You will need it in subsequent tasks.
In the training-vm SSH terminal enter the following to create an environment variable named "BUCKET" and verify that it exists with the echo command:
BUCKET="<your unique bucket name (Project ID)>"
echo $BUCKET
You can use $BUCKET in terminal commands. And if you need to enter the bucket name <your-bucket> in a text field in Console, you can quickly retrieve the name with echo $BUCKET.
Task 3. Pipeline filtering
The goal of this lab is to become familiar with the structure of a Dataflow project and learn how to execute a Dataflow pipeline.
Return to the training-vm SSH terminal and navigate to the directory /training-data-analyst/courses/data_analysis/lab2/python and view the file grep.py.
View the file with Nano. Do not make any changes to the code.
cd ~/training-data-analyst/courses/data_analysis/lab2/python
nano grep.py
Press Ctrl+X to exit Nano.
Can you answer these questions about the file grep.py?
What files are being read?
What is the search term?
Where does the output go?
There are three transforms in the pipeline:
What does the transform do?
What does the second transform do?
Where does its input come from?
What does it do with this input?
What does it write to its output?
Where does the output go to?
What does the third transform do?
Task 4 Execute the pipeline locally
Install pip package and latest Python SDK from PyPI.
Save the file and close Nano by pressing the CTRL+X key, then press Y, and Enter.
Submit the Dataflow job to the cloud:
python3 grepc.py
Note: You may ignore the message: WARNING:root:Make sure that locally built Python SDK docker image has Python 3.7 interpreter. Your Dataflow job will start successfully.
Because this is such a small job, running on the cloud will take significantly longer than running it locally (on the order of 7-10 minutes).
Return to the browser tab for Console.
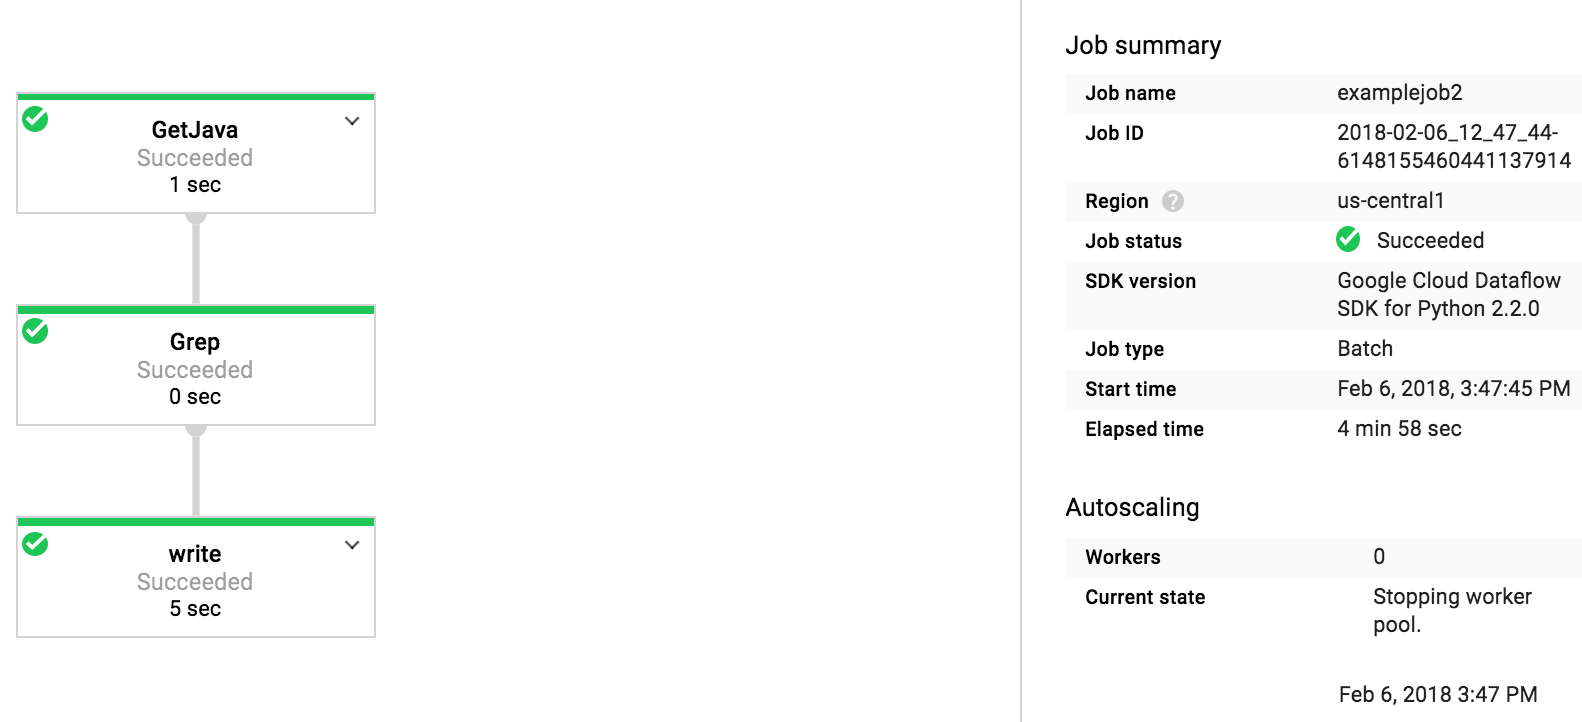
On the Navigation menu, click Dataflow and click on your job to monitor progress.
Example:
Wait for the job status to turn to Succeeded.
Click Check my progress to verify the objective.
Submit the Dataflow job to the Cloud
Examine the output in the Cloud Storage bucket.
On the Navigation menu, click Cloud Storage > Buckets and click on your bucket.
Click the javahelp directory.
This job will generate the file output.txt. If the file is large enough it will be sharded into multiple parts with names like: output-0000x-of-000y. You can identify the most recent file by name or by the Last modified field.
Click on the file to view it.
Alternatively, you can download the file via the training-vm SSH terminal and view it:
When you have completed your lab, click End Lab. Google Skills removes the resources you’ve used and cleans the account for you.
You will be given an opportunity to rate the lab experience. Select the applicable number of stars, type a comment, and then click Submit.
The number of stars indicates the following:
1 star = Very dissatisfied
2 stars = Dissatisfied
3 stars = Neutral
4 stars = Satisfied
5 stars = Very satisfied
You can close the dialog box if you don't want to provide feedback.
For feedback, suggestions, or corrections, please use the Support tab.
Copyright 2026 Google LLC All rights reserved. Google and the Google logo are trademarks of Google LLC. All other company and product names may be trademarks of the respective companies with which they are associated.
Moduły tworzą projekt Google Cloud i zasoby na określony czas.
Moduły mają ograniczenie czasowe i nie mają funkcji wstrzymywania. Jeśli zakończysz moduł, musisz go zacząć od początku.
Aby rozpocząć, w lewym górnym rogu ekranu kliknij Rozpocznij moduł.
Użyj przeglądania prywatnego
Skopiuj podaną nazwę użytkownika i hasło do modułu.
Kliknij Otwórz konsolę w trybie prywatnym.
Zaloguj się w konsoli
Zaloguj się z użyciem danych logowania do modułu. Użycie innych danych logowania może spowodować błędy lub naliczanie opłat.
Zaakceptuj warunki i pomiń stronę zasobów przywracania.
Nie klikaj Zakończ moduł, chyba że właśnie został przez Ciebie zakończony lub chcesz go uruchomić ponownie, ponieważ spowoduje to usunięcie wyników i projektu.
Ta treść jest obecnie niedostępna
Kiedy dostępność się zmieni, wyślemy Ci e-maila z powiadomieniem
Świetnie
Kiedy dostępność się zmieni, skontaktujemy się z Tobą e-mailem
Jeden moduł, a potem drugi
Potwierdź, aby zakończyć wszystkie istniejące moduły i rozpocząć ten
Aby uruchomić moduł, użyj przeglądania prywatnego
Najlepszym sposobem na uruchomienie tego laboratorium jest użycie okna incognito lub przeglądania prywatnego. Dzięki temu unikniesz konfliktu między swoim kontem osobistym a kontem do nauki, co mogłoby spowodować naliczanie dodatkowych opłat na koncie osobistym.
In this lab you will open a Dataflow project, use pipeline filtering, and execute the pipeline locally and on the cloud using Python.
Czas trwania:
Konfiguracja: 1 min
·
Dostęp na 90 min
·
Ukończono w 90 min

 ), select IAM & Admin > IAM.