Konten ini belum dioptimalkan untuk perangkat seluler.
Untuk pengalaman terbaik, kunjungi kami dengan komputer desktop menggunakan link yang dikirim melalui email.
Overview
In this lab, you learn how to load data into BigQuery and run complex queries. Next, you will execute a Dataflow pipeline that can carry out Map and Reduce operations, use side inputs and stream into BigQuery.
Objective
In this lab, you learn how to use BigQuery as a data source into Dataflow, and how to use the results of a pipeline as a side input to another pipeline.
Read data from BigQuery into Dataflow
Use the output of a pipeline as a side-input to another pipeline
Setup
For each lab, you get a new Google Cloud project and set of resources for a fixed time at no cost.
Sign in to Google Skills using an incognito window.
Note the lab's access time (for example, 1:15:00), and make sure you can finish within that time.
There is no pause feature. You can restart if needed, but you have to start at the beginning.
When ready, click Start lab.
Note your lab credentials (Username and Password). You will use them to sign in to the Google Cloud Console.
Click Open Google Console.
Click Use another account and copy/paste credentials for this lab into the prompts.
If you use other credentials, you'll receive errors or incur charges.
Accept the terms and skip the recovery resource page.
Check project permissions
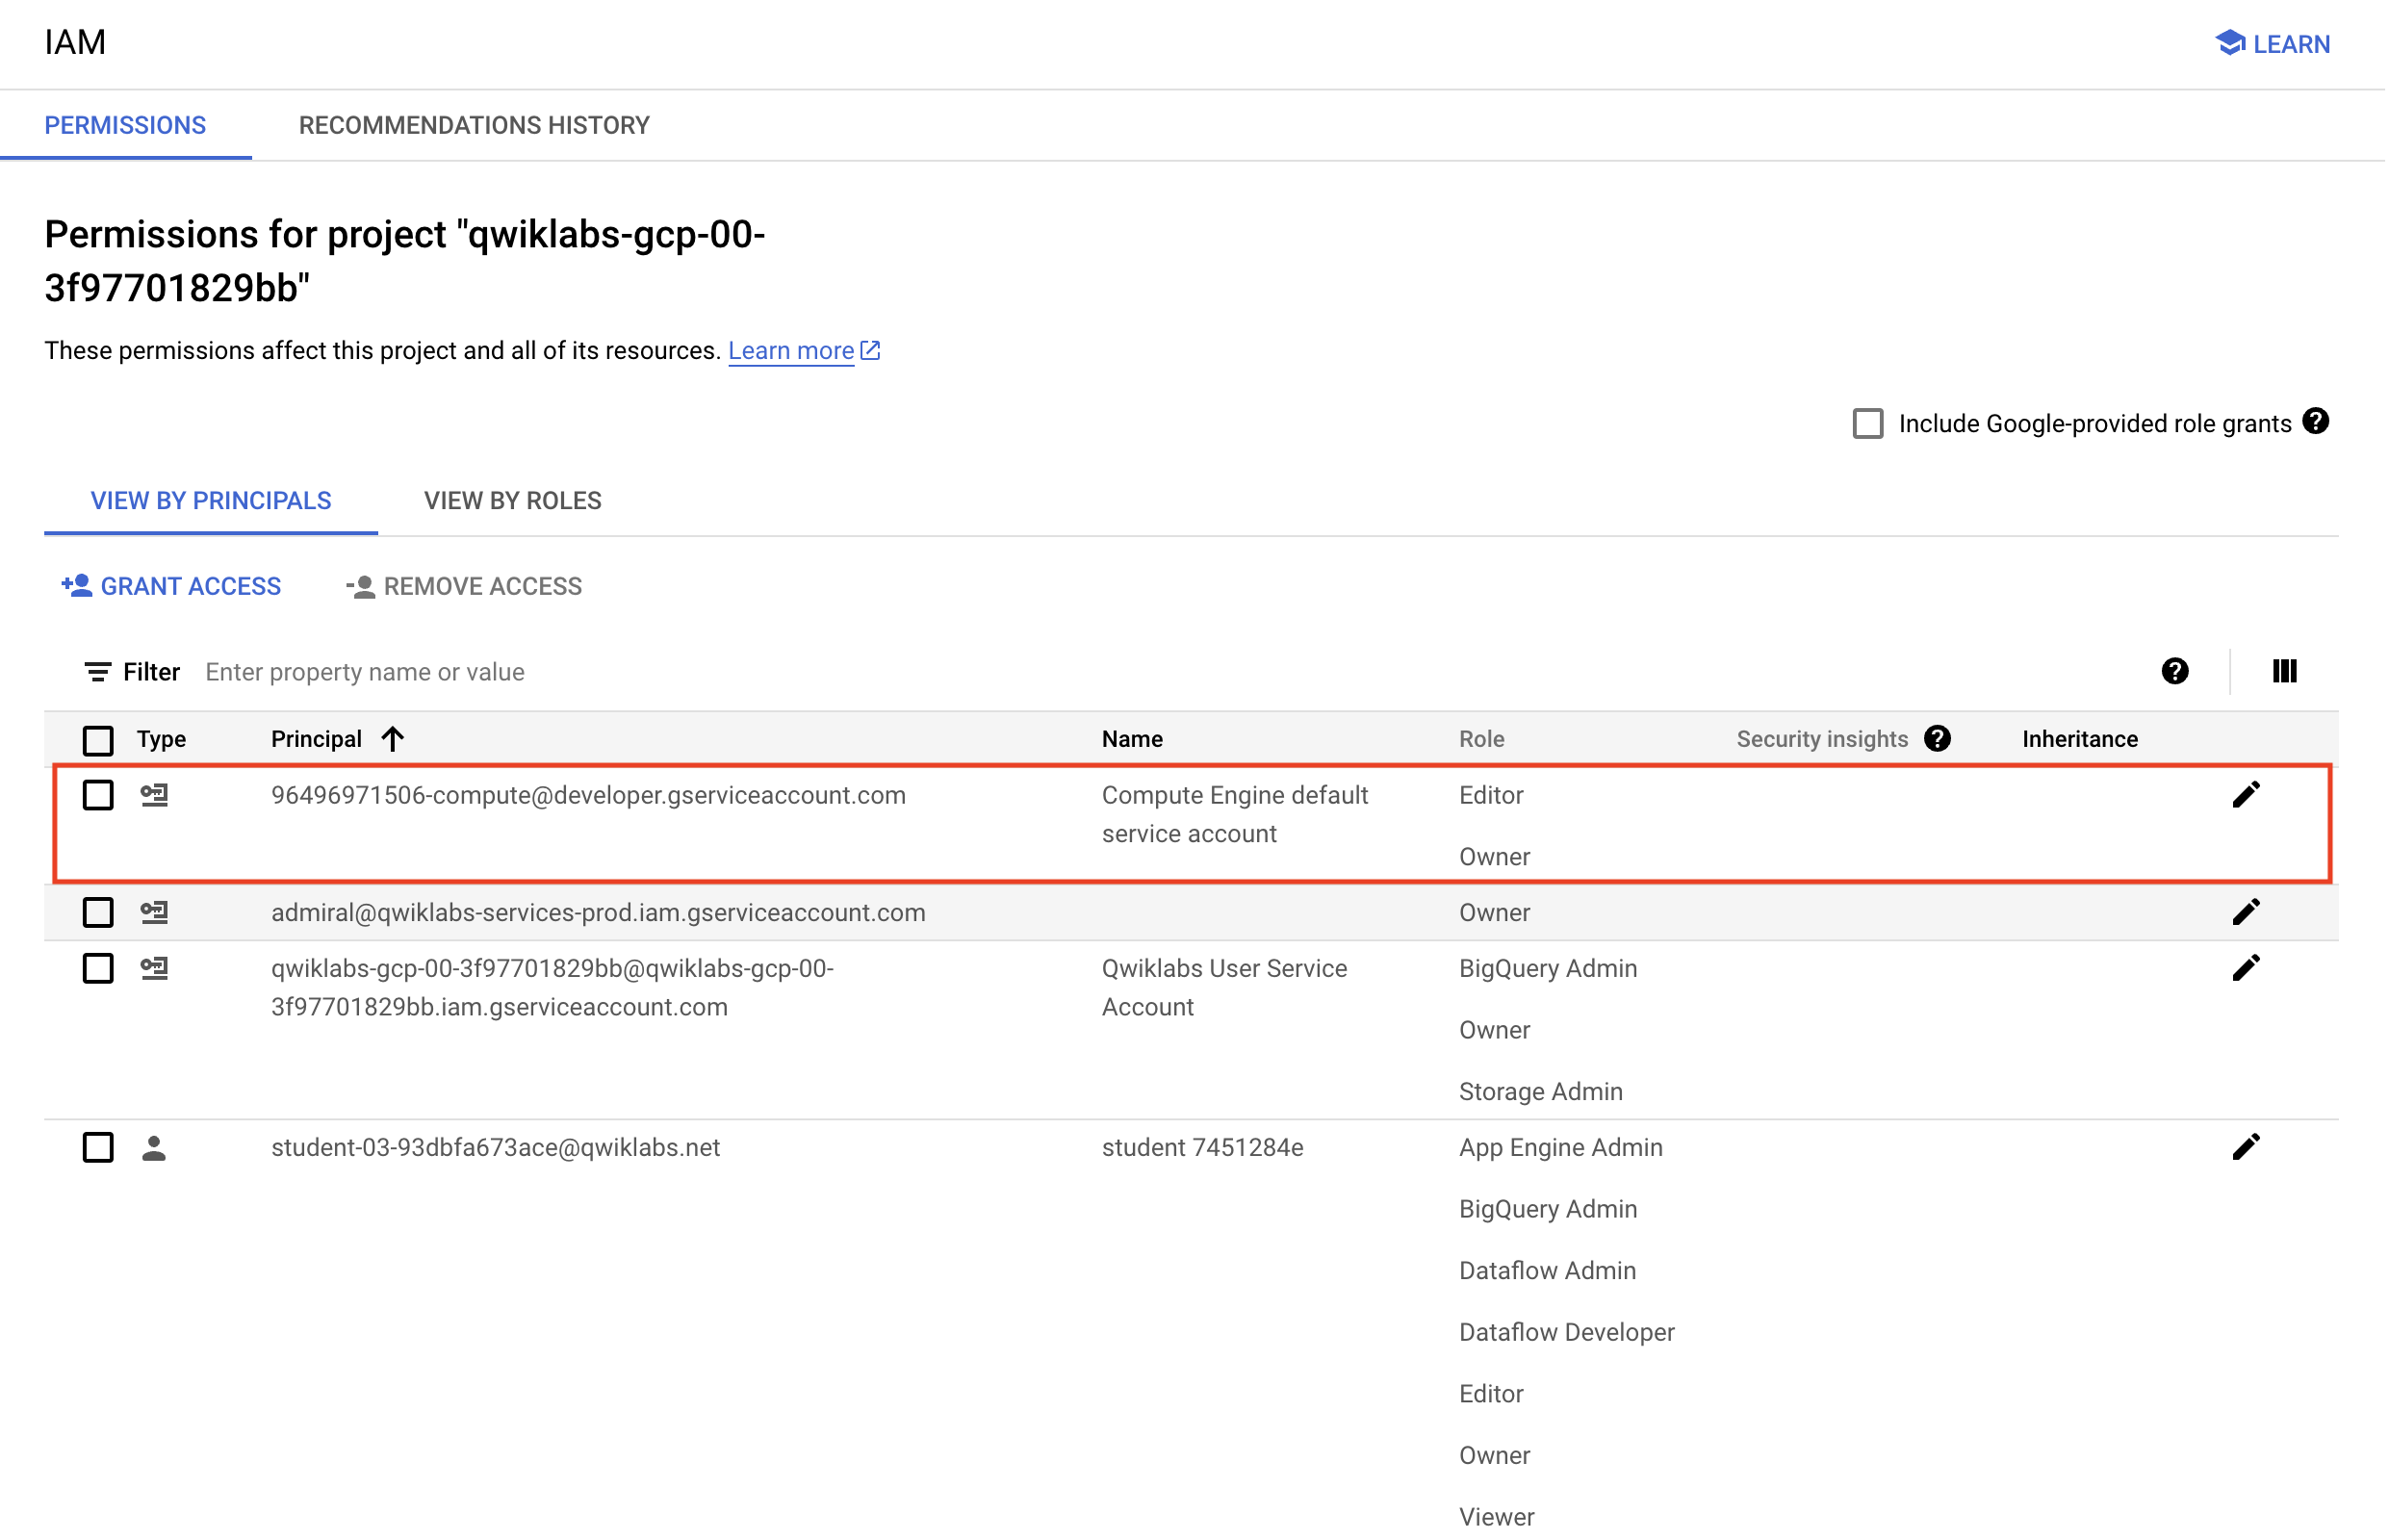
Before you begin your work on Google Cloud, you need to ensure that your project has the correct permissions within Identity and Access Management (IAM).
In the Google Cloud console, on the Navigation menu (), select IAM & Admin > IAM.
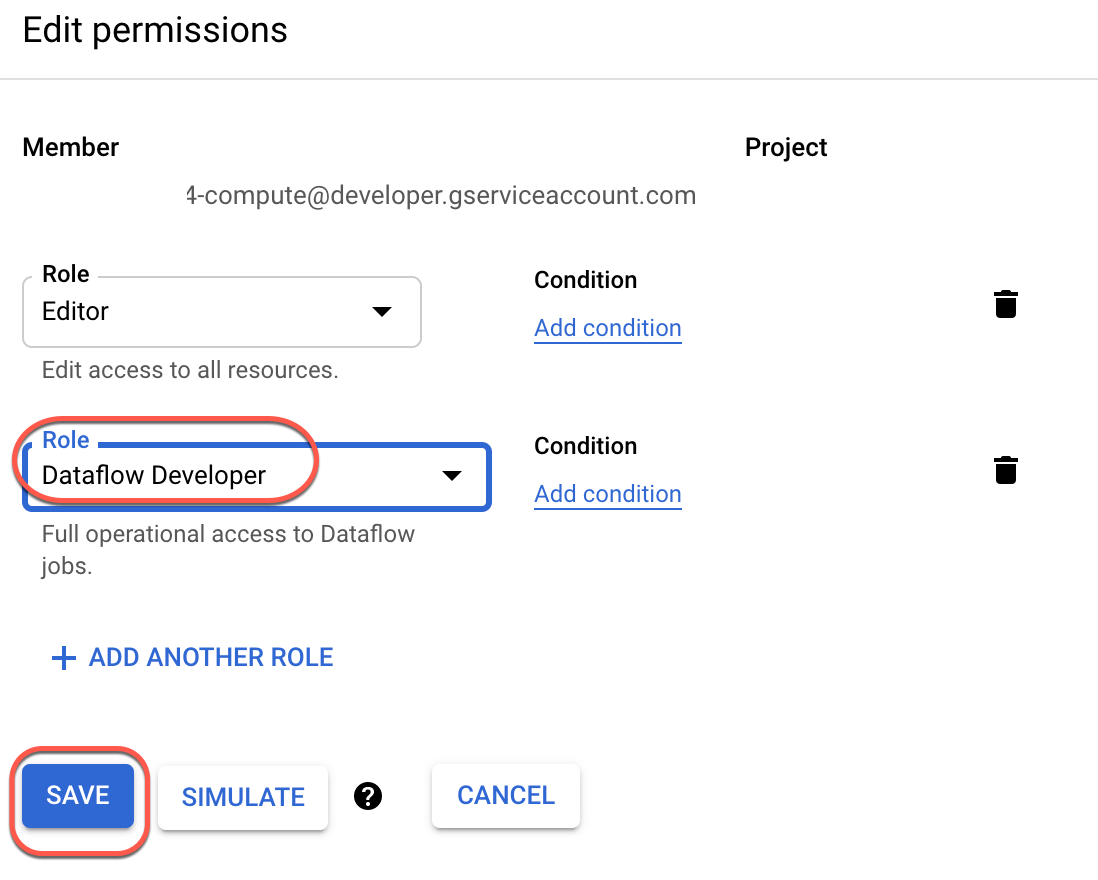
Confirm that the default compute Service Account {project-number}-compute@developer.gserviceaccount.com is present and has the editor role assigned. The account prefix is the project number, which you can find on Navigation menu > Cloud Overview > Dashboard.
Note: If the account is not present in IAM or does not have the editor role, follow the steps below to assign the required role.
In the Google Cloud console, on the Navigation menu, click Cloud Overview > Dashboard.
Copy the project number (e.g. 729328892908).
On the Navigation menu, select IAM & Admin > IAM.
At the top of the roles table, below View by Principals, click Grant Access.
In the Console, on the Navigation menu, click Cloud Storage > Buckets.
Click + Create.
Specify the following, and leave the remaining settings as their defaults:
Property
Value (type value or select option as specified)
Name
Location type > Region
Click Create.
If you get the Public access will be prevented prompt, select Enforce public access prevention on this bucket and click Confirm.
In the training-vm SSH terminal enter the following to create three environment variables. One named "BUCKET", another named "PROJECT", and the last named "REGION". Verify that each exists with the echo command:
In the console, on the Navigation menu (), click BigQuery.
If prompted click Done.
Click "+" (SQL Query) and type the following query:
SELECT
content
FROM
`cloud-training-demos.github_repos.contents_java`
LIMIT
10
Click on Run.
What is being returned?
The BigQuery table cloud-training-demos.github_repos.contents_java contains the content (and some metadata) of all the Java files present in GitHub in 2016.
To find out how many Java files this table has, type the following query and click Run:
SELECT
COUNT(*)
FROM
`cloud-training-demos.github_repos.contents_java`
How many files are there in this dataset?
Is this a dataset you want to process locally or on the cloud?
Task 3. Explore the pipeline code
Return to the training-vm SSH terminal and navigate to the directory /training-data-analyst/courses/data_analysis/lab2/python and view the file JavaProjectsThatNeedHelp.py.
View the file with Nano. Do not make any changes to the code. Press Ctrl+X to exit Nano.
cd ~/training-data-analyst/courses/data_analysis/lab2/python
nano JavaProjectsThatNeedHelp.py
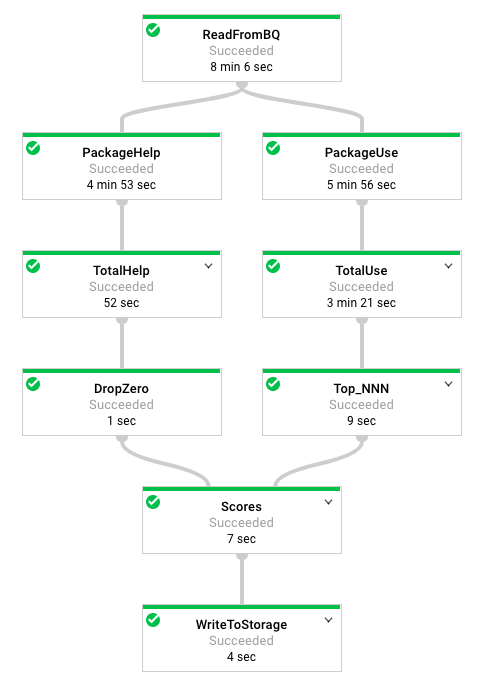
Refer to this diagram as you read the code. The pipeline looks like this:
Answer the following questions:
Looking at the class documentation at the very top, what is the purpose of this pipeline?
Where does the content come from?
What does the left side of the pipeline do?
What does the right side of the pipeline do?
What does ToLines do? (Hint: look at the content field of the BigQuery result)
Why is the result of ReadFromBQ stored in a named PCollection instead of being directly passed to another step?
What are the two actions carried out on the PCollection generated from ReadFromBQ?
If a file has 3 FIXMEs and 2 TODOs in its content (on different lines), how many calls for help are associated with it?
If a file is in the package com.google.devtools.build, what are the packages that it is associated with?
popular_packages and help_packages are both named PCollections and both used in the Scores (side inputs) step of the pipeline. Which one is the main input and which is the side input?
What is the method used in the Scores step?
What Python data type is the side input converted into in the Scores step?
Note: The Java version of this program is slightly different from the Python version. The Java SDK supports AsMap and the Python SDK doesn't. It supports AsDict instead. In Java, the PCollection is converted into a View as a preparatory step before it is used. In Python, the PCollection conversion occurs in the step where it is used.
Task 4. Execute the pipeline
The program requires BUCKET, PROJECT, and REGION values and whether you want to run the pipeline locally using --DirectRunner or on the cloud using --DataFlowRunner.
Execute the pipeline locally by typing the following into the training-vm SSH terminal:
python3 JavaProjectsThatNeedHelp.py --bucket $BUCKET --project $PROJECT --region $REGION --DirectRunner
Note: Please ignore the warning if any, such as 'BeamDeprecationWarning', and move forward.
Once the pipeline has finished executing, On the Navigation menu (), click Cloud Storage > Buckets and click on your bucket. You will find the results in the javahelp folder. Click on the Result object to examine the output.
Execute the pipeline on the cloud by typing the following into the training-vm SSH terminal:
python3 JavaProjectsThatNeedHelp.py --bucket $BUCKET --project $PROJECT --region $REGION --DataFlowRunner
Note: Please ignore the warning if any, such as 'BeamDeprecationWarning', and move forward.
Return to the browser tab for Console. On the Navigation menu (), click View All Products, and select Dataflow from the Analytics section.
Click on your job to monitor progress.
Note: The process may take some time. Wait until the job succeeds.
Once the pipeline has finished executing, On the Navigation menu () click Cloud Storage > Buckets and click on your bucket. You will find the results in the javahelp folder. Click on the Result object to examine the output. The file name will be the same but you will notice that the file creation time is more recent.
Click Check my progress to verify the objective.
Execute the pipeline
End your lab
When you have completed your lab, click End Lab. Google Skills removes the resources you’ve used and cleans the account for you.
You will be given an opportunity to rate the lab experience. Select the applicable number of stars, type a comment, and then click Submit.
The number of stars indicates the following:
1 star = Very dissatisfied
2 stars = Dissatisfied
3 stars = Neutral
4 stars = Satisfied
5 stars = Very satisfied
You can close the dialog box if you don't want to provide feedback.
For feedback, suggestions, or corrections, please use the Support tab.
Copyright 2026 Google LLC All rights reserved. Google and the Google logo are trademarks of Google LLC. All other company and product names may be trademarks of the respective companies with which they are associated.
Lab membuat project dan resource Google Cloud untuk jangka waktu tertentu
Lab memiliki batas waktu dan tidak memiliki fitur jeda. Jika lab diakhiri, Anda harus memulainya lagi dari awal.
Di kiri atas layar, klik Start lab untuk memulai
Gunakan penjelajahan rahasia
Salin Nama Pengguna dan Sandi yang diberikan untuk lab tersebut
Klik Open console dalam mode pribadi
Login ke Konsol
Login menggunakan kredensial lab Anda. Menggunakan kredensial lain mungkin menyebabkan error atau dikenai biaya.
Setujui persyaratan, dan lewati halaman resource pemulihan
Jangan klik End lab kecuali jika Anda sudah menyelesaikan lab atau ingin mengulanginya, karena tindakan ini akan menghapus pekerjaan Anda dan menghapus project
Konten ini tidak tersedia untuk saat ini
Kami akan memberi tahu Anda melalui email saat konten tersedia
Bagus!
Kami akan menghubungi Anda melalui email saat konten tersedia
Satu lab dalam satu waktu
Konfirmasi untuk mengakhiri semua lab yang ada dan memulai lab ini
Gunakan penjelajahan rahasia untuk menjalankan lab
Menggunakan jendela Samaran atau browser pribadi adalah cara terbaik untuk menjalankan lab ini. Langkah ini akan mencegah konflik antara akun pribadi Anda dan akun Siswa, yang dapat menyebabkan tagihan ekstra pada akun pribadi Anda.
In this lab you will try out a BigQuery query, explore the pipeline code, and execute the pipeline using Python.

 ), select IAM & Admin > IAM.