In this lab, you will use Dataflow to collect traffic events from simulated traffic sensor data made available through Google Cloud PubSub, and write them into a Bigtable table.
Note: At the time of this writing, streaming pipelines are not available in the DataFlow Python SDK. So the streaming labs are written in Java.
Objectives
In this lab, you will perform the following tasks:
Launch Dataflow pipeline to read from Pub/Sub and write into Bigtable.
Open an HBase shell to query the Bigtable database.
Setup
For each lab, you get a new Google Cloud project and set of resources for a fixed time at no cost.
Sign in to Qwiklabs using an incognito window.
Note the lab's access time (for example, 1:15:00), and make sure you can finish within that time.
There is no pause feature. You can restart if needed, but you have to start at the beginning.
When ready, click Start lab.
Note your lab credentials (Username and Password). You will use them to sign in to the Google Cloud Console.
Click Open Google Console.
Click Use another account and copy/paste credentials for this lab into the prompts.
If you use other credentials, you'll receive errors or incur charges.
Accept the terms and skip the recovery resource page.
Check project permissions
Before you begin your work on Google Cloud, you need to ensure that your project has the correct permissions within Identity and Access Management (IAM).
In the Google Cloud console, on the Navigation menu (), select IAM & Admin > IAM.
Confirm that the default compute Service Account {project-number}-compute@developer.gserviceaccount.com is present and has the editor role assigned. The account prefix is the project number, which you can find on Navigation menu > Cloud Overview > Dashboard.
Note: If the account is not present in IAM or does not have the editor role, follow the steps below to assign the required role.
In the Google Cloud console, on the Navigation menu, click Cloud Overview > Dashboard.
Copy the project number (e.g. 729328892908).
On the Navigation menu, select IAM & Admin > IAM.
At the top of the roles table, below View by Principals, click Grant Access.
Replace {project-number} with your project number.
For Role, select Project (or Basic) > Editor.
Click Save.
Task 1. Preparation
You will be running a sensor simulator from the training VM. There are several files and some setup of the environment required.
Open the SSH terminal and connect to the training VM
In the Console, on the Navigation menu ( ), click Compute Engine > VM instances.
Locate the line with the instance called training-vm.
On the far right, under the Connect column, click on SSH to open a terminal window. Then click Connect.
In this lab, you will enter CLI commands on the training-vm.
Verify initialization is complete
The training-vm is installing some software in the background. Verify that setup is complete by checking the contents of the new directory:
ls /training
The setup is complete when the result of your list (ls) command output appears as in the image below. If the full listing does not appear, wait a few minutes and try again.
Note: It may take 2 to 3 minutes for all background actions to complete.
student-04-2324ale56789@training-vm:~$ ls /training
bq-magic.sh project_env.sh sensor_magic.sh
student-04-2324ale56789@training-vm:~$
Download code repository
Next, you will download a code repository for use in this lab:
On the training-vm SSH terminal, enter the following:
source /training/project_env.sh
This script sets the $DEVSHELL_PROJECT_ID and $BUCKET environment variables.
Prepare HBase quickstart files
In the training-vm SSH terminal, run the script to download and unzip the quickstart files (you will later use these to run the HBase shell.):
cd ~/training-data-analyst/courses/streaming/process/sandiego
./install_quickstart.sh
Click Check my progress to verify the objective.
Copy sample files to the training_vm home directory
Task 2. Simulate traffic sensor data into Pub/Sub
In the training-vm SSH terminal, start the sensor simulator. The script reads sample data from a csv file and publishes it to Pub/Sub:
/training/sensor_magic.sh
This command will send 1 hour of data in 1 minute. Let the script continue to run in the current terminal.
Open a second SSH terminal and connect to the training VM
In the upper right corner of the training-vm SSH terminal, click on the gear-shaped button (), and select New Connection from the drop-down menu. A new terminal window will open.
The new terminal session will not have the required environment variables. Complete the next step to set these variables.
In the new training-vm SSH terminal, enter the following:
source /training/project_env.sh
Click Check my progress to verify the objective.
Simulate traffic sensor data into Pub/Sub
Task 3. Launch dataflow pipeline
To ensure that the proper APIs and permissions are set, execute the following block of code in the Cloud Shell:
In the second training-vm SSH terminal, navigate to the directory for this lab. Examine the script in Cloud Shell or using nano. Do not make any changes to the code.:
cd ~/training-data-analyst/courses/streaming/process/sandiego
nano run_oncloud.sh
What does the script do?
The script takes 3 required arguments: project id, bucket name, classname and possibly a 4th argument: options. In this part of the lab, we will use the --bigtable option which will direct the pipeline to write into Cloud Bigtable.
Press CTRL+X to exit.
Run the following commands to create the Bigtable instance:
cd ~/training-data-analyst/courses/streaming/process/sandiego
export ZONE={{{project_0.startup_script.gcp_zone|Lab GCP Zone}}}
./create_cbt.sh
Run the following commands for the Dataflow pipeline to read from PubSub and write into Cloud Bigtable:
[INFO] ------------------------------------------------------------------------
[INFO] BUILD SUCCESS
[INFO] ------------------------------------------------------------------------
[INFO] Total time: 47.582 s
[INFO] Finished at: 2018-06-08T21:25:32+00:00
[INFO] Final Memory: 58M/213M
[INFO] ------------------------------------------------------------------------
Click Check my progress to verify the objective.
Launch Dataflow Pipeline
Task 4. Explore the pipeline
Return to the browser tab for Console. On the Navigation menu ( ), click Dataflow and click on the new pipeline job. Confirm that the pipeline job is listed and verify that it is running without errors.
Find the write:cbt step in the pipeline graph, and click on the down arrow on the right to see the writer in action. Click on the given writer. Review the Bigtable Options in the Step summary.
Task 5. Query Bigtable data
In the second training-vm SSH terminal, run the quickstart.sh script to launch the HBase shell:
cd ~/training-data-analyst/courses/streaming/process/sandiego/quickstart
./quickstart.sh
When the script completes, you will be in an HBase shell prompt that looks like this:
hbase(main):001:0>
At the HBase shell prompt, type the following query to retrieve 2 rows from your Bigtable table that was populated by the pipeline. It may take a few minutes for results to return via the HBase query.
Repeat the 'scan' command until you see a list of rows returned:
scan 'current_conditions', {'LIMIT' => 2}
Review the output. Notice each row is broken into column, timestamp, value combinations.
Run another query. This time look only at the lane: speed column, limit to 10 rows, and specify rowid patterns for start and end rows to scan over:
Review the output. Notice that you see 10 of the column, timestamp, value combinations, all of which correspond to Highway 15. Also notice that column is restricted to lane: speed.
Feel free to run other queries if you are familiar with the syntax. Once you're satisfied, enter quit to exit the shell:
quit
Task 6. Cleanup
In the second training-vm SSH terminal, run the following script to delete your Bigtable instance:
cd ~/training-data-analyst/courses/streaming/process/sandiego
./delete_cbt.sh
If prompted to confirm, enter Y.
On your Dataflow page in your Cloud Console, click on the pipeline job name.
Click Stop on the top menu bar. Select Cancel, and then click Stop Job.
Go back to the first SSH terminal with the publisher, and enter Ctrl+C to stop it.
In the BigQuery console, click on the three dots next to the demos dataset, and click Delete.
Type delete and then click Delete.
End your lab
When you have completed your lab, click End Lab. Google Cloud Skills Boost removes the resources you’ve used and cleans the account for you.
You will be given an opportunity to rate the lab experience. Select the applicable number of stars, type a comment, and then click Submit.
The number of stars indicates the following:
1 star = Very dissatisfied
2 stars = Dissatisfied
3 stars = Neutral
4 stars = Satisfied
5 stars = Very satisfied
You can close the dialog box if you don't want to provide feedback.
For feedback, suggestions, or corrections, please use the Support tab.
Copyright 2022 Google LLC All rights reserved. Google and the Google logo are trademarks of Google LLC. All other company and product names may be trademarks of the respective companies with which they are associated.
Lab membuat project dan resource Google Cloud untuk jangka waktu tertentu
Lab memiliki batas waktu dan tidak memiliki fitur jeda. Jika lab diakhiri, Anda harus memulainya lagi dari awal.
Di kiri atas layar, klik Start lab untuk memulai
Gunakan penjelajahan rahasia
Salin Nama Pengguna dan Sandi yang diberikan untuk lab tersebut
Klik Open console dalam mode pribadi
Login ke Konsol
Login menggunakan kredensial lab Anda. Menggunakan kredensial lain mungkin menyebabkan error atau dikenai biaya.
Setujui persyaratan, dan lewati halaman resource pemulihan
Jangan klik End lab kecuali jika Anda sudah menyelesaikan lab atau ingin mengulanginya, karena tindakan ini akan menghapus pekerjaan Anda dan menghapus project
Konten ini tidak tersedia untuk saat ini
Kami akan memberi tahu Anda melalui email saat konten tersedia
Bagus!
Kami akan menghubungi Anda melalui email saat konten tersedia
Satu lab dalam satu waktu
Konfirmasi untuk mengakhiri semua lab yang ada dan memulai lab ini
Gunakan penjelajahan rahasia untuk menjalankan lab
Gunakan jendela Samaran atau browser pribadi untuk menjalankan lab ini. Langkah ini akan mencegah konflik antara akun pribadi Anda dan akun Siswa yang dapat menyebabkan tagihan ekstra pada akun pribadi Anda.
Streaming Data Processing: Streaming Data into Bigtable
 ), select IAM & Admin > IAM.
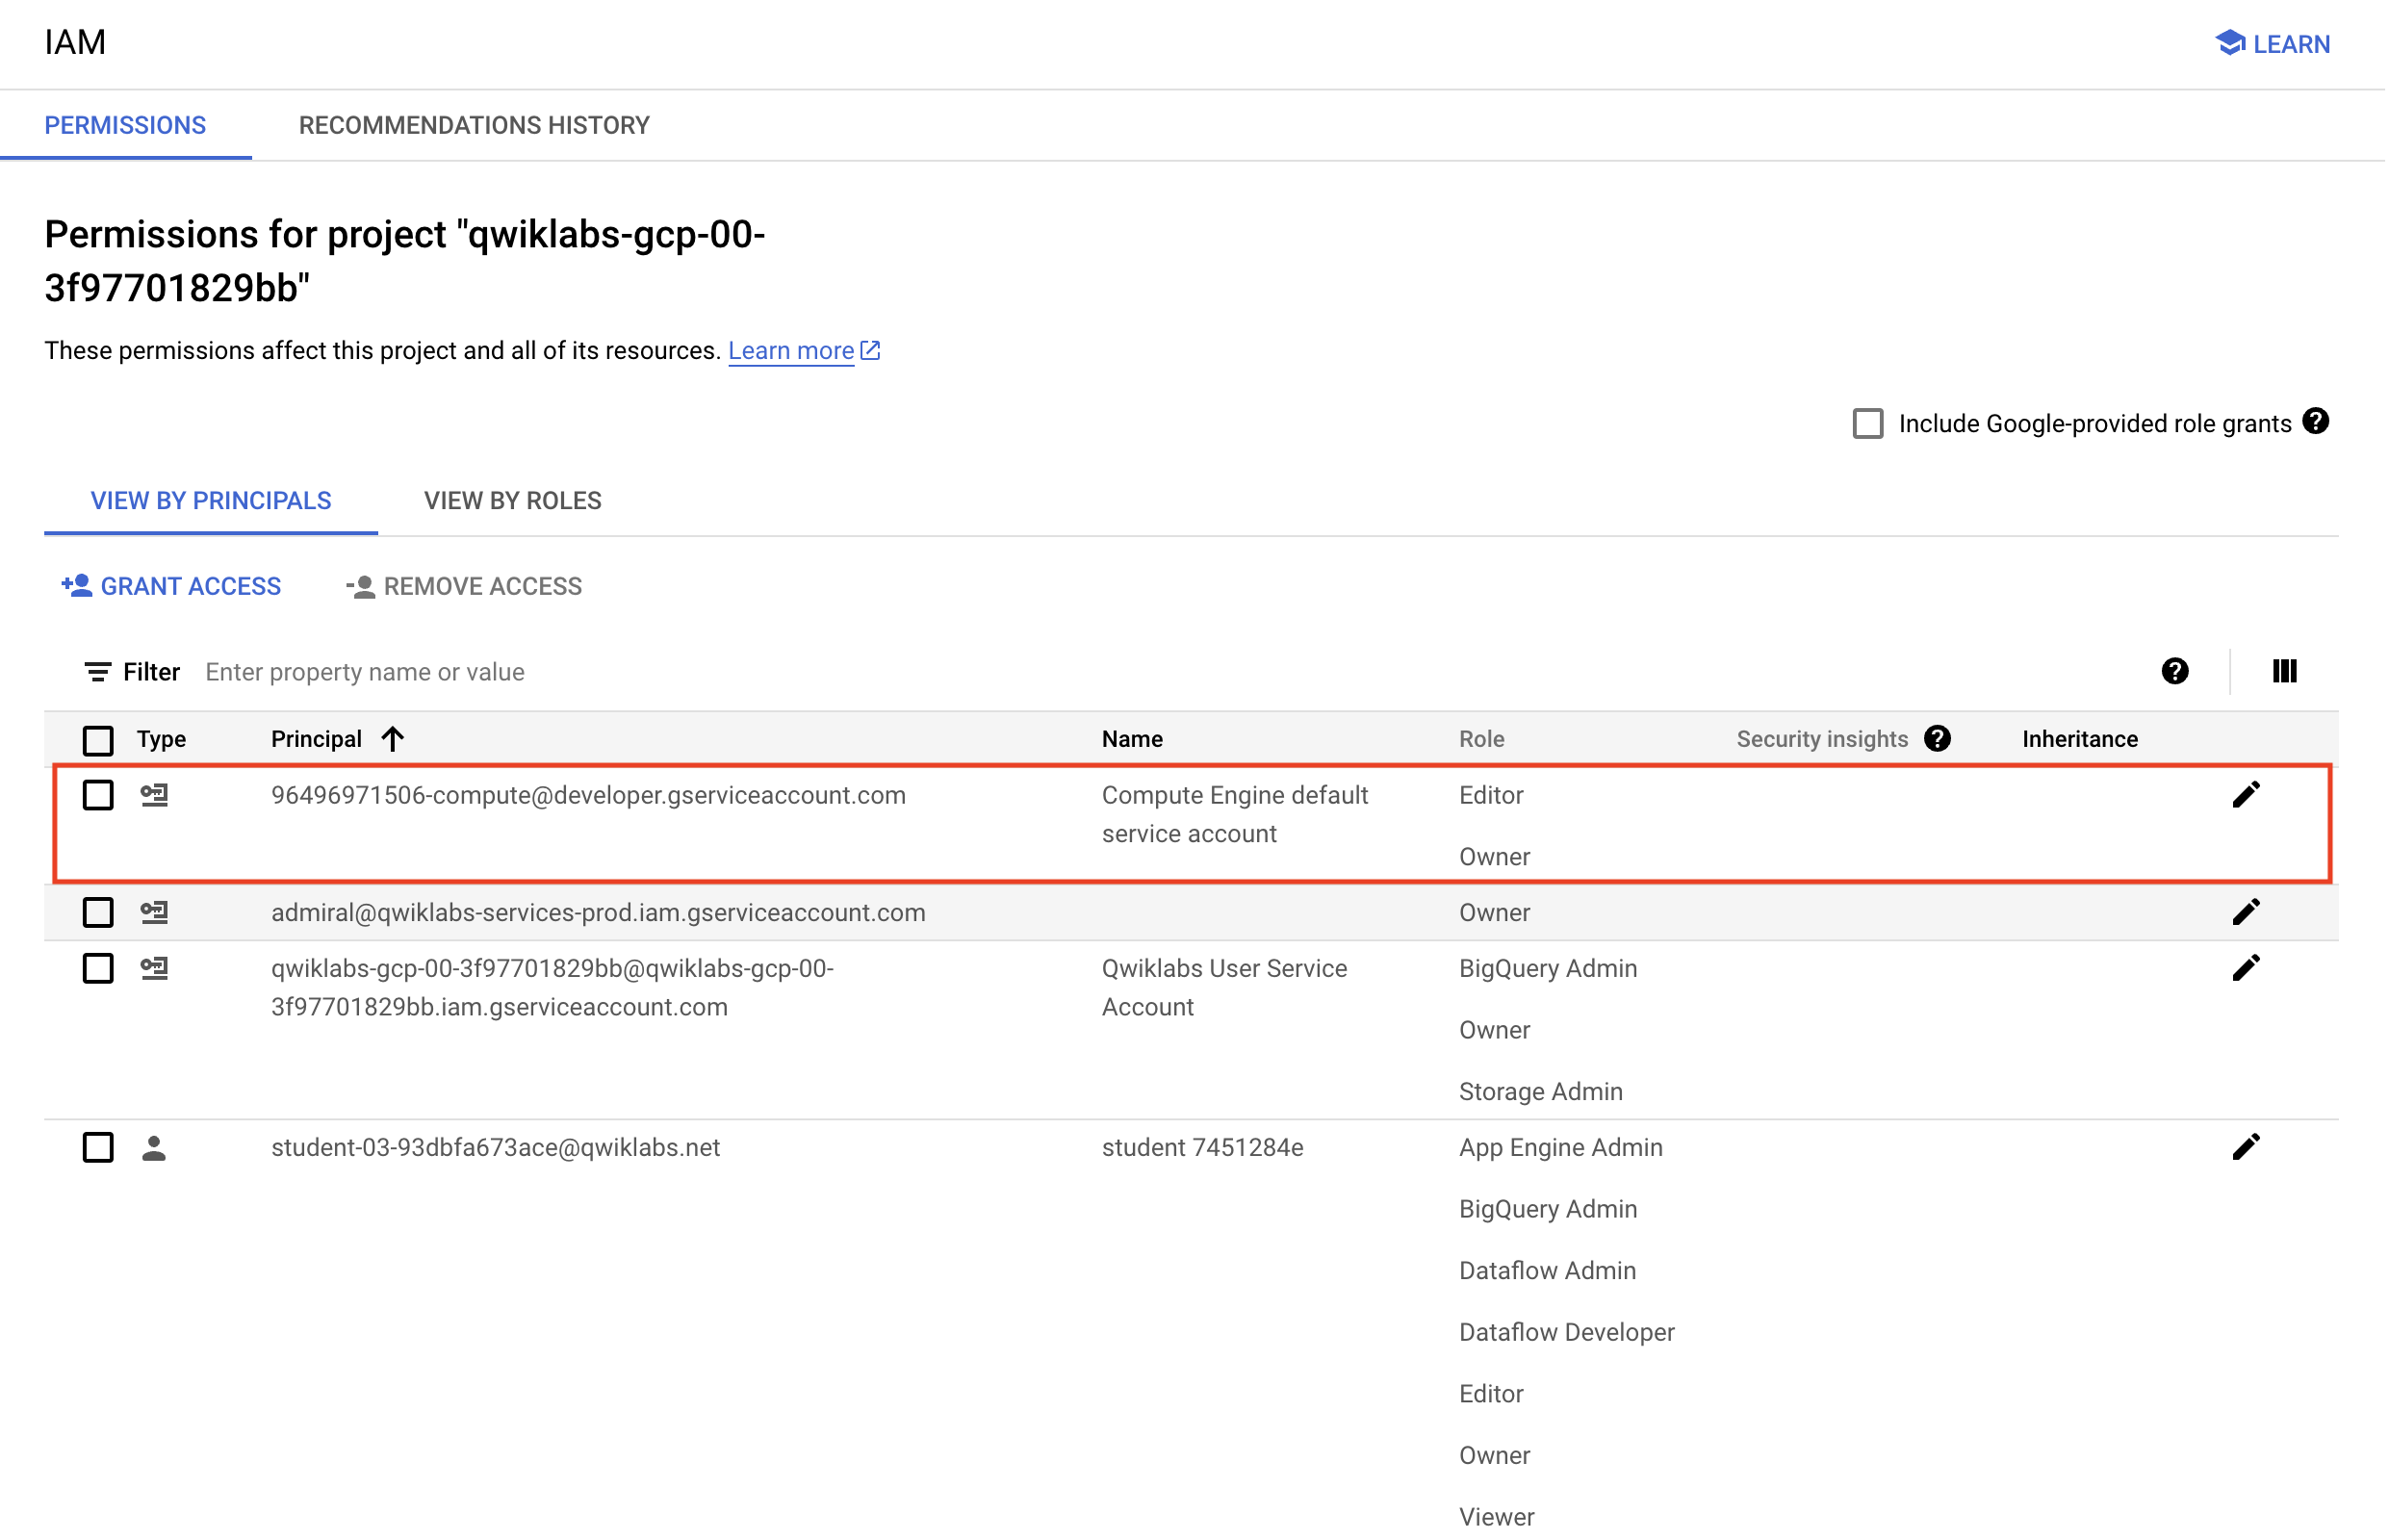
 ), and select New Connection from the drop-down menu. A new terminal window will open.


