Vertex AI is now Gemini Enterprise Agent Platform! We are currently updating our content to reflect this change. Please bear with us if you encounter naming inconsistencies during this transition.
Apply your skills in Google Cloud console
Checkpoints
Create custom mode VPC networks with firewall rules
Check my progress
/ 10
Create VM instances
Check my progress
/ 10
Create the VM instance with multiple network interfaces
Check my progress
/ 10
Lab setup instructions and requirements
Protect your account and progress. Always use a private browser window and lab credentials to run this lab.
This content is not yet optimized for mobile devices.
For the best experience, please visit us on a desktop computer using a link sent by email.
Overview
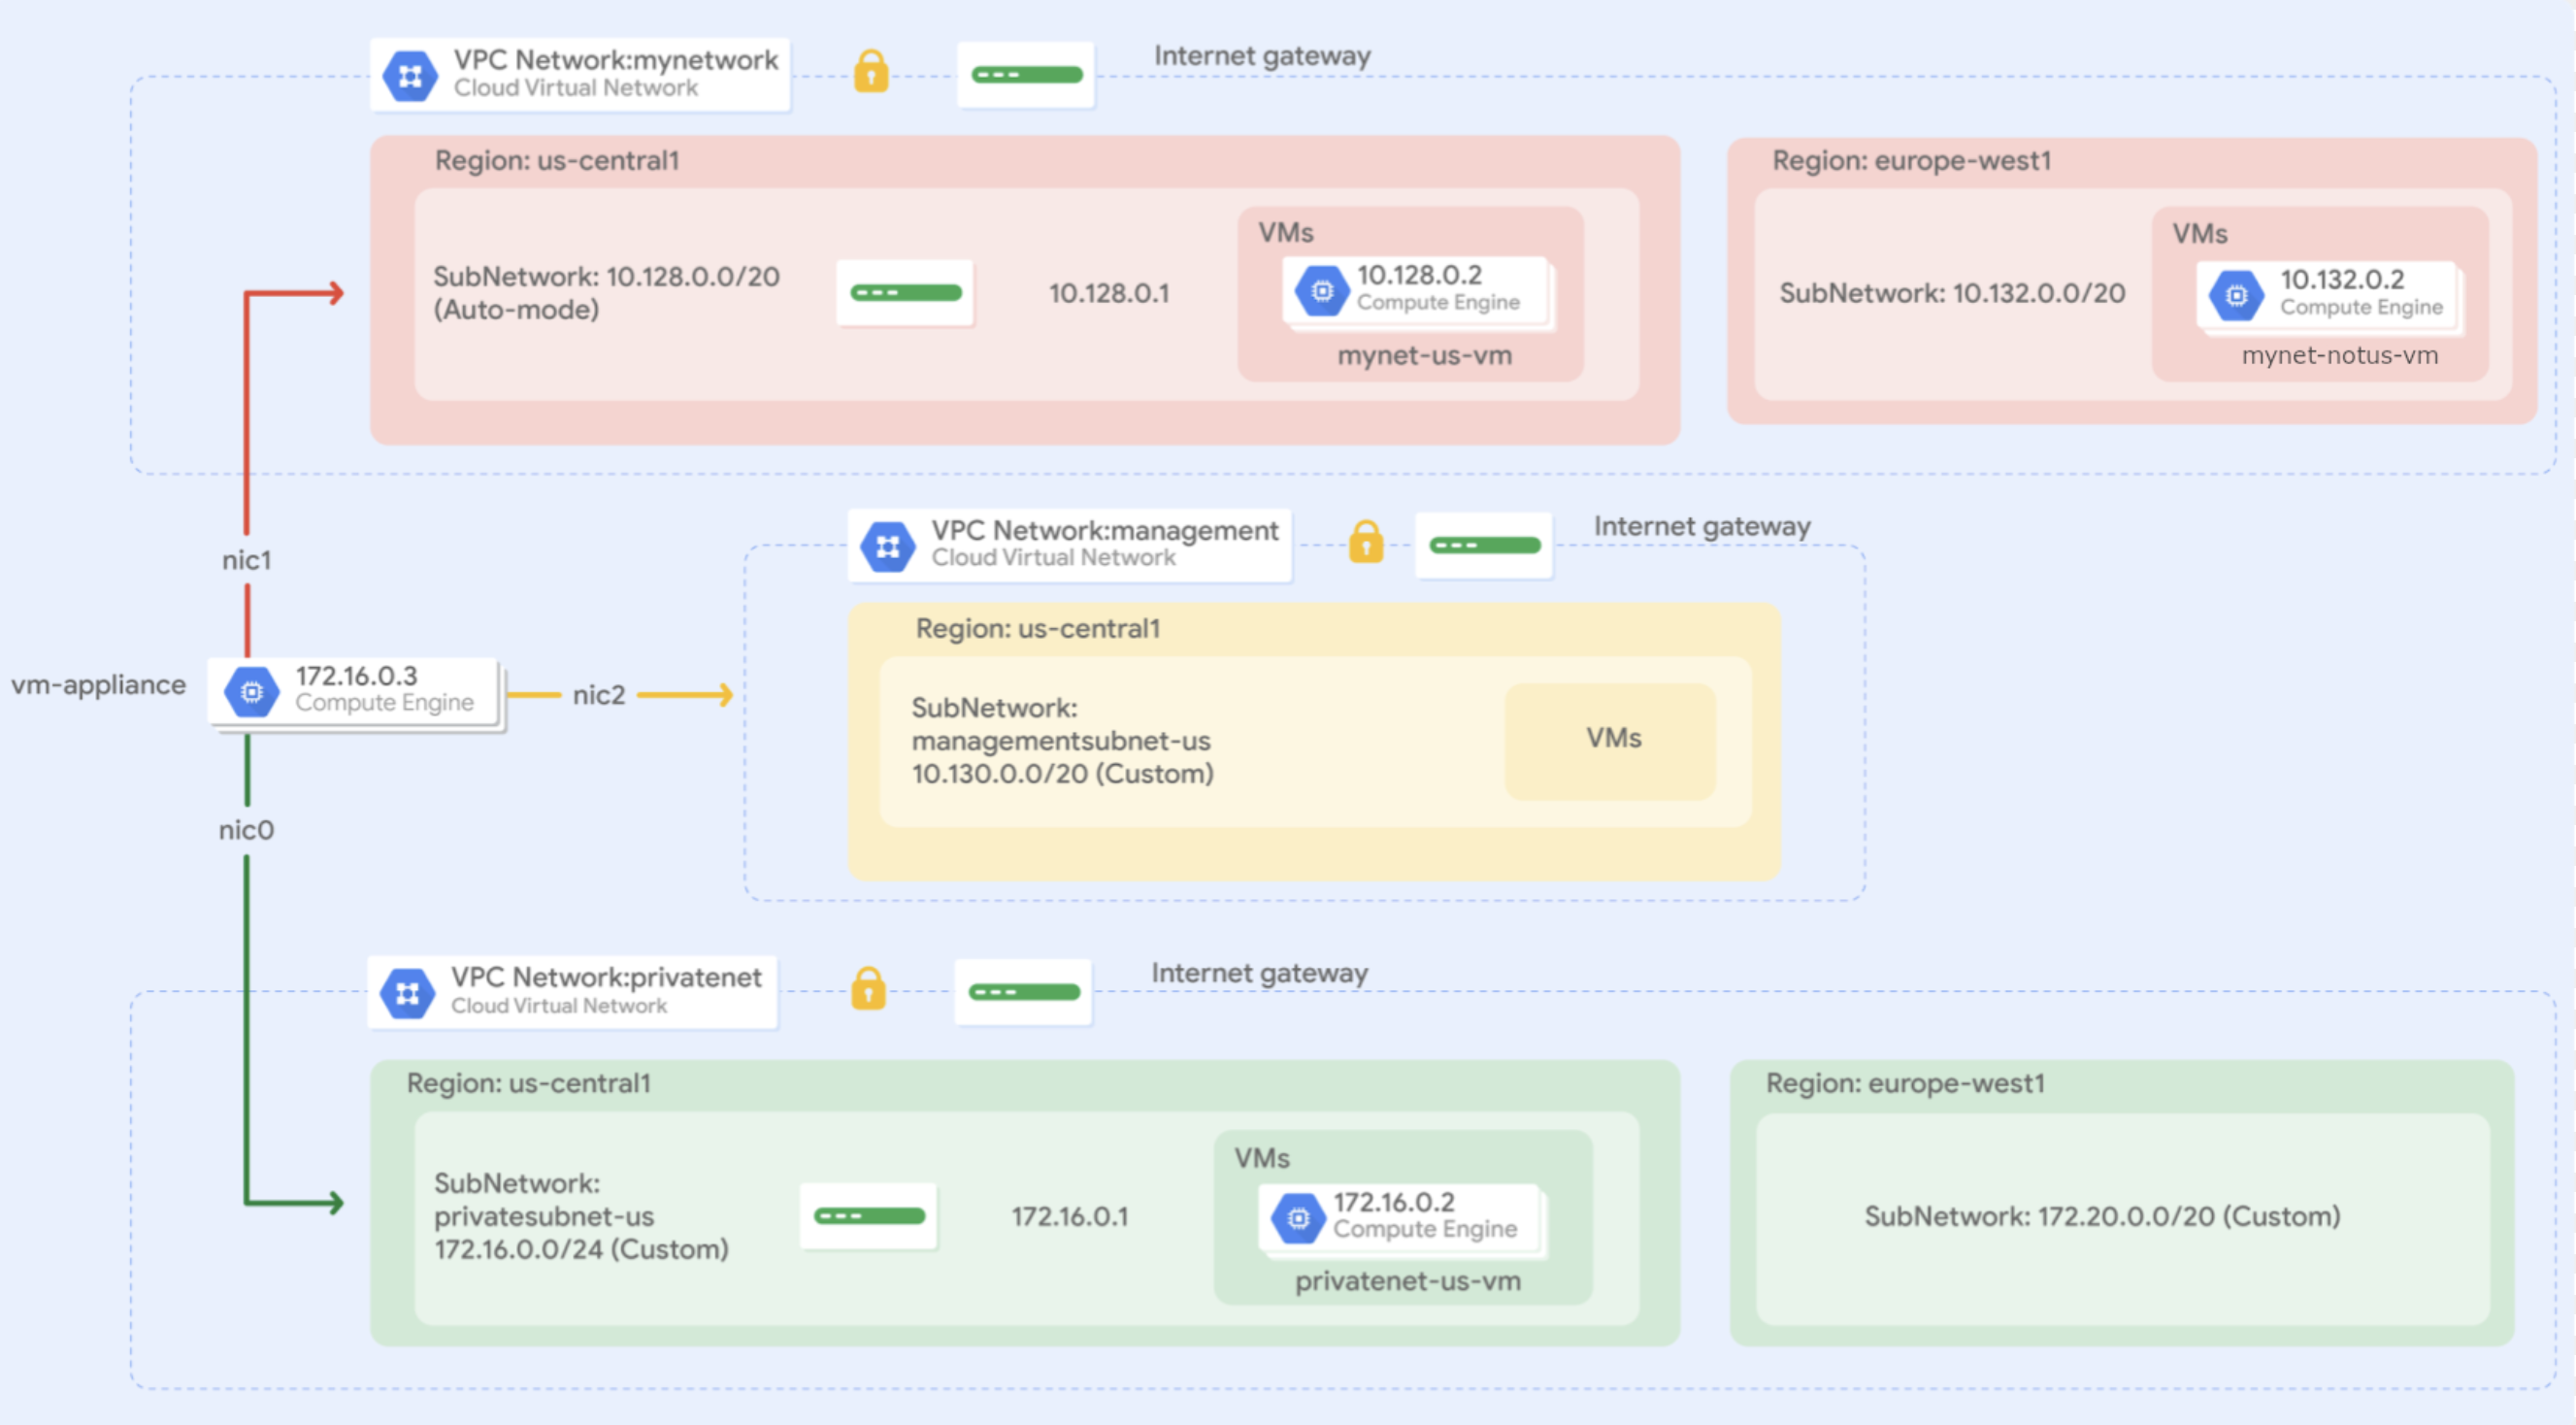
In this lab, you create several VPC networks and VM instances and test connectivity across networks. Specifically, you create two custom mode networks (managementnet and privatenet) with firewall rules and VM instances, as shown in this network diagram:
The mynetwork network, its firewall rules, and two VM instances (mynet-notus-vm and mynet-us-vm) have already been created for you in this Google Skills project.
Objectives
In this lab, you learn how to perform the following tasks:
Create custom mode VPC networks with firewall rules
Create VM instances using Compute Engine
Explore the connectivity for VM instances across VPC networks
Create a VM instance with multiple network interfaces
Setup and requirements
For each lab, you get a new Google Cloud project and set of resources for a fixed time at no cost.
Click the Start Lab button. If you need to pay for the lab, a pop-up opens for you to select your payment method.
On the left is the Lab Details panel with the following:
The Open Google Cloud console button
Time remaining
The temporary credentials that you must use for this lab
Other information, if needed, to step through this lab
Click Open Google Cloud console (or right-click and select Open Link in Incognito Window if you are running the Chrome browser).
The lab spins up resources, and then opens another tab that shows the Sign in page.
Tip: Arrange the tabs in separate windows, side-by-side.
Note: If you see the Choose an account dialog, click Use Another Account.
If necessary, copy the Username below and paste it into the Sign in dialog.
{{{user_0.username | "Username"}}}
You can also find the Username in the Lab Details panel.
Click Next.
Copy the Password below and paste it into the Welcome dialog.
{{{user_0.password | "Password"}}}
You can also find the Password in the Lab Details panel.
Click Next.
Important: You must use the credentials the lab provides you. Do not use your Google Cloud account credentials.
Note: Using your own Google Cloud account for this lab may incur extra charges.
Click through the subsequent pages:
Accept the terms and conditions.
Do not add recovery options or two-factor authentication (because this is a temporary account).
Do not sign up for free trials.
After a few moments, the Google Cloud console opens in this tab.
Note: To view a menu with a list of Google Cloud products and services, click the Navigation menu at the top-left, or type the service or product name in the Search field.
Task 1. Create custom mode VPC networks with firewall rules
Create two custom networks, managementnet and privatenet, along with firewall rules to allow SSH, ICMP, and RDP ingress traffic.
Create the managementnet network
Create the managementnet network using the Cloud console.
In the Google Cloud console, in the Navigation menu (), click VPC Network > VPC networks.
Notice the default and mynetwork networks with their subnets.
Each Google Cloud project starts with the default network. In addition, the mynetwork network has been created for you as part of your network diagram.
Click Create VPC network.
For Name, type managementnet.
For Subnet creation mode, click Custom.
For New subnet, specify the following, and leave the remaining settings as their defaults:
Property
Value (type value or select option as specified)
Name
managementsubnet-us
Region
IPv4 range
10.130.0.0/20
Click Done.
Click Equivalent command line.
These commands illustrate that networks and subnets can be created using the gcloud command line. You will create the privatenet network using these commands with similar parameters.
Click Close.
Click Create.
Create the privatenet network
Create the privatenet network using the gcloud command line.
In the Cloud console, click Activate Cloud Shell ().
If prompted, click Continue.
Run the following command to create the privatenet network:
Run the following command to list the available VPC networks:
gcloud compute networks list
The output should look like this:
NAME: default
SUBNET_MODE: AUTO
BGP_ROUTING_MODE: REGIONAL
IPV4_RANGE:
GATEWAY_IPV4:
NAME: managementnet
SUBNET_MODE: CUSTOM
BGP_ROUTING_MODE: REGIONAL
IPV4_RANGE:
GATEWAY_IPV4:
NAME: mynetwork
SUBNET_MODE: AUTO
BGP_ROUTING_MODE: REGIONAL
IPV4_RANGE:
GATEWAY_IPV4:
NAME: privatenet
SUBNET_MODE: CUSTOM
BGP_ROUTING_MODE: REGIONAL
IPV4_RANGE:
GATEWAY_IPV4:
Note: default and mynetwork are auto mode networks and create subnets in each region automatically. managementnet and privatenet are custom mode networks and start with no subnets, which gives you full control over subnet creation.
Run the following command to list the available VPC subnets (sorted by VPC network):
gcloud compute networks subnets list --sort-by=NETWORK
The output should look like this:
NAME: default
REGION: northamerica-south1
NETWORK: default
RANGE: 10.224.0.0/20
STACK_TYPE: IPV4_ONLY
IPV6_ACCESS_TYPE:
INTERNAL_IPV6_PREFIX:
EXTERNAL_IPV6_PREFIX:
NAME: default
REGION: europe-north2
NETWORK: default
RANGE: 10.226.0.0/20
STACK_TYPE: IPV4_ONLY
IPV6_ACCESS_TYPE:
INTERNAL_IPV6_PREFIX:
EXTERNAL_IPV6_PREFIX:
NAME: managementsubnet-us
REGION: us-east1
NETWORK: managementnet
RANGE: 10.130.0.0/20
STACK_TYPE: IPV4_ONLY
IPV6_ACCESS_TYPE:
INTERNAL_IPV6_PREFIX:
EXTERNAL_IPV6_PREFIX:
NAME: mynetwork
REGION: us-central1
NETWORK: mynetwork
RANGE: 10.128.0.0/20
STACK_TYPE: IPV4_ONLY
IPV6_ACCESS_TYPE:
INTERNAL_IPV6_PREFIX:
EXTERNAL_IPV6_PREFIX:
NAME: mynetwork
REGION: europe-west1
NETWORK: mynetwork
RANGE: 10.132.0.0/20
STACK_TYPE: IPV4_ONLY
IPV6_ACCESS_TYPE:
INTERNAL_IPV6_PREFIX:
EXTERNAL_IPV6_PREFIX:
NAME: mynetwork
REGION: us-west1
NETWORK: mynetwork
RANGE: 10.138.0.0/20
STACK_TYPE: IPV4_ONLY
IPV6_ACCESS_TYPE:
INTERNAL_IPV6_PREFIX:
EXTERNAL_IPV6_PREFIX:
NAME: mynetwork
REGION: asia-east1
NETWORK: mynetwork
RANGE: 10.140.0.0/20
STACK_TYPE: IPV4_ONLY
IPV6_ACCESS_TYPE:
INTERNAL_IPV6_PREFIX:
EXTERNAL_IPV6_PREFIX:
NAME: mynetwork
REGION: us-east1
NETWORK: mynetwork
RANGE: 10.142.0.0/20
STACK_TYPE: IPV4_ONLY
IPV6_ACCESS_TYPE:
INTERNAL_IPV6_PREFIX:
EXTERNAL_IPV6_PREFIX:
NAME: mynetwork
REGION: asia-northeast1
NETWORK: mynetwork
RANGE: 10.146.0.0/20
STACK_TYPE: IPV4_ONLY
IPV6_ACCESS_TYPE:
INTERNAL_IPV6_PREFIX:
EXTERNAL_IPV6_PREFIX:
NAME: mynetwork
REGION: asia-southeast1
NETWORK: mynetwork
RANGE: 10.148.0.0/20
STACK_TYPE: IPV4_ONLY
IPV6_ACCESS_TYPE:
INTERNAL_IPV6_PREFIX:
EXTERNAL_IPV6_PREFIX:
NAME: mynetwork
REGION: us-east4
NETWORK: mynetwork
RANGE: 10.150.0.0/20
STACK_TYPE: IPV4_ONLY
IPV6_ACCESS_TYPE:
INTERNAL_IPV6_PREFIX:
EXTERNAL_IPV6_PREFIX:
NAME: mynetwork
REGION: australia-southeast1
NETWORK: mynetwork
RANGE: 10.152.0.0/20
STACK_TYPE: IPV4_ONLY
IPV6_ACCESS_TYPE:
INTERNAL_IPV6_PREFIX:
EXTERNAL_IPV6_PREFIX:
Note: As expected, the default and mynetwork networks have subnets in each region, because they are auto mode networks. The managementnet and privatenet networks only have the subnets that you created, because they are custom mode networks.
In the Cloud console, in the Navigation menu (), click VPC Network > VPC networks.
Verify that the same networks and subnets are listed in the Cloud console.
Create the firewall rules for managementnet
Create firewall rules to allow SSH, ICMP, and RDP ingress traffic to VM instances on the managementnet network.
In the Cloud console, in the Navigation menu (), click VPC Network > Firewall.
Click Create firewall rule.
Specify the following, and leave the remaining settings as their defaults:
Property
Value (type value or select option as specified)
Name
managementnet-allow-icmp-ssh-rdp
Network
managementnet
Targets
All instances in the network
Source filter
IPv4 Ranges
Source IPv4 ranges
0.0.0.0/0
Protocols and ports
Specified protocols and ports
For tcp, specify ports 22 and 3389.
Click Other protocols and enter icmp.
Note: Make sure to include the /0 in the Source IPv4 ranges to specify all networks.
Click Equivalent command line.
These commands illustrate that firewall rules can also be created using the gcloud command line. You will create the privatenet's firewall rules using these commands with similar parameters.
Click Close.
Click Create.
Create the firewall rules for privatenet
Create the firewall rules for privatenet network using the gcloud command line.
Return to Cloud Shell. If necessary, click Activate Cloud Shell ().
Run the following command to create the privatenet-allow-icmp-ssh-rdp firewall rule:
The firewall rules for mynetwork network have been created for you. You can define multiple protocols and ports in one firewall rule (privatenet and managementnet) or spread them across multiple rules (default and mynetwork).
In the Cloud console, on the Navigation menu (), click VPC Network > Firewall.
Verify that the same firewall rules are listed in the Cloud console.
Click Check my progress to verify the objective.
Create custom mode VPC networks with firewall rules
Task 2. Create VM instances
Create two VM instances:
managementnet-us-vm in managementsubnet-us
privatenet-us-vm in privatesubnet-us
Create the managementnet-us-vm instance
Create the managementnet-us-vm instance using the Cloud console.
In the Cloud console, in the Navigation menu (), click Compute Engine > VM instances.
mynet-us-vm and mynet-notus-vm have been created for you as part of your network diagram.
Click Create Instance.
Specify the following, and leave the remaining settings as their defaults:
Property
Value (type value or select option as specified)
Name
managementnet-us-vm
Region
Zone
In the left frame, click Machine configuration. Make sure the following values are selected:
| Series | E2|
| Machine type | 2vCPU (4 GB memory, e2-medium)|
In the left frame, click Networking.
For Network interfaces, click the dropdown icon to edit.
Specify the following, and leave the remaining settings as their defaults:
Property
Value (type value or select option as specified)
Network
managementnet
Subnetwork
managementsubnet-us
Note: The subnets available for selection are restricted to those in the selected region.
Click Done.
Click Equivalent Code.
This illustrates that VM instances can also be created using the gcloud command line. You will create the privatenet-us-vm instance using these commands with similar parameters.
Click Toggle panel "Equivalent code".
Click Create.
Create the privatenet-us-vm instance
Create the privatenet-us-vm instance using the gcloud command line.
Return to Cloud Shell. If necessary, click Activate Cloud Shell ().
Run the following command to create the privatenet-us-vm instance:
Run the following command to list all the VM instances (sorted by zone):
gcloud compute instances list --sort-by=ZONE
The output should look like this:
NAME ZONE MACHINE_TYPE PREEMPTIBLE INTERNAL_IP EXTERNAL_IP STATUS
mynet-notus-vm {{{ project_0.default_zone_2 | "filled at lab start" }}} e2-medium 10.132.0.2 35.205.124.164 RUNNING
managementnet-us-vm {{{ project_0.default_zone | "filled at lab start" }}} e2-medium 10.130.0.2 35.226.20.87 RUNNING
mynet-us-vm {{{ project_0.default_zone | "filled at lab start" }}} e2-medium 10.128.0.2 35.232.252.86 RUNNING
privatenet-us-vm {{{ project_0.default_zone | "filled at lab start" }}} e2-medium 172.16.0.2 35.184.221.40 RUNNING
In the Cloud console, in the Navigation menu (), click Compute Engine > VM instances.
Verify that the VM instances are listed in the Cloud console.
For Columns, select Network.
There are three instances in the US and one instance that is not in the US. These instances are spread across three VPC networks (managementnet, mynetwork, and privatenet), with no instance in the same zone and network as another. In the next task, you explore the effect this has on internal connectivity.
Click Check my progress to verify the objective.
Create VM instances
Task 3. Explore the connectivity between VM instances
Explore the connectivity between the VM instances. Specifically, determine the effect of having VM instances in the same zone versus having instances in the same VPC network.
Ping the external IP addresses
Ping the external IP addresses of the VM instances to determine whether you can reach the instances from the public internet.
In the Cloud console, in the Navigation menu, click Compute Engine > VM instances.
Note the external IP addresses for mynet-notus-vm, managementnet-us-vm, and privatenet-us-vm.
For mynet-us-vm, click SSH to launch a terminal and connect.
To test connectivity to mynet-notus-vm's external IP, run the following command, replacing mynet-notus-vm's external IP:
ping -c 3 <Enter mynet-notus-vm's external IP here>
This should work!
To test connectivity to managementnet-us-vm's external IP, run the following command, replacing managementnet-us-vm's external IP:
ping -c 3 <Enter managementnet-us-vm's external IP here>
This should work!
To test connectivity to privatenet-us-vm's external IP, run the following command, replacing privatenet-us-vm's external IP:
ping -c 3 <Enter privatenet-us-vm's external IP here>
This should work!
Note: You can ping the external IP address of all VM instances, even though they are in either a different zone or VPC network. This confirms that public access to those instances is only controlled by the ICMP firewall rules that you established earlier.
Ping the internal IP addresses
Ping the internal IP addresses of the VM instances to determine whether you can reach the instances from within a VPC network.
In the Cloud console, in the Navigation menu, click Compute Engine > VM instances.
Note the internal IP addresses for mynet-notus-vm, managementnet-us-vm, and privatenet-us-vm.
Return to the SSH terminal for mynet-us-vm.
To test connectivity to mynet-notus-vm's internal IP, run the following command, replacing mynet-notus-vm's internal IP:
ping -c 3 <Enter mynet-notus-vm's internal IP here>
Note: You can ping the internal IP address of mynet-notus-vm because it is on the same VPC network as the source of the ping (mynet-us-vm), even though both VM instances are in separate zones, regions, and continents!
To test connectivity to managementnet-us-vm's internal IP, run the following command, replacing managementnet-us-vm's internal IP:
ping -c 3 <Enter managementnet-us-vm's internal IP here>
Note: This should not work, as indicated by a 100% packet loss!
To test connectivity to privatenet-us-vm's internal IP, run the following command, replacing privatenet-us-vm's internal IP:
ping -c 3 <Enter privatenet-us-vm's internal IP here>
Note: This should not work either, as indicated by a 100% packet loss! You cannot ping the internal IP address of managementnet-us-vm and privatenet-us-vm because they are in separate VPC networks from the source of the ping (mynet-us-vm), even though they are all in the same zone.
VPC networks are by default isolated private networking domains. However, no internal IP address communication is allowed between networks, unless you set up mechanisms such as VPC peering or VPN.
Task 4. Create a VM instance with multiple network interfaces
Every instance in a VPC network has a default network interface. You can create additional network interfaces attached to your VMs. Multiple network interfaces enable you to create configurations in which an instance connects directly to several VPC networks (up to 8 interfaces, depending on the instance's type).
Create the VM instance with multiple network interfaces
Create the vm-appliance instance with network interfaces in privatesubnet-us, managementsubnet-us, and mynetwork. The CIDR ranges of these subnets do not overlap, which is a requirement for creating a VM with multiple network interface controllers (NICs).
In the Cloud console, in the Navigation menu, click Compute Engine > VM instances.
Click Create instance.
Specify the following, and leave the remaining settings as their defaults:
Property
Value (type value or select option as specified)
Name
vm-appliance
Region
Zone
In the left frame, click Machine configuration.
Make sure that the following values are selected.
| Series | E2|
| Machine type | 4vCPUs (16 GB memory, e2-standard-4)|
Note: The number of interfaces allowed in an instance is dependent on the instance's machine type and the number of vCPUs. The e2-standard-4 allows up to 4 network interfaces. Learn more about determining the number allowed interfaces from the Creating instances with multiple network interfaces guide.
In the left frame, click Networking.
For Network interfaces, click the dropdown icon to edit.
Specify the following, and leave the remaining settings as their defaults:
Property
Value (type value or select option as specified)
Network
privatenet
Subnetwork
privatesubnet-us
Click Done.
Click Add a network interface.
Specify the following, and leave the remaining settings as their defaults:
Property
Value (type value or select option as specified)
Network
managementnet
Subnetwork
managementsubnet-us
Click Done.
Click Add a network interface.
Specify the following, and leave the remaining settings as their defaults:
Property
Value (type value or select option as specified)
Network
mynetwork
Subnetwork
mynetwork
Click Done.
Click Create.
Explore the network interface details
Explore the network interface details of vm-appliance within the Cloud console and within the VM's terminal.
In the Cloud console, in the Navigation menu, click Compute Engine > VM instances.
To open the Network interface details page, in the Internal IP address of vm-appliance, click nic0.
Verify that nic0 is attached to privatesubnet-us, is assigned an internal IP address within that subnet (172.16.0.0/24), and has applicable firewall rules.
Click nic0 and select nic1.
Verify that nic1 is attached to managementsubnet-us, is assigned an internal IP address within that subnet (10.130.0.0/20), and has applicable firewall rules.
Click nic1 and select nic2.
Verify that nic2 is attached to mynetwork, is assigned an internal IP address within that subnet (10.128.0.0/20), and has applicable firewall rules. The subnet shown may differ depending on the region selected during VM creation.
Note: Each network interface has its own internal IP address so that the VM instance can communicate with those networks.
In the Cloud console, in the Navigation menu, click Compute Engine > VM instances.
For vm-appliance, click SSH to launch a terminal and connect.
Run the following command to list the network interfaces within the VM instance:
Demonstrate that the vm-appliance instance is connected to privatesubnet-us, managementsubnet-us, and mynetwork by pinging VM instances on those subnets.
In the Cloud console, in the Navigation menu, click Compute Engine > VM instances.
Note the internal IP addresses for privatenet-us-vm, managementnet-us-vm, mynet-us-vm, and mynet-notus-vm.
Return to the SSH terminal for vm-appliance.
To test connectivity to privatenet-us-vm's internal IP, run the following command, replacing privatenet-us-vm's internal IP:
ping -c 3 <Enter privatenet-us-vm's internal IP here>
This works!
Repeat the same test by running the following:
ping -c 3 privatenet-us-vm
Note: You can ping privatenet-us-vm by its name because VPC networks have an internal DNS service that allows you to address instances by their DNS names instead of their internal IP addresses. When an internal DNS query is made with the instance hostname, it resolves to the primary interface (nic0) of the instance. Therefore, this only works for privatenet-us-vm in this case.
To test connectivity to managementnet-us-vm's internal IP, run the following command, replacing managementnet-us-vm's internal IP:
ping -c 3 <Enter managementnet-us-vm's internal IP here>
This works!
To test connectivity to mynet-us-vm's internal IP, run the following command, replacing mynet-us-vm's internal IP:
ping -c 3 <Enter mynet-us-vm's internal IP here>
This works!
To test connectivity to mynet-notus-vm's internal IP, run the following command, replacing mynet-notus-vm's internal IP:
ping -c 3 <Enter mynet-notus-vm's internal IP here>
Note: This does not work! In a multiple interface instance, every interface gets a route for the subnet that it is in. In addition, the instance gets a single default route that is associated with the primary interface ens4. Unless manually configured otherwise, any traffic leaving an instance for any destination other than a directly connected subnet will leave the instance via the default route on ens4.
To list the routes for vm-appliance instance, run the following command:
ip route
The output should look like this example:
default via 172.16.0.1 dev ens4 proto dhcp src 172.16.0.3 metric 100
10.130.0.0/20 via 10.130.0.1 dev ens5
10.130.0.0/20 via 10.130.0.1 dev ens5 proto dhcp src 10.130.0.3 metric 100
10.130.0.1 dev ens5 scope link
10.130.0.1 dev ens5 proto dhcp scope link src 10.130.0.3 metric 100
10.142.0.0/20 via 10.142.0.1 dev ens6
10.142.0.0/20 via 10.142.0.1 dev ens6 proto dhcp src 10.142.0.3 metric 100
10.142.0.1 dev ens6 scope link
10.142.0.1 dev ens6 proto dhcp scope link src 10.142.0.3 metric 100
169.254.169.254 dev ens5 proto dhcp scope link src 10.130.0.3 metric 100
169.254.169.254 dev ens6 proto dhcp scope link src 10.142.0.3 metric 100
169.254.169.254 via 172.16.0.1 dev ens4 proto dhcp src 172.16.0.3 metric 100
172.16.0.0/24 via 172.16.0.1 dev ens4 proto dhcp src 172.16.0.3 metric 100
172.16.0.1 dev ens4 proto dhcp scope link src 172.16.0.3 metric 100
Note: The primary interface ens4 gets the default route (default via 172.16.0.1 dev ens4), and all three interfaces, ens4, ens5, and ens6, get routes for their respective subnets. Because the subnet of mynet-notus-vm (10.132.0.0/20) is not included in this routing table, the ping to that instance leaves vm-appliance on ens4 (which is on a different VPC network).
Learn more about how you can change this behavior by configuring policy routing from the Creating instances with multiple network interfaces guide.
Click Check my progress to verify the objective.
Create the VM instance with multiple network interfaces
Review
In this lab, you created several custom mode VPC networks, firewall rules, and VM instances using the Cloud console and the gcloud command line. Then you tested the connectivity across VPC networks, which worked when pinging external IP addresses but not when pinging internal IP addresses. Thus you created a VM instance with three network interfaces and verified internal connectivity for VM instances that are on the subnets that are attached to the multiple interface VM.
End your lab
When you have completed your lab, click End Lab. Google Skills removes the resources you’ve used and cleans the account for you.
You will be given an opportunity to rate the lab experience. Select the applicable number of stars, type a comment, and then click Submit.
The number of stars indicates the following:
1 star = Very dissatisfied
2 stars = Dissatisfied
3 stars = Neutral
4 stars = Satisfied
5 stars = Very satisfied
You can close the dialog box if you don't want to provide feedback.
For feedback, suggestions, or corrections, please use the Support tab.
Copyright 2026 Google LLC All rights reserved. Google and the Google logo are trademarks of Google LLC. All other company and product names may be trademarks of the respective companies with which they are associated.
Labs create a Google Cloud project and resources for a fixed time
Labs have a time limit and no pause feature. If you end the lab, you'll have to restart from the beginning.
On the top left of your screen, click Start lab to begin
Use private browsing
Copy the provided Username and Password for the lab
Click Open console in private mode
Sign in to the Console
Sign in using your lab credentials. Using other credentials might cause errors or incur charges.
Accept the terms, and skip the recovery resource page
Don't click End lab unless you've finished the lab or want to restart it, as it will clear your work and remove the project
This content is not currently available
We will notify you via email when it becomes available
Great!
We will contact you via email if it becomes available
One lab at a time
Confirm to end all existing labs and start this one
Use private browsing to run the lab
Using an Incognito or private browser window is the best way to run
this lab. This prevents any conflicts between your personal account
and the Student account, which may cause extra charges incurred to
your personal account.
In this lab, you create several VPC networks and VM instances and test connectivity across networks.


 ).
).


