Dieser Inhalt ist noch nicht für Mobilgeräte optimiert.
Die Lernumgebung funktioniert am besten, wenn Sie auf einem Computer über einen per E‑Mail gesendeten Link darauf zugreifen.
Overview
Test
Kubernetes clusters are configured using manifests, or configs, written in
YAML or JSON. These configurations include important Kubernetes objects such as
Namespaces, ClusterRoles, ClusterRoleBindings, Roles, RoleBindings,
PodSecurityPolicy, NetworkPolicy, and ResourceQuotas, etc.
These declarative configs can be applied by hand or with automated tooling. The
preferred method is to use an automated process to establish and maintain a
consistently managed environment from the beginning.
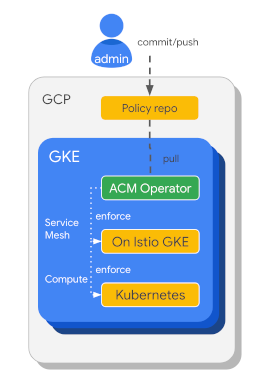
Anthos Config Management is a solution to help manage these resources in
a configuration-as-code like manner. Anthos Config Management utilizes a
version-controlled Git repository (repo) for configuration storage along
with configuration operators which apply configs to selected clusters.
Anthos Config Management allows you to easily manage the configuration of many
clusters. At the heart of this process are the Git repositories that store the
configurations to be applied on the clusters.
Objectives
In this lab, you learn how to perform the following tasks:
Install the Config Management Operator and the nomos command-line tool
Set up your config repo in Cloud Source Repositories
Connect your GKE clusters to the config repo
Examine the configs in your clusters and repo
Filter application of configs by Namespace
Review automated drift management
Update a config in the repo
Setup and requirements
For each lab, you get a new Google Cloud project and set of resources for a fixed time at no cost.
Sign in to Google Skills using an incognito window.
Note the lab's access time (for example, 1:15:00), and make sure you can finish within that time.
There is no pause feature. You can restart if needed, but you have to start at the beginning.
When ready, click Start lab.
Note your lab credentials (Username and Password). You will use them to sign in to the Google Cloud Console.
Click Open Google Console.
Click Use another account and copy/paste credentials for this lab into the prompts.
If you use other credentials, you'll receive errors or incur charges.
Accept the terms and skip the recovery resource page.
After you complete the initial sign-in steps, the project dashboard appears.
Click Select a project, highlight your GCP Project ID, and click
OPEN to select your project.
Activate Google Cloud Shell
Google Cloud Shell is a virtual machine that is loaded with development tools. It offers a persistent 5GB home directory and runs on the Google Cloud.
Google Cloud Shell provides command-line access to your Google Cloud resources.
In Cloud console, on the top right toolbar, click the Open Cloud Shell button.
Click Continue.
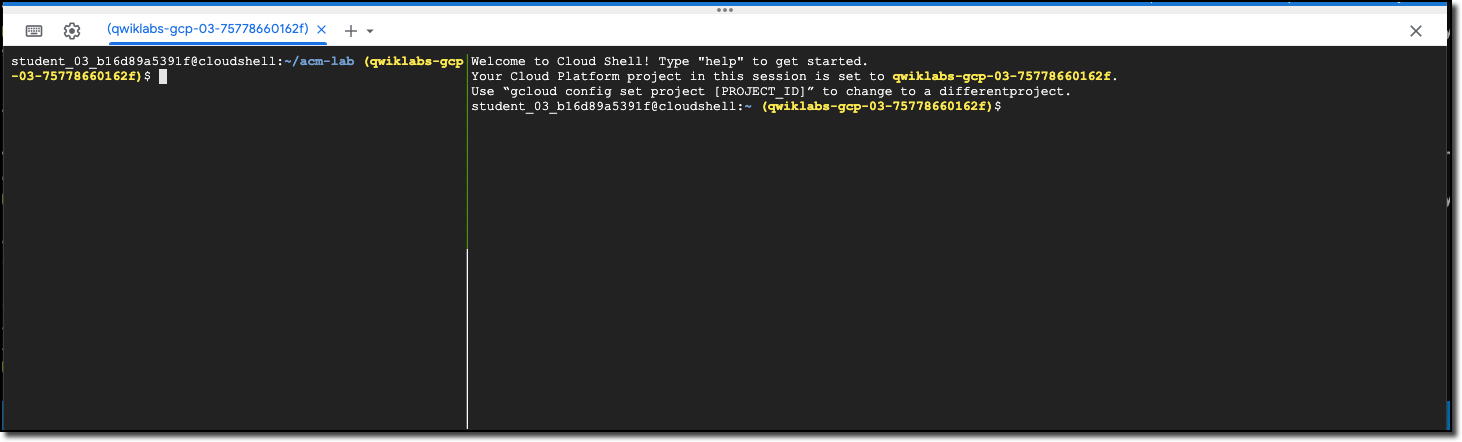
It takes a few moments to provision and connect to the environment. When you are connected, you are already authenticated, and the project is set to your PROJECT_ID. For example:
gcloud is the command-line tool for Google Cloud. It comes pre-installed on Cloud Shell and supports tab-completion.
You can list the active account name with this command:
Select the token contents in the Cloud Shell (this will automatically copy
the contents).
Note: Don't use Ctrl+c or
Command+c to copy to the clipboard. Those keystrokes will
copy over new line breaks from the display,instead of treating the token
as a single line of text.
Simply selecting text in Cloud Shell will put the contents in your
clipboard buffer.
Go to Navigation > Kubernetes Engine > Clusters, scroll to the right,
click on the 3 dots to open the dropdown menu of the the onprem-connect
cluster row, and click on the Log in option.
When prompted, select Token as the authentication type, and paste the
previously copied token, then click Login.
You should now see two clusters listed with green checkmarks which
indicates both clusters are registered successfully.
Visit the Gateways, Services & Ingress page, select Services tab and find the frontend-external
service address for each cluster.
Remove the filters(if any) to see the frontend-external service addresses.
Visit those addresses in new browser tabs and verify that separate, independent applications are up and running in each cluster.
Task 2. Install the Config Management Operator and the nomos command-line tool
The Config Management Operator is a Kubernetes controller that manages
Anthos Config Management in a Kubernetes cluster. In this task, you install
the Operator as a system workload on both clusters. You also install the
nomos command-line tool which helps you to understand the state of Anthos
Config Management in your clusters.
Install the Config Management Operator on the gke cluster
Set the Zone environment variable
ZONE={{{ project_0.default_zone| "Zone added at lab start" }}}
In Cloud Shell, switch your context to the gke cluster:
Download the configuration file for Config Management resources:
export LAB_DIR=$HOME/acm-lab
mkdir $LAB_DIR
cd $LAB_DIR
gsutil cp gs://config-management-release/released/latest/config-management-operator.yaml config-management-operator.yaml
Review the file in the Cloud Shell editor to get a sense of what is being
created on your cluster.
The file is acm-lab/config-management-operator.yaml:
edit config-management-operator.yaml
Note:
You may need to load the code editor in a new window when running the lab
in an incognito window.
Exit the editor and apply the configuration to the gke cluster:
You may need to click Open Terminal in Cloud Shell.
kubectl apply -f config-management-operator.yaml
Output
customresourcedefinition.apiextensions.k8s.io/configmanagements.addons.sigs.k8s.io created
clusterrolebinding.rbac.authorization.k8s.io/config-management-operator created
clusterrole.rbac.authorization.k8s.io/config-management-operator created
serviceaccount/config-management-operator created
deployment.apps/config-management-operator created
namespace/config-management-system created
Use the GCP Console to verify that a system workload called config-management-operator has been created. Visit Navigation > Kubernetes Engine > Workloads.
Remove the filter to show system objects, and you should see the
deployment.
Install the Config Management Operator on the onprem cluster
Switch contexts, and apply the configuration file to the onprem cluster:
Using the console, or the kubectl command, verify that the Config Management
Operator has been deployed to the onprem cluster.
Install the nomos command-line tool in Cloud Shell
In Cloud Shell, download the nomos command-line tool:
cd $LAB_DIR
gsutil cp gs://config-management-release/released/latest/linux_amd64/nomos nomos
chmod +x ./nomos
Use nomos status to check if Anthos Config Management is properly installed and configured:
./nomos status
Output:
Connecting to clusters...
gke
--------------------
Failed to get the RootSync CRD: customresourcedefinitions.apiextensions.k8s.io "rootsyncs.configsync.gke.io" not found
*onprem.k8s.local
--------------------
Failed to get the RootSync CRD: customresourcedefinitions.apiextensions.k8s.io "rootsyncs.configsync.gke.io" not found
In this case, config management is installed but not yet configured for your clusters.
When nomos status reports an error, it also shows any additional error
text available to help diagnose the problem under
Config Management Errors.
You will correct the issues you see here in later steps.
Task 3. Set up your Anthos Config Management repository
Anthos Config Management requires you to store your configurations in a
Git repository. In this task, you set up that repository.
Anthos Config Management supports any Git repo including GitHub and Google
Cloud Source Repositories. In this lab, you will use
Cloud Source Repositories.
Create a new local config repo
Set the username and email address for your Git activities:
git clone https://github.com/GoogleCloudPlatform/training-data-analyst
cd ./training-data-analyst/courses/ahybrid/v1.0/AHYBRID071/config
Take a moment to review the structure of the config directory. Click the Open Editor button in Cloud Shell, then in the explorer section of the editor, drill down into acm-lab/training-data-analyst/courses/ahybrid/v1.0/AHYBRID071/config.
Take a minute to review the subdirectories and the contents of the config
files you find.
Click Open Terminal to return to the Cloud Shell command line, and initialize the config directory as a new local Git repo:
Push your code to the new repository's master branch:
git push origin master
Verify your repo and source code were created in Cloud Source Repositories. Select Navigation > VIEW ALL PRODUCTS > Source Repositories. Then select the anthos_config
repository.
Generate keys, and create secrets on your clusters
The Anthos Config Management Config Operator, when running on your clusters,
needs read-only access to your Git repo, so it can read the latest committed
configs, then check and/or apply them to your clusters. The credentials for
this read-only access to your Git repo are stored in the git-creds secret
on each enrolled cluster.
When using Cloud Source Repositories, an SSH keypair is the recommended approach to authorize access to your repo.
kubectx gke
kubectl create secret generic git-creds \
--namespace=config-management-system \
--from-file=ssh=$HOME/.ssh/id_rsa.acm
kubectx onprem.k8s.local
kubectl create secret generic git-creds \
--namespace=config-management-system \
--from-file=ssh=$HOME/.ssh/id_rsa.acm
Note: This private key should be carefully protected!
Manage keys in Cloud Source Repositories
The SSH public key portion of your generated SSH keypair needs to be registered with Cloud Source Repositories. The Config Operators on your clusters can then use the SSH private key, just stored as a cluster secret, to access your config repository.
In the Cloud Source Repositories console, click the three dots in the top-right toolbar, then click Manage SSH Keys.
Click Register SSH Key.
You may be prompted to enter your Google Skills user password.
Enter config demo key in the Key Name field.
You can choose a different key name if needed.
From Cloud Shell, copy the key value from the output of this command:
cat $HOME/.ssh/id_rsa.acm.pub
Note: The key begins with ssh- or ecdsa-,
and ends with an email address.
Note: Don't use Ctrl+c or
Command+c to copy to the clipboard. Those keystrokes will
copy over new line breaks from the display,instead of treating the key
value as it should.
Simply selecting text in Cloud Shell will put the contents in your
clipboard buffer.
Return to Cloud Source Repositories, and paste the copied key from your
public key file into the Key field.
Click Register.
You will now see your registered key on the Manage SSH Keys page.
Task 4. Define and deploy Config Management Operators
Create your ConfigManagement YAML files
To configure the Config Management Operators to read from your repo, you will
create configuration files for the ConfigManagement CustomResources and apply
them to your clusters.
You have been provided configuration files for your two clusters. You will
need to modify each to point to your hosted repo.
Using the Cloud Shell Code Editor, open the gke configuration file
for editing:
Replace the [qwiklabs-user-email] placeholder with the email address for your
Google Skills user, as shown in the upper left corner of the lab window.
Replace the [qwiklabs-project] placeholder with GCP Project ID for your
project shown in the upper left corner of the Google Skills window.
Notice also that a variety of options can be included to configure
how the resource interacts with your repo. For example, auth
is set to ssh indicating ConfigManagement should use the keys
stored previously.
You can copy the line from gke-config-management.yaml.
Check the current state of your clusters
Back in Cloud Shell, switch contexts to your gke cluster and list Namespaces:
kubectx gke
kubectl get namespace
Output:
NAME STATUS AGE
config-management-monitoring Active 6m31s
config-management-system Active 6m31s
default Active 26m
istio-system Active 25m
kube-node-lease Active 27m
kube-public Active 27m
kube-system Active 27m
prod Active 24m
Do you see a prod Namespace?
What about a dev Namespace?
Describe the prod Namespace and note the labels you see:
kubectl describe namespace prod
Output:
Name: prod
Labels: istio.io/rev=asm-1157-1
Annotations:
Status: Active
Resource Quotas
Name: gke-resource-quotas
Resource Used Hard
-------- --- ---
count/ingresses.extensions 0 100
count/jobs.batch 0 5k
pods 12 1500
services 12 500
No LimitRange resource.
List the ClusterRoles and the ClusterRoleBindings on the gke cluster:
kubectl get clusterroles
Output:
NAME
...
system:node-bootstrapper
system:node-problem-detector
system:node-proxier
system:persistent-volume-provisioner
system:public-info-viewer
system:volume-scheduler
view
and
kubectl get clusterrolebindings
Output:
NAME
...
system:metrics-server
system:node
system:node-proxier
system:public-info-viewer
system:volume-scheduler
Do you see any references to namespace-readers?
List the RoleBindings for the prod service.
kubectl get rolebindings -n prod
Output:
NAME ROLE AGE
istio-ingressgateway Role/istio-ingressgateway 12m
Do you see any reference to sre@foo-corp.com?
Note: At this point, both your clusters have a prod Namespace, but no dev Namespace. There are no namespace-readers ClusterRoles or bindings, nor are there any RoleBindings in the prod Namespace for the sre group. This will all change when config management is enabled.
Review the configurations stored in your repo
In the Cloud Shell editor, navigate to acm-lab/training-data-analyst/courses/ahybrid/v1.0/AHYBRID071/config. Note the folder structure:
The cluster folder has configurations that apply to clusters being
managed
The namespaces folder has configurations that apply to namespaces on
clusters being managed.
In the cluster folder, open and review the configuration files you find. One defines a ClusterRole you wish to add to each cluster, and the second defines a ClusterRoleBinding you wish to add to each cluster.
In the namespaces folder, open the dev folder and then the namespace.yaml file inside. This file defines a Namespace you wish to have created on every cluster.
In the namespaces folder, open the prod folder and then the namespace.yaml file inside. This file defines a Namespace you wish to have created on every cluster. Note the env label.
In the namespaces folder, open the selector-sre-support.yaml file. Note that the NamespaceSelector will select only Namespaces that have a given label. In this case, the label is env:prod - so only the prod Namespace will be affected by configurations that use this selector.
In the namespaces folder, open the rolebinding-sre.yaml file. Note the annotations which indicate that this config should be applied using a selector.
Note:
When these configurations are applied, you should end up with the
following in place:
A ClusterRole named namespace-readers
A ClusterRoleBinding for Cheryl
A dev Namespace
A prod Namespace with env and
istio-injection labels
A RoleBinding in the prod Namespace for
sre@foo-corp.com
Deploy the Config Management Operator
In Cloud Shell, apply the configuration to the gke cluster.
configmanagement.configmanagement.gke.io/config-management created
If you get an error message, run the `kubectl apply` command again. The error message should disappear.
configmanagement.configmanagement.gke.io/config-management created
Wait 30 seconds, then use nomos status to see if Anthos Config Management is properly installed and configured. If the clusters aren't both synched, wait another 30 seconds and try again. They should be synched at this point.
./nomos status
Output:
Connecting to clusters...
*gke
--------------------
:root-sync ssh://student-00-d32e55d77a02@qwiklabs.net@source.developers.google.com:2022/p/qwiklabs-gcp-01-d08087e65819/r/anthos_config@master
SYNCED @ 2024-09-25 08:00:13 +0000 UTC 43a1a388b924b18c985ee230c8b316fe2711c8b1
Managed resources:
NAMESPACE NAME STATUS SOURCEHASH
clusterrole.rbac.authorization.k8s.io/namespace-readers Current 43a1a38
clusterrolebinding.rbac.authorization.k8s.io/namespace-readers Current 43a1a38
namespace/dev Current 43a1a38
namespace/prod Current 43a1a38
prod rolebinding.rbac.authorization.k8s.io/sre-admin Current 43a1a38
onprem.k8s.local
--------------------
:root-sync ssh://student-00-d32e55d77a02@qwiklabs.net@source.developers.google.com:2022/p/qwiklabs-gcp-01-d08087e65819/r/anthos_config@master
SYNCED @ 2024-09-25 07:56:22 +0000 UTC 43a1a388b924b18c985ee230c8b316fe2711c8b1
Managed resources:
NAMESPACE NAME STATUS SOURCEHASH
clusterrole.rbac.authorization.k8s.io/namespace-readers Current 43a1a38
clusterrolebinding.rbac.authorization.k8s.io/namespace-readers Current 43a1a38
namespace/dev Current 43a1a38
namespace/prod Current 43a1a38
prod rolebinding.rbac.authorization.k8s.io/sre-admin Current 43a1a38
Task 5. Verify that the configurations have been applied to your clusters
Set your kubectl context and list the Namespaces on the gke cluster:
kubectx gke
kubectl get namespaces
Do you see both dev and prod Namespaces?
List the ClusterRoles the gke cluster:
kubectl get clusterroles
Do you see an entry for namespace-readers?
List the ClusterRolesBindings the gke cluster:
kubectl get clusterrolebindings
Do you see an entry for namespace-readers?
Describe the ClusterRoleBinding for namespace-readers:
Are there any bindings for the prod Namespace? Note that the
Namespace selector limited application of this configuration to only
the prod Namespace.
Your configurations, stored in your Cloud Source Repository, have been
applied to the gke cluster. Now, check to see if they have been applied
to the onprem cluster.
Set your kubectl context:
kubectx onprem.k8s.local
Repeat the steps that you performed against the gke cluster. Verify that the changes have applied to the onprem cluster as well.
Task 7. Review automated drift management
In this task, you verify that Anthos Config Management keeps objects in sync with the configs in your repo, even if someone makes manual changes.
Set up tmux panes in Cloud Shell
You are going to configure three Cloud Shell panes so that you can issue commands in one pane and watch the effects on the two clusters in the other panes.
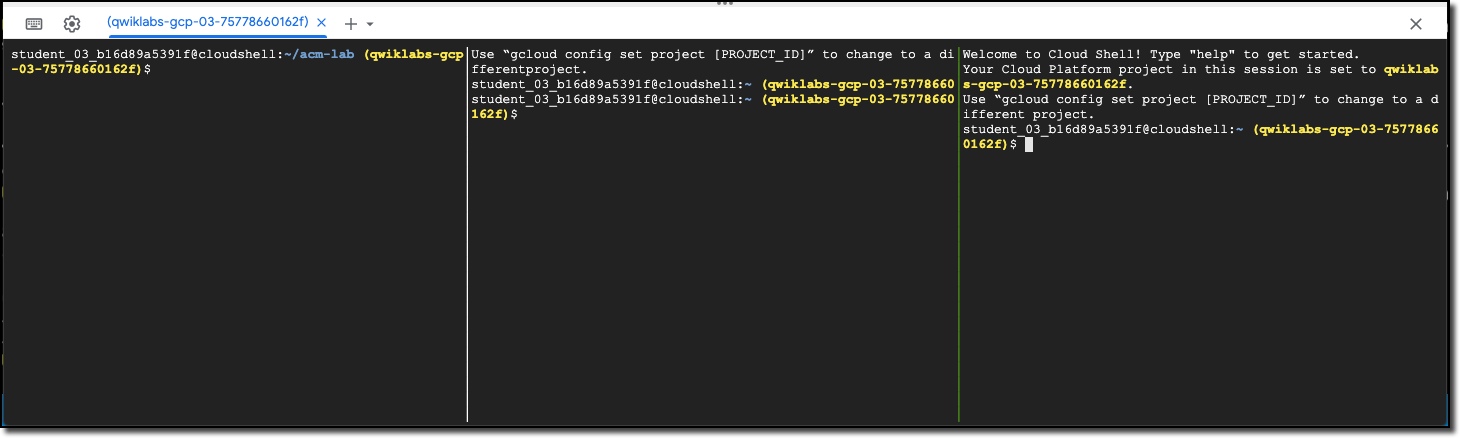
Split the session screen with the tmux utility built-into Cloud Shell by typing <Ctrl>+b, then %. You should see 2 panes in the Cloud Shell.
Any time you interact with tmux, you'll start with the <Ctrl>+b combination, which signals a command to tmux.
Switch to the left-hand pane by typing:
<Ctrl>+b
<left-arrow>
Resize the left-hand pane by doing the following:
Type <Ctrl>+b to begin interaction with tmux
Type : to get a tmux command prompt
Type resize-pane -L 35 to make the left-hand pane narrower
Your panes should look like this:
Switch to the right-hand pane by typing:
<Ctrl>+b
<right-arrow>
In the right-hand pane, split the pane by typing:
<Ctrl>+b
%
You should now have 3 panes that are roughly the same width.
Try deleting an object managed by Anthos Config Management
Switch the the left-hand pane (<Ctrl>+b, <right-arrow>), set the kubectl context, and have kubectl watch for changes to the ClusterRoleBinding for namespace-readers on the gke cluster:
clear
kubectx gke
kubectl get clusterrolebinding namespace-readers --watch-only
Switch the the middle pane (<Ctrl>+b, <right-arrow>), set the kubectl context and have kubectl watch for changes to the ClusterRoleBinding for namespace-readers on the onprem
cluster:
clear
kubectx onprem.k8s.local
kubectl get clusterrolebinding namespace-readers --watch-only
Switch the the right-hand pane (<Ctrl>+b, <right-arrow>), and delete the ClusterRoleBinding on both clusters:
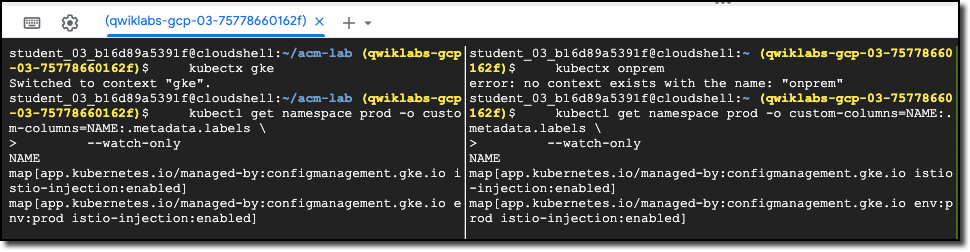
You should see two updates display in each of the panes where you are
watching for object changes. One indicating the deletion of the object,
and one showing the creation of the object to have the cluster comply with
the defined config.
In the right-hand pane, confirm that the ClusterRoleBinding has been recreated on the gke cluster:
You should see two messages in each of the panes where you are watching
for object changes. The first shows the labels on the namespace after
the env:prod label is removed. The second shows the labels after it's
been re-added.
Task 8. Update a config in the repo
In this task, you verify that Anthos Config Management updates managed
objects when the configs in your repo change.
Review the current configuration and set up watches
Switch to the left-hand pane (<Ctrl>+b, <rigt-arrow>), and cancel the kubectl watch command by typing <Ctrl>+c.
In the left pane, review the namespace-readers ClusterRoleBinding
on the gke cluster:
clear
kubectx gke
kubectl get clusterrolebindings namespace-readers -o yaml
Output:
...
subjects:
- apiGroup: rbac.authorization.k8s.io
kind: User
name: cheryl@anthos_labs.com
Configure kubectl to watch for changes to the subjects in this ClusterRoleBinding on the gke cluster:
Add a new User block to the subjects field for jane@anthos_labs.com. You can copy the entire cheryl@anthos_labs.comUser, to a new User, and replace the name with jane@anthos_labs.com.
The new subjects block has the contents:
subjects:
- kind: User
name: cheryl@anthos_labs.com
apiGroup: rbac.authorization.k8s.io
- kind: User
name: jane@anthos_labs.com
apiGroup: rbac.authorization.k8s.io
Save your changes.
Push the change to your config repo
In the right pane, check your config changes are syntactically valid:
export LAB_DIR=$HOME/acm-lab
cd $LAB_DIR
./nomos vet --path=training-data-analyst/courses/ahybrid/v1.0/AHYBRID071/config
No errors are printed, so the configuration is valid.
In the right pane, create a commit, and push the change to your repo:
cd ~/acm-lab/training-data-analyst/courses/ahybrid/v1.0/AHYBRID071/config
git add .
git commit -m "Add Jane to namespace-reader."
git push origin master
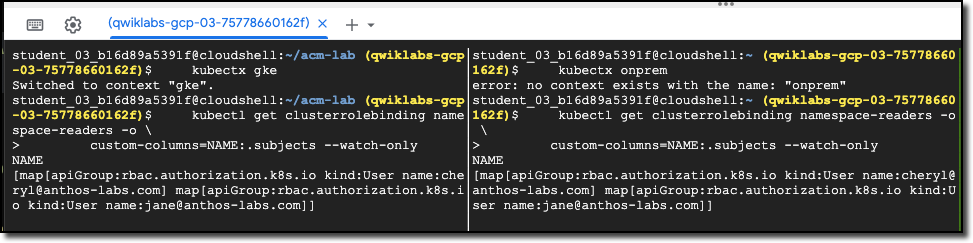
Within a few seconds of the push being completed, you should see a message
in each of the panes where you are watching for object changes. They should
show that there are now entries for both Cheryl and Jane.
Review
In this lab, you configured Anthos Config Management and explored some of its
useful features. You connected a Git repository for configuration-as-code
change-management. You set up a Config Operator to manage your clusters, and
you verified that the operator maintains state in your clusters to match your
repository.
End your lab
When you have completed your lab, click End Lab. Google Skills removes the resources you’ve used and cleans the account for you.
You will be given an opportunity to rate the lab experience. Select the applicable number of stars, type a comment, and then click Submit.
The number of stars indicates the following:
1 star = Very dissatisfied
2 stars = Dissatisfied
3 stars = Neutral
4 stars = Satisfied
5 stars = Very satisfied
You can close the dialog box if you don't want to provide feedback.
For feedback, suggestions, or corrections, please use the Support tab.
Copyright 2026 Google LLC All rights reserved. Google and the Google logo are trademarks of Google LLC. All other company and product names may be trademarks of the respective companies with which they are associated.
Labs erstellen ein Google Cloud-Projekt und Ressourcen für einen bestimmten Zeitraum
Labs haben ein Zeitlimit und keine Pausenfunktion. Wenn Sie das Lab beenden, müssen Sie von vorne beginnen.
Klicken Sie links oben auf dem Bildschirm auf Lab starten, um zu beginnen
Privates Surfen verwenden
Kopieren Sie den bereitgestellten Nutzernamen und das Passwort für das Lab
Klicken Sie im privaten Modus auf Konsole öffnen
In der Konsole anmelden
Melden Sie sich mit Ihren Lab-Anmeldedaten an. Wenn Sie andere Anmeldedaten verwenden, kann dies zu Fehlern führen oder es fallen Kosten an.
Akzeptieren Sie die Nutzungsbedingungen und überspringen Sie die Seite zur Wiederherstellung der Ressourcen
Klicken Sie erst auf Lab beenden, wenn Sie das Lab abgeschlossen haben oder es neu starten möchten. Andernfalls werden Ihre bisherige Arbeit und das Projekt gelöscht.
Diese Inhalte sind derzeit nicht verfügbar
Bei Verfügbarkeit des Labs benachrichtigen wir Sie per E-Mail
Sehr gut!
Bei Verfügbarkeit kontaktieren wir Sie per E-Mail
Es ist immer nur ein Lab möglich
Bestätigen Sie, dass Sie alle vorhandenen Labs beenden und dieses Lab starten möchten
Privates Surfen für das Lab verwenden
Am besten führen Sie dieses Lab in einem Inkognito- oder privaten Browserfenster aus. So vermeiden Sie Konflikte zwischen Ihrem privaten Konto und dem Teilnehmerkonto, die zusätzliche Kosten für Ihr privates Konto verursachen könnten.
Install and configure Anthos Config Management for unified policy management of multi-service applications across multiple clusters.


 in the top-right toolbar, then click