Konten ini belum dioptimalkan untuk perangkat seluler.
Untuk pengalaman terbaik, kunjungi kami dengan komputer desktop menggunakan link yang dikirim melalui email.
Overview
A Cloud Service mesh is an architecture that enables managed, observable, and secure
communication among your services, making it easier for you to create robust
enterprise applications made up of many microservices on your chosen infrastructure.
It manage the common requirements of running a service, such as monitoring, networking,
and security, with consistent, powerful tools, making it easier for service developers
and operators to focus on creating and managing great applications for their users.
Cloud Service Mesh’s traffic management model relies on the following two
components:
Control plane: manages and configures the Envoy proxies to route traffic and
enforce policies.
Data plane: encompasses all network communication between microservices
performed at runtime by the Envoy proxies.
These components enable mesh traffic management features including:
Service discovery
Load balancing
Traffic routing and control
Objectives
In this lab, you learn how to perform the following tasks:
Configure and use Istio Gateways
Apply default destination rules, for all available versions
Apply virtual services to route by default to only one version
Route to a specific version of a service based on user identity
Shift traffic gradually from one version of a microservice to another
Use the Cloud Service Mesh dashboard to view routing to multiple versions
Setup networking best practices such as retries, circuit breakers and timeouts
Setup and requirements
In this task, you perform initialization steps for your lab.
For each lab, you get a new Google Cloud project and set of resources for a fixed time at no cost.
Sign in to Google Skills using an incognito window.
Note the lab's access time (for example, 1:15:00), and make sure you can finish within that time.
There is no pause feature. You can restart if needed, but you have to start at the beginning.
When ready, click Start lab.
Note your lab credentials (Username and Password). You will use them to sign in to the Google Cloud Console.
Click Open Google Console.
Click Use another account and copy/paste credentials for this lab into the prompts.
If you use other credentials, you'll receive errors or incur charges.
Accept the terms and skip the recovery resource page.
After you complete the initial sign-in steps, the project dashboard appears.
Click Select a project, highlight your GCP Project ID, and click
OPEN to select your project.
Activate Google Cloud Shell
Google Cloud Shell is a virtual machine that is loaded with development tools. It offers a persistent 5GB home directory and runs on the Google Cloud.
Google Cloud Shell provides command-line access to your Google Cloud resources.
In Cloud console, on the top right toolbar, click the Open Cloud Shell button.
Click Continue.
It takes a few moments to provision and connect to the environment. When you are connected, you are already authenticated, and the project is set to your PROJECT_ID. For example:
gcloud is the command-line tool for Google Cloud. It comes pre-installed on Cloud Shell and supports tab-completion.
You can list the active account name with this command:
[core]
project = qwiklabs-gcp-44776a13dea667a6
Note:
Full documentation of gcloud is available in the
gcloud CLI overview guide
.
Task 1. Review Traffic Management use cases
Different traffic management capabilities are enabled by using different
configuration options.
Example: traffic splitting
Route traffic to multiple versions of a service.
Example: timeouts
Set a timeout, the amount of time Istio waits for a response to a request.
The timeout for HTTP requests is 15 seconds, but it can be overridden.
Example: retries
A retry is an attempt to complete an operation multiple times if it fails.
Adjust the maximum number of retry attempts, or the number of attempts possible
within the default or overridden timeout period.
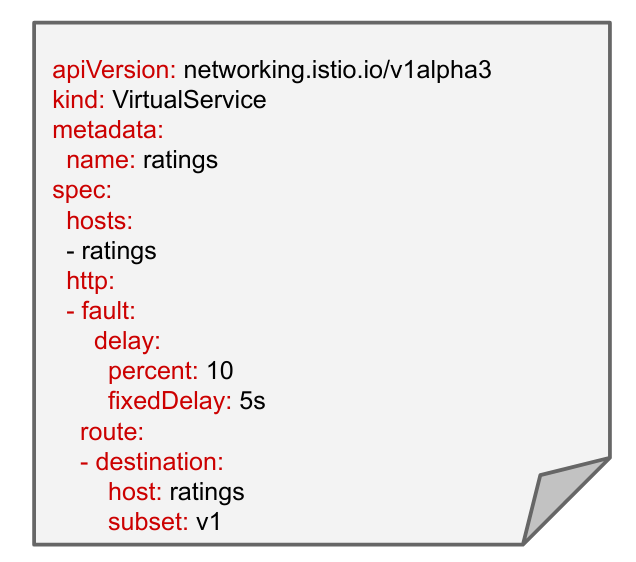
Example: fault injection: inserting delays
Fault injection is a testing method that introduces errors into a system to
ensure that it can withstand and recover from error conditions.
This example introduces a 5 second delay in 10% of the requests to the
"v1" version of the ratings microservice.
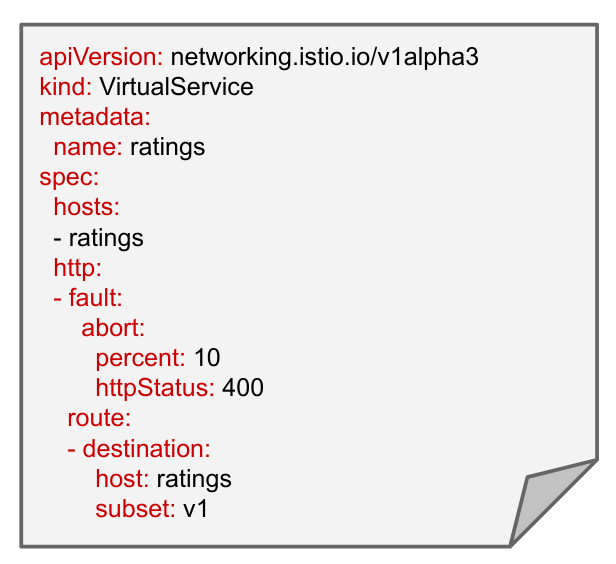
Example: fault injection: inserting aborts
The above example returns an HTTP 400 error code for 10% of the requests to the
ratings service "v1".
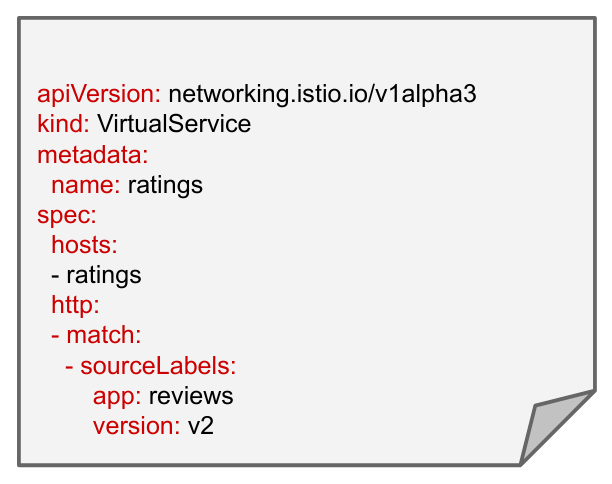
Example: conditional routing: based on source labels
A rule can indicate that it only applies to calls from workloads (pods)
implementing the version v2 of the reviews service.
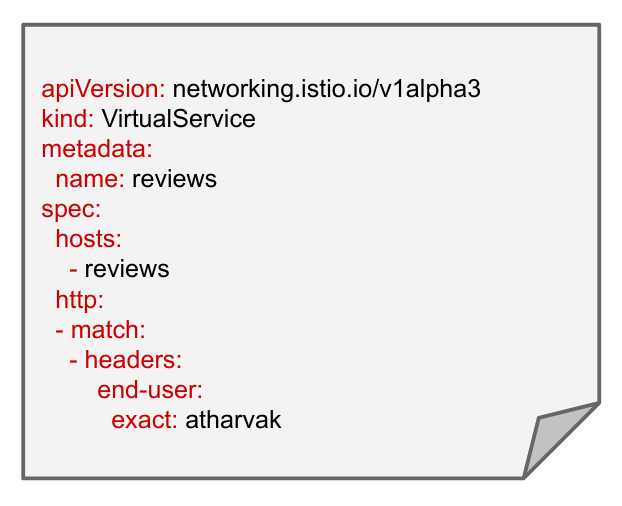
Example: conditional routing: based on request headers
The above rule only applies to an incoming request if it includes a custom
"end-user" header that contains the string “atharvak”.
Task 2. Complete lab setup
This lab environment has already been partially configured.
A GKE cluster named gke was created.
Cloud Service Mesh has been installed
The Bookinfo multi-service sample application was deployed.
Configure cluster access for kubectl
Set the Zone environment variable:
CLUSTER_ZONE={{{ project_0.default_zone| "Zone added at lab start" }}}
In Cloud Shell, set environment variables cluster name:
Ensure the Kubernetes pods for the Cloud Service Mesh control plane are
deployed:
kubectl get pods -n asm-ingress
Output:
NAME READY STATUS RESTARTS AGE
istio-ingressgateway-69fc5475fd-4wglw 1/1 Running 0 22m
istio-ingressgateway-69fc5475fd-stb7x 1/1 Running 0 22m
istio-ingressgateway-69fc5475fd-vkxp4 1/1 Running 0 22m
Pod status should be Running or Completed.
Ensure corresponding Kubernetes services for the Cloud Service Mesh control
plane are deployed:
kubectl get service -n asm-ingress
Output:
NAME TYPE CLUSTER-IP EXTERNAL-IP PORT(S) AGE
istio-ingressgateway LoadBalancer 34.118.232.124 34.75.207.190 15021:32645/TCP,80:31091/TCP,443:32092/TCP 30m
Verify the Bookinfo deployment
Confirm that the application has been deployed correctly:
kubectl get pods
Output:
NAME READY STATUS
details-v1-1520924117-48z17 2/2 Running
productpage-v1-560495357-jk1lz 2/2 Running
ratings-v1-734492171-rnr5l 2/2 Running
reviews-v1-874083890-f0qf0 2/2 Running
reviews-v2-1343845940-b34q5 2/2 Running
reviews-v3-1813607990-8ch52 2/2 Running
Note: See how each pod has two containers?
That's the application container and the Istio sidecar proxy.
Review running application services:
kubectl get services
Output:
NAME TYPE CLUSTER-IP EXTERNAL-IP ...
details ClusterIP 10.7.248.49
kubernetes ClusterIP 10.7.240.1
productpage ClusterIP 10.7.248.22
ratings ClusterIP 10.7.247.26
reviews ClusterIP 10.7.246.22
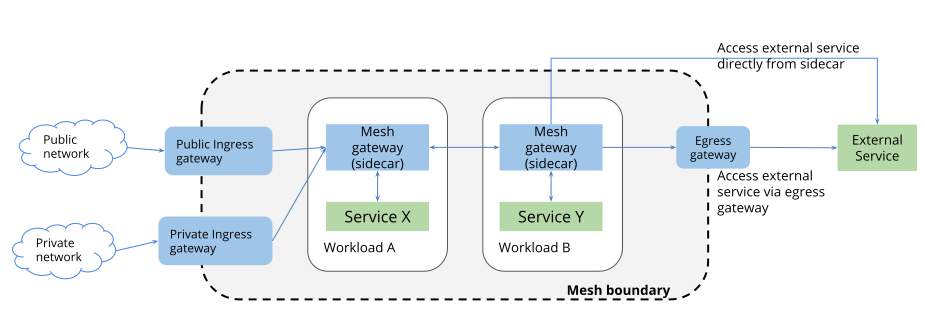
Task 3. Install Gateways to enable ingress
In a Kubernetes environment, the Kubernetes Ingress Resource is used to specify
services that should be exposed outside the cluster. In Cloud Service Mesh, a
better approach, which also works in Kubernetes and other environments, is
to use a Gateway resource. A Gateway allows mesh features such as monitoring,
mTLS, and advanced routing capabilities rules to be applied to traffic
entering the cluster.
Gateways overcome Kubernetes Ingress shortcomings by separating the L4-L6 spec
from L7. The Gateway configures the L4-L6 functions, such as the ports to
expose, or the protocol to use. Then service owners bind VirtualService to
configure L7 traffic routing options, such as routing based on paths, headers,
weights, etc.
There are two options for deploying gateways, either shared or dedicated.
Shared gateways use a single centralized gateway is that used by many
applications, possibly across many namespaces. In the example below, the
Gateway in the ingress namespace delegates ownership of routes to application
namespaces, but retains control over TLS configuration. This works well when
using shared TLS certificates or shared infrastructure. In this lab we will use
this option.
Dedicated gateways give full control and ownership to a single namespace, since
an application namespace has its own dedicated gateway. This works well for
applications that require isolation for security or performance.
Install an ingress gateway in your cluster
Create a namespace for the gateway:
kubectl create namespace ingress
Label the gateway namespace with a revision label for auto-injection:
The revision label is used by the sidecar injector webhook to associate
injected proxies with a particular control plane revision.
You can ignore the message "istio-injection not found" in the output. That
means that the namespace didn't previously have the istio-injection label,
which you should expect in new installations of Service Mesh or new
deployments.
Because auto-injection fails if a namespace has both the
istio-injection and the revision label, all kubectl label commands in the
Service Mesh documentation includes removing the istio-injection label.
Download and apply the gateway configuration files. These include the pods
and services that will first receive the incoming requests from outside the
cluster:
cat <<'EOF' > ingress.yaml
apiVersion: v1
kind: ServiceAccount
metadata:
name: istio-ingressgateway
namespace: ingress
---
apiVersion: v1
kind: Service
metadata:
name: istio-ingressgateway
namespace: ingress
labels:
app: istio-ingressgateway
istio: ingressgateway
spec:
ports:
# status-port exposes a /healthz/ready endpoint that can be used with GKE Ingress health checks
- name: status-port
port: 15021
protocol: TCP
targetPort: 15021
# Any ports exposed in Gateway resources should be exposed here.
- name: http2
port: 80
- name: https
port: 443
selector:
istio: ingressgateway
app: istio-ingressgateway
type: LoadBalancer
---
apiVersion: rbac.authorization.k8s.io/v1
kind: Role
metadata:
name: istio-ingressgateway
namespace: ingress
rules:
- apiGroups:
- ""
resources:
- secrets
verbs:
- get
- watch
- list
---
apiVersion: rbac.authorization.k8s.io/v1
kind: RoleBinding
metadata:
name: istio-ingressgateway
namespace: ingress
roleRef:
apiGroup: rbac.authorization.k8s.io
kind: Role
name: istio-ingressgateway
subjects:
- kind: ServiceAccount
name: istio-ingressgateway
---
apiVersion: policy/v1
kind: PodDisruptionBudget
metadata:
name: istio-ingressgateway
namespace: ingress
spec:
maxUnavailable: 1
selector:
matchLabels:
istio: ingressgateway
app: istio-ingressgateway
---
apiVersion: apps/v1
kind: Deployment
metadata:
name: istio-ingressgateway
namespace: ingress
spec:
replicas: 1
selector:
matchLabels:
app: istio-ingressgateway
istio: ingressgateway
template:
metadata:
annotations:
# This is required to inject the gateway with the
# required configuration.
inject.istio.io/templates: gateway
labels:
app: istio-ingressgateway
istio: ingressgateway
spec:
containers:
- name: istio-proxy
image: auto # The image will automatically update each time the pod starts.
serviceAccountName: istio-ingressgateway
---
apiVersion: autoscaling/v2
kind: HorizontalPodAutoscaler
metadata:
name: istio-ingressgateway
namespace: ingress
spec:
maxReplicas: 5
metrics:
- type: Resource
resource:
name: cpu
target:
type: Utilization
averageUtilization: 80
minReplicas: 3
scaleTargetRef:
apiVersion: apps/v1
kind: Deployment
name: istio-ingressgateway
EOF
kubectl apply -n ingress -f ingress.yaml
After you create the deployment, verify that the new services are working:
kubectl get pod,service -n ingress
Notice the resource is a LoadBalancer. This ingress gateway uses an
external TCP load balancer in GCP.
Deploy the Gateway to specify the port and protocol to be used. In this
case, the gateway enables HTTP traffic over port 80:
The VirtualService resource must be located in the same namespace as the
application. Notice that it establishes the productpage service as the
default destination.
Verify that the Gateway and VirtualService have been created and notice that
the VirtualService is pointing to the Gateway:
kubectl get gateway,virtualservice
Save this external IP in your Cloud Shell environment:
export GATEWAY_URL=$(kubectl get svc -n ingress istio-ingressgateway \
-o=jsonpath='{.status.loadBalancer.ingress[0].ip}')
echo The gateway address is $GATEWAY_URL
Note: If the gateway address is empty, wait 1-2
minutes and try the last command again. Do this until you have an address in
your $GATEWAY_URL variable.
Generate some background traffic
Generate some background traffic against the application so that when you
explore the Service Mesh dashboard, there's some interesting data to
view.
In Cloud Shell, install siege, a load generation tool:
sudo apt install siege
Use siege to create traffic against your services:
siege http://${GATEWAY_URL}/productpage
Access the BookInfo application
In Cloud Shell, open another tab by clicking on the + icon in the Cloud
Shell menu bar.
Set the Zone environment variable:
CLUSTER_ZONE={{{ project_0.default_zone| "Zone added at lab start" }}}
Check that the Bookinfo app responds to a curl request sent to it
from outside the cluster, using the external IP saved earlier:
curl -I http://${GATEWAY_URL}/productpage
Output:
HTTP/1.1 200 OK
content-type: text/html; charset=utf-8
content-length: 5293
server: istio-envoy
date: Wed, 01 Feb 2023 13:28:58 GMT
x-envoy-upstream-service-time: 27
Open the Bookinfo application in your browser. Run this command in the
Cloud Shell to get the full URL:
echo http://${GATEWAY_URL}/productpage
Congratulations! You exposed an HTTP endpoint for the Bookinfo
productpage service to external traffic. The Gateway configuration resources
allow external traffic to enter the service mesh and make the traffic
management and policy features available for edge services.
Click Check my progress to verify the objective.
Install Gateways to enable ingress.
Task 4. Use the Service Mesh dashboard view routing to multiple versions
There are a couple of items to note when it comes to viewing data in the Service Mesh dashboard.
The first is that, for most pages, it takes 1-2 minutes for the data to be available for display. That means that if you look at a page, it might not have the data you expect for 1-2 minutes. If you don't see the data you want, wait for a minute or so and then refresh the page.
The Topology page also has a big initial delay before data is shown. It can take up to 5+ minutes for the initial set of data to be available. If you see a message that there is no data, wait a bit and then refresh the page and return to the Topology view.
In the previous paragraphs, you are instructed to wait AND to refresh the page. As it turns out, not only is the data a bit delayed in arriving, but many pages won't show the available data without a page refresh. So if you expect the data to be available and you don't see it, make sure to do a refresh of the page in your browser.
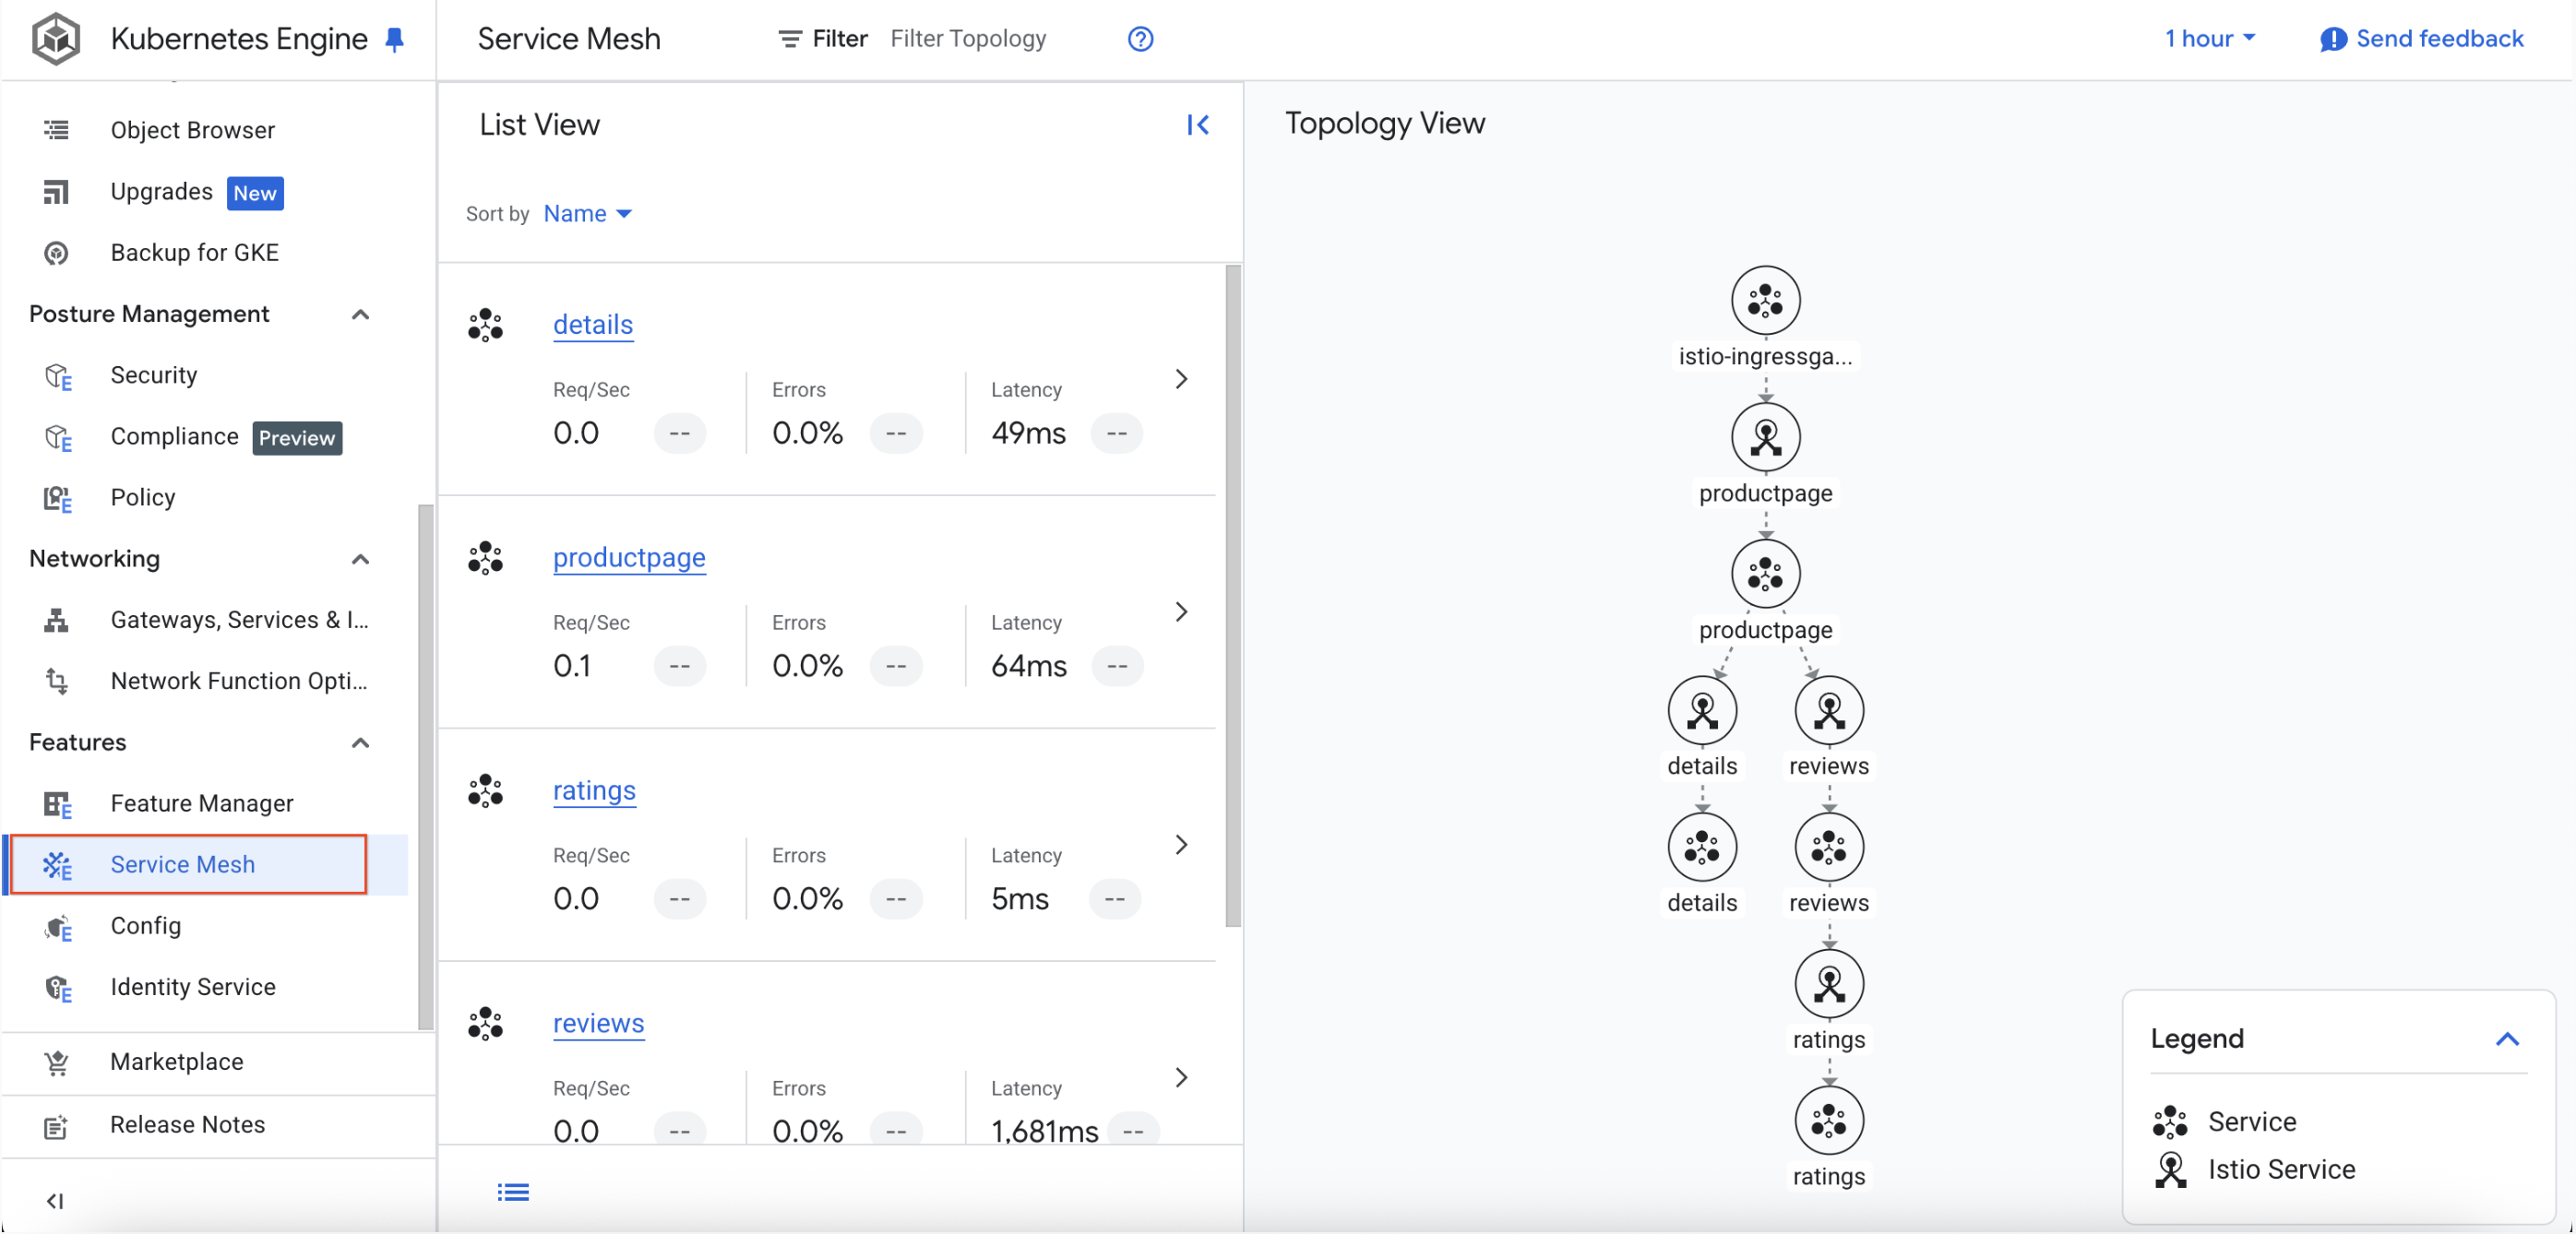
View routing information in the Table View
From the Navigation menu, select Kubernetes Engine > Features > Service Mesh.
Note: If the Topology view is not displayed, refresh the browser window.
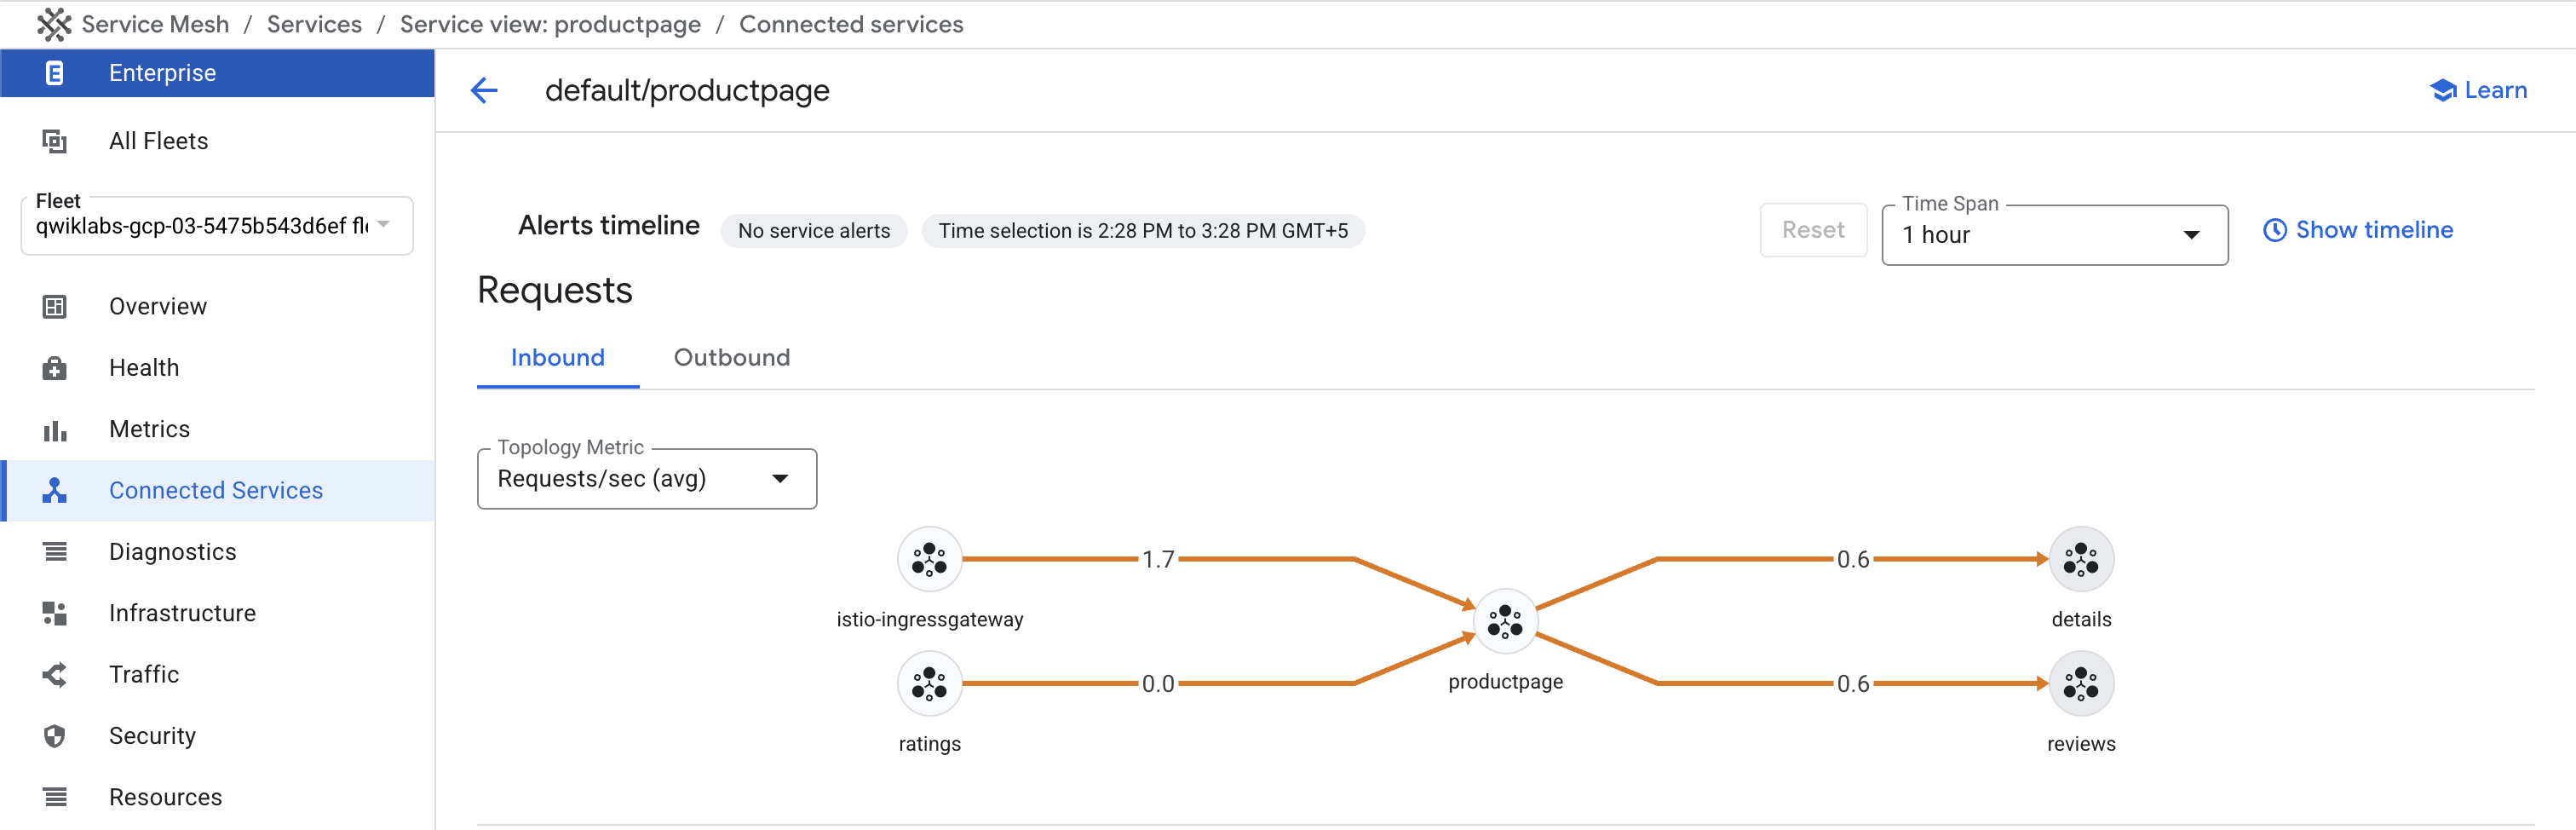
Click on the productpage service, then select Connected Services
on the left.
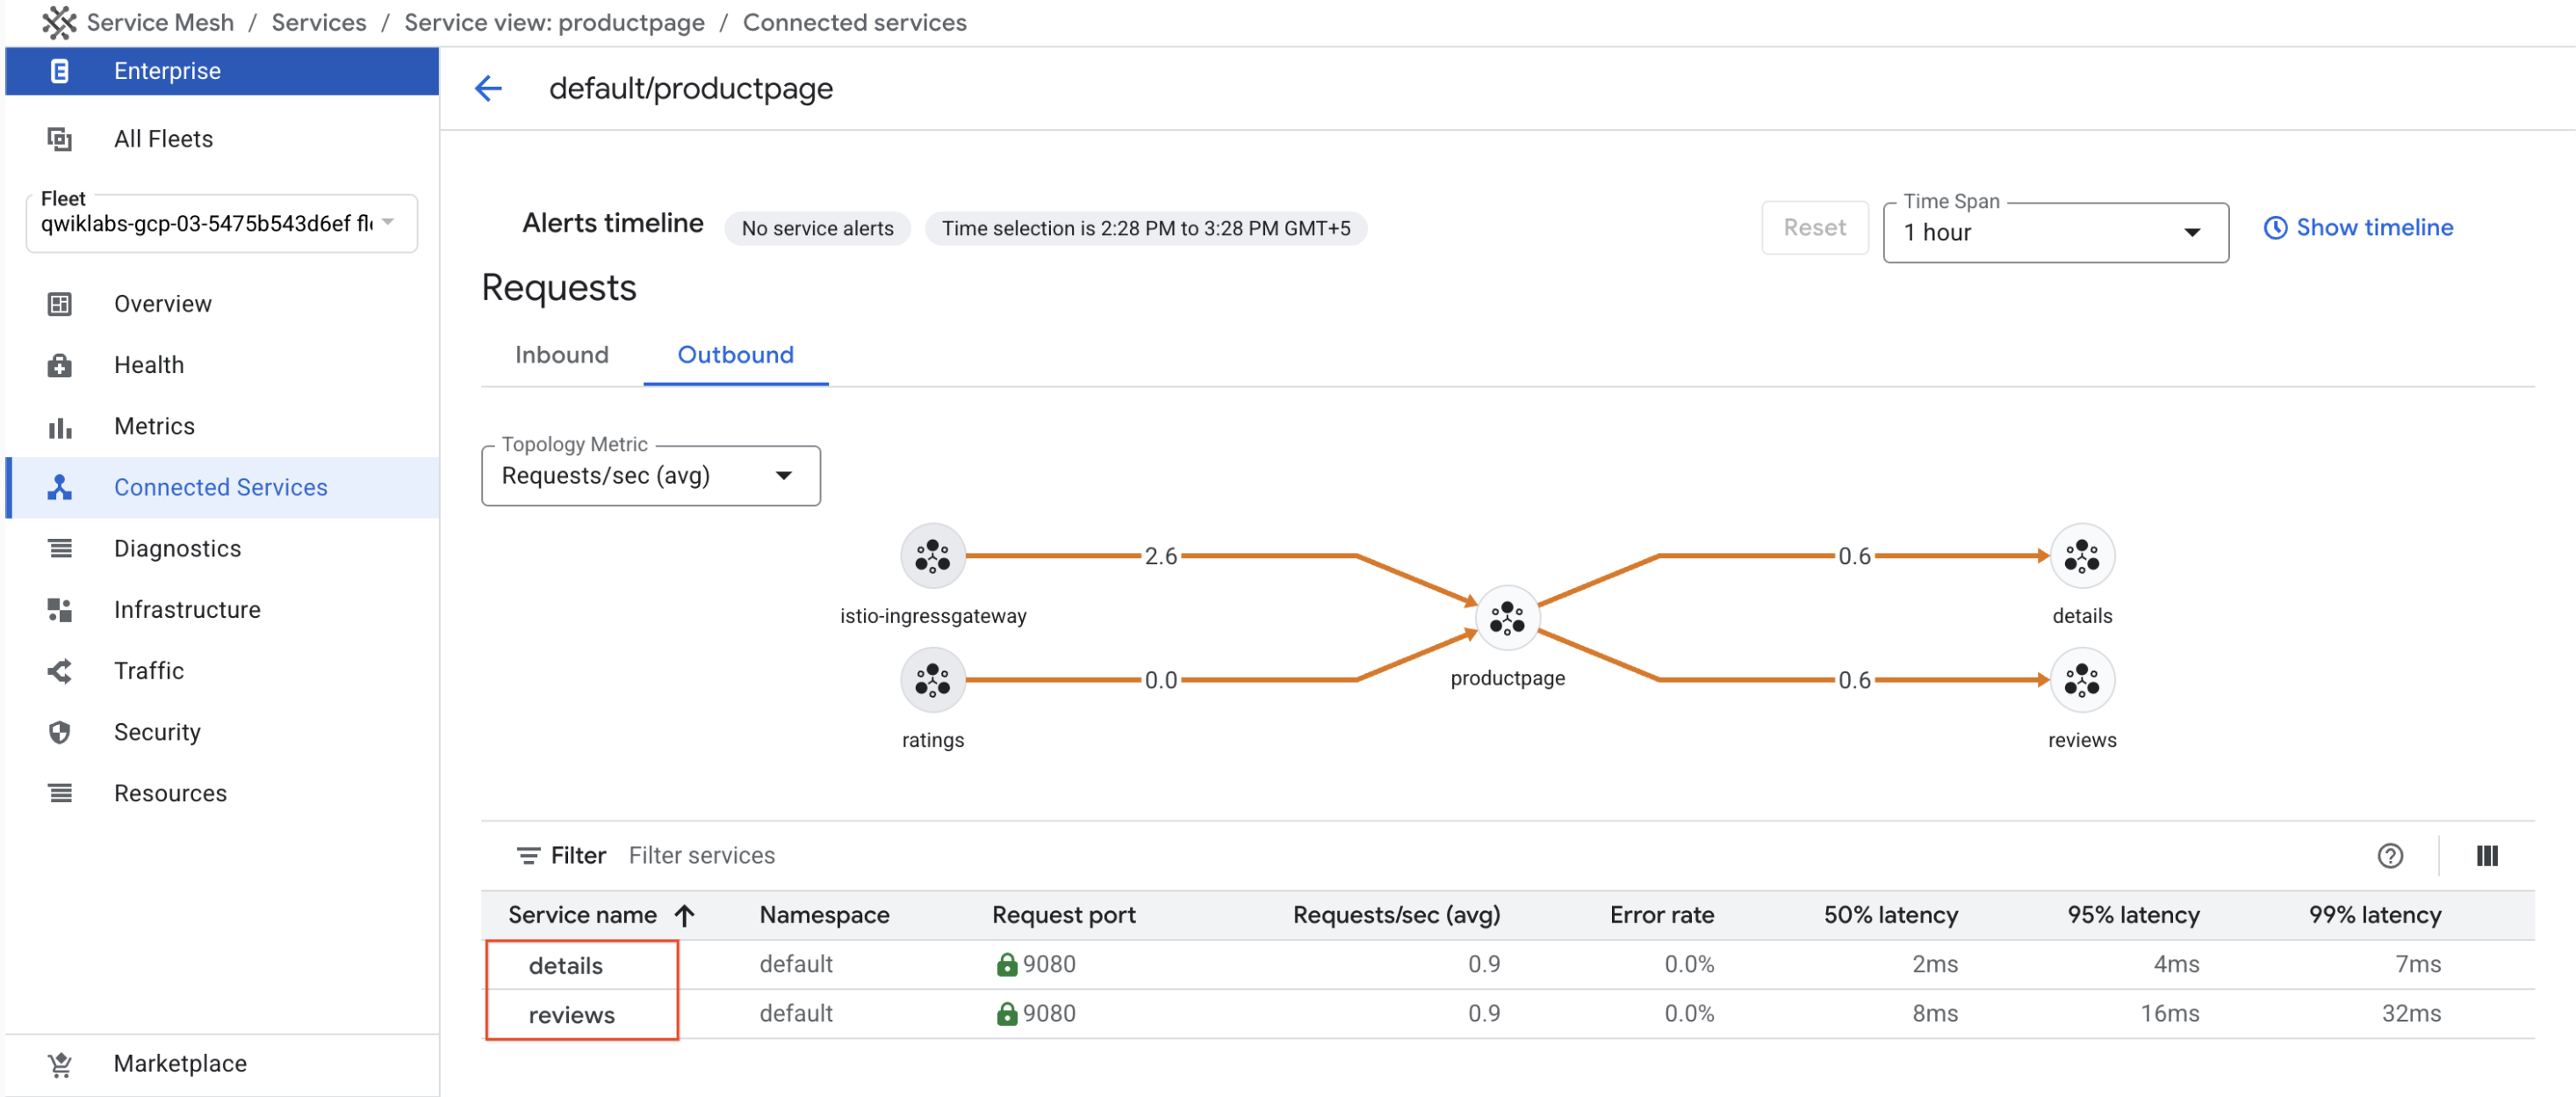
Select the Outbound tab and note the two services called by the
productpage pods.
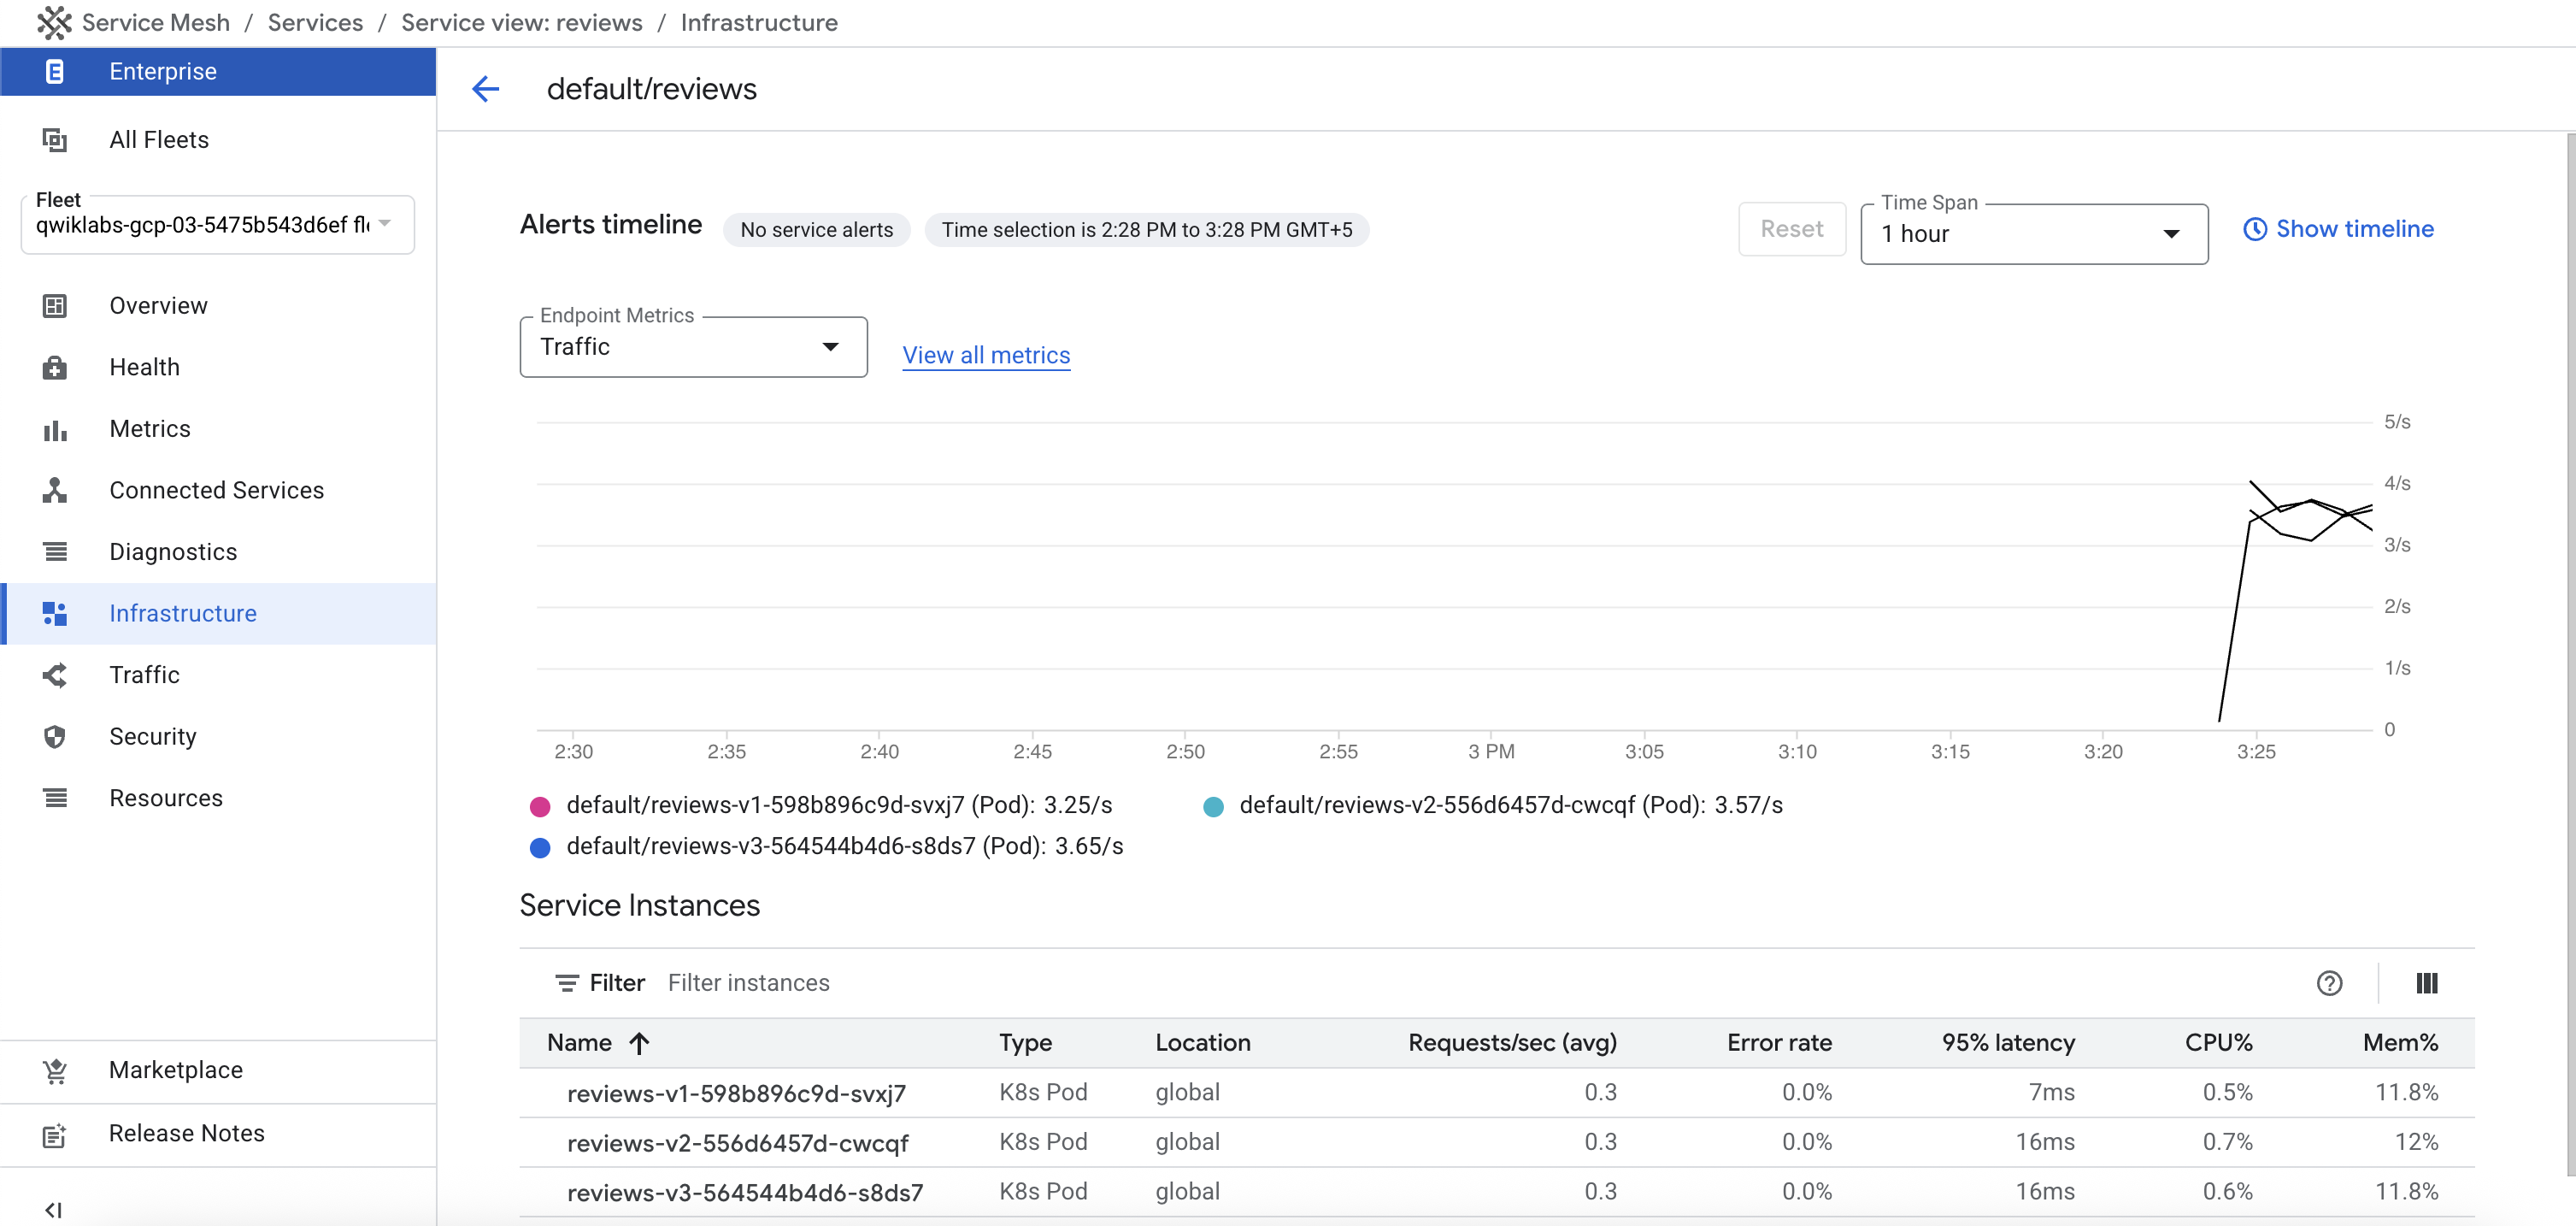
Click on the reviews service.
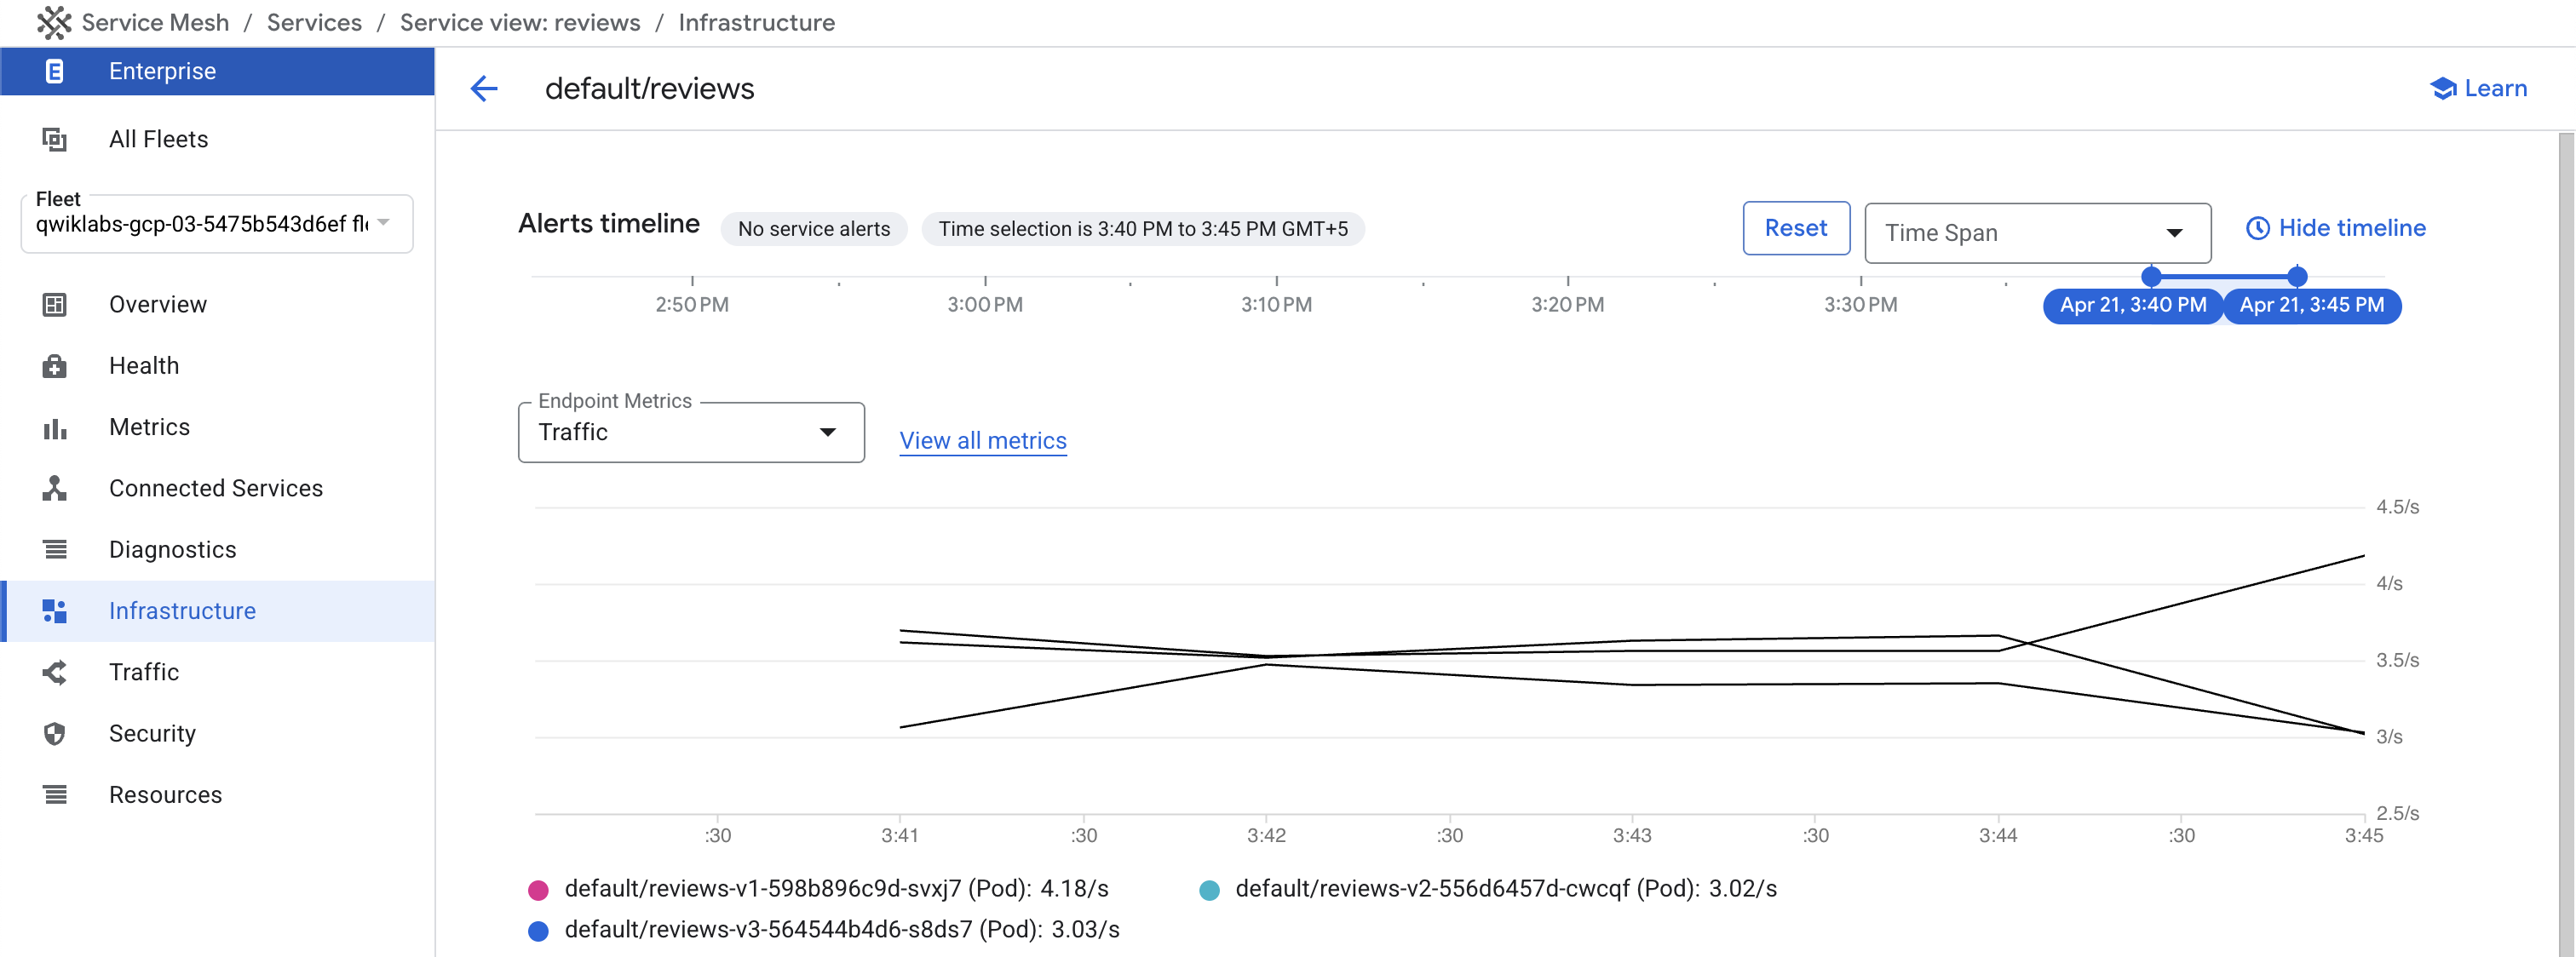
Note the service statistics, then select the Infrastructure link on the
left-hand menu.
You can see that there are multiple pods, running different versions of the reviews logic, that receive traffic sent to the reviews service.
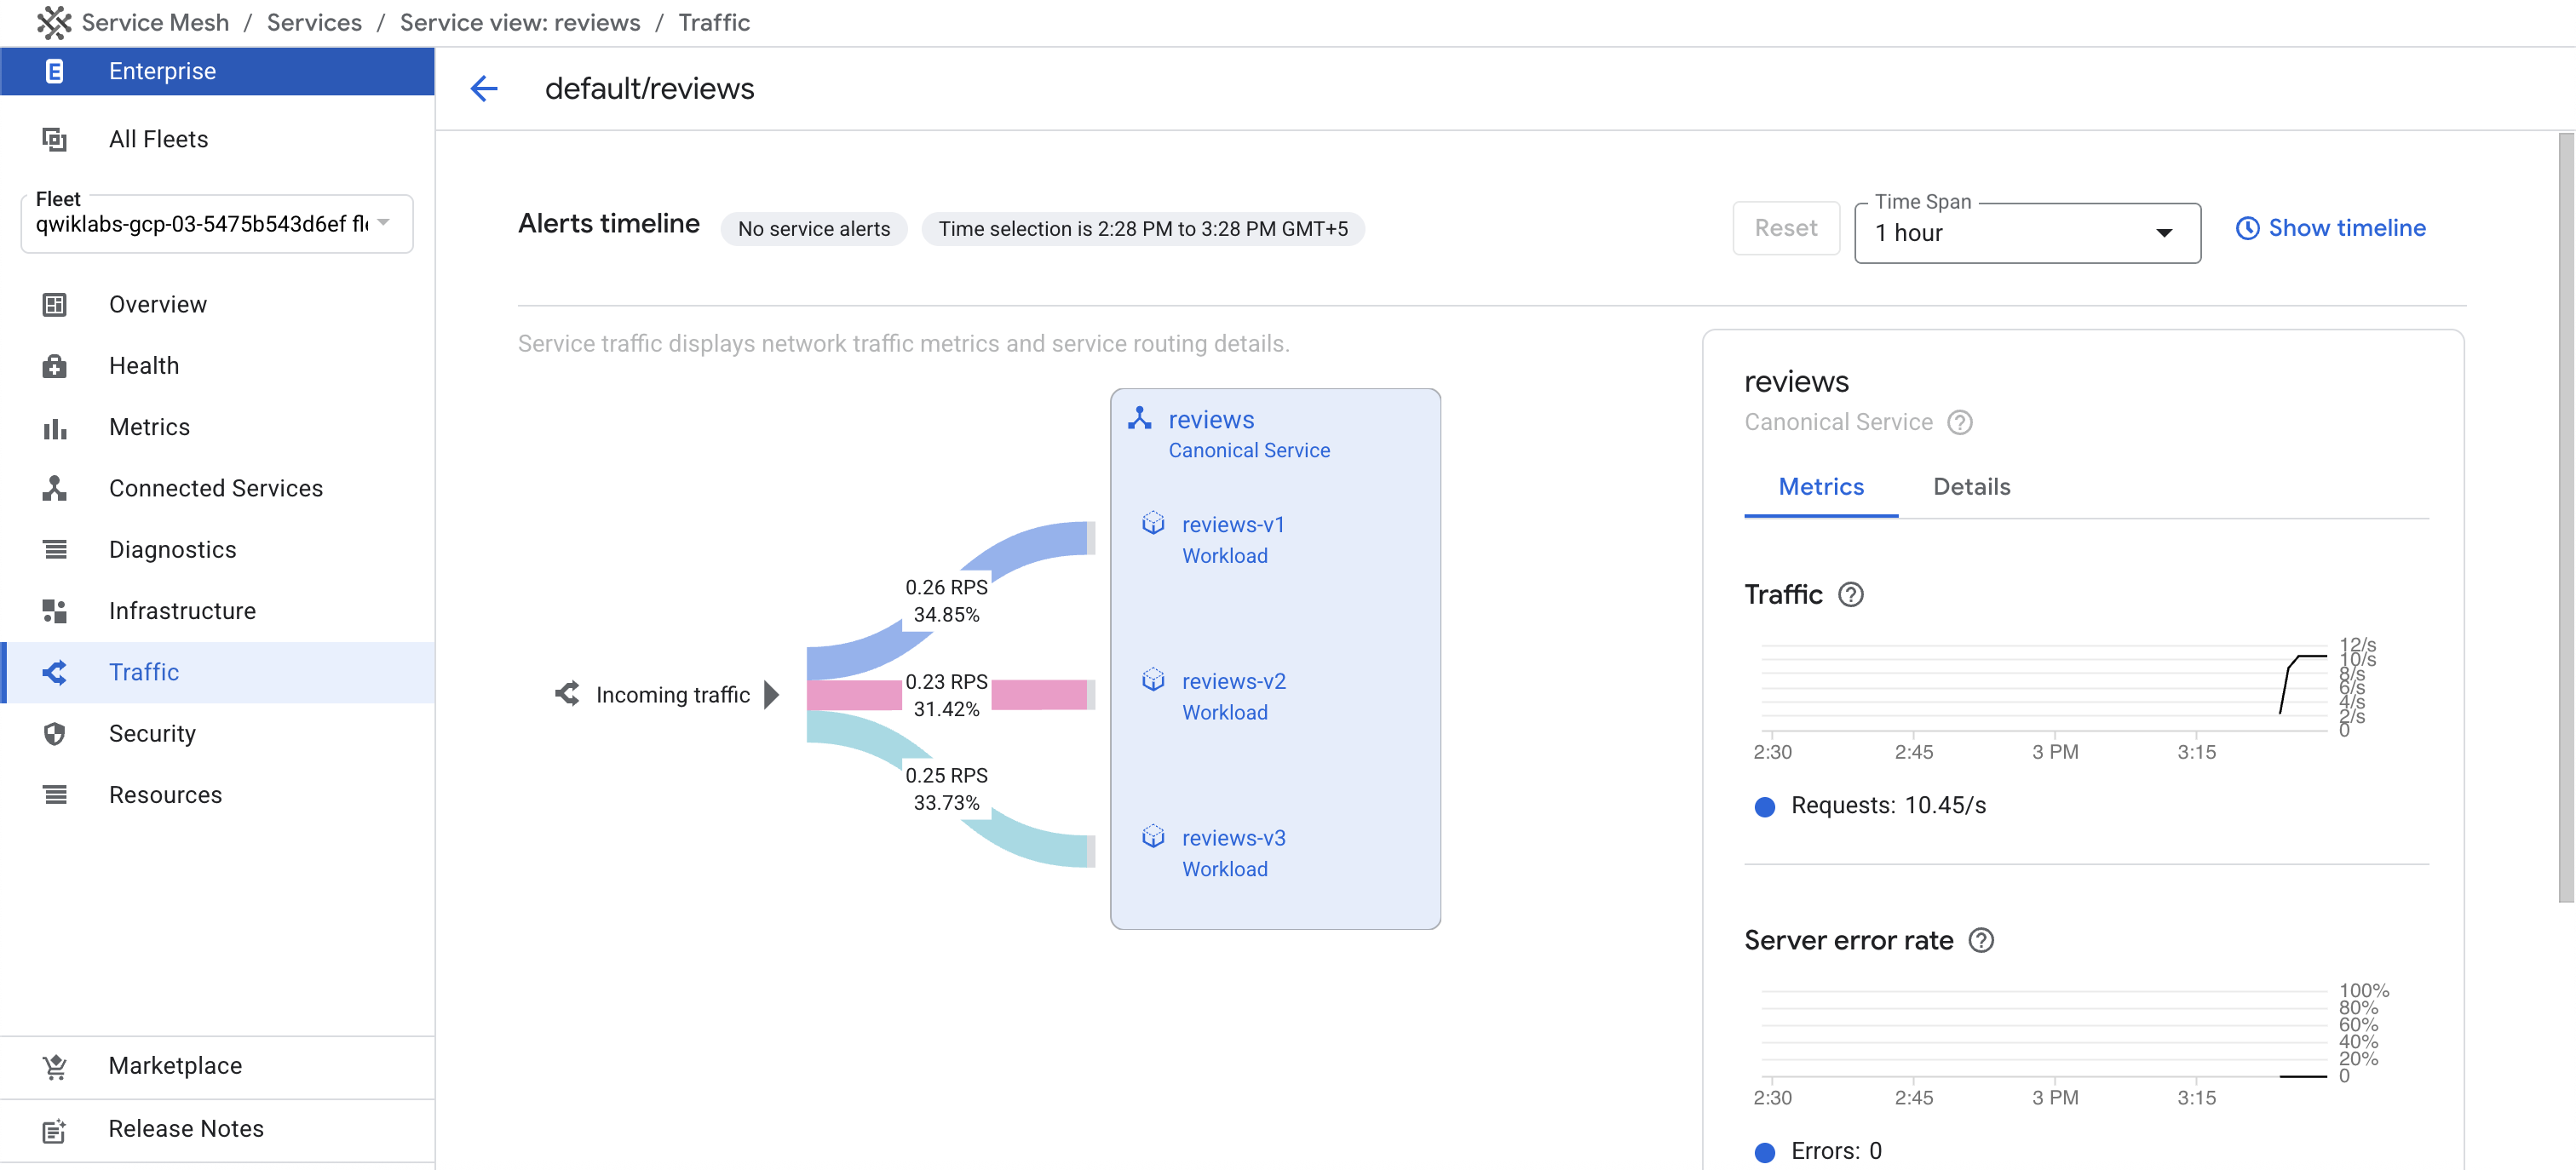
Click on Traffic in the left-hand menu to see another view of traffic
distribution.
You can see that there is relatively even distribution of traffic across
the three backend pods running the different versions of the application
logic.
View routing information in the Topology View
Click on the Service Mesh logo in the upper left corner to return
to the main dashboard page.
Note: If you see an error message indicating that there is no data available to
graph, or you see a chart that doesn't have all the traffic you expect,
wait 1-2 minutes and try again.
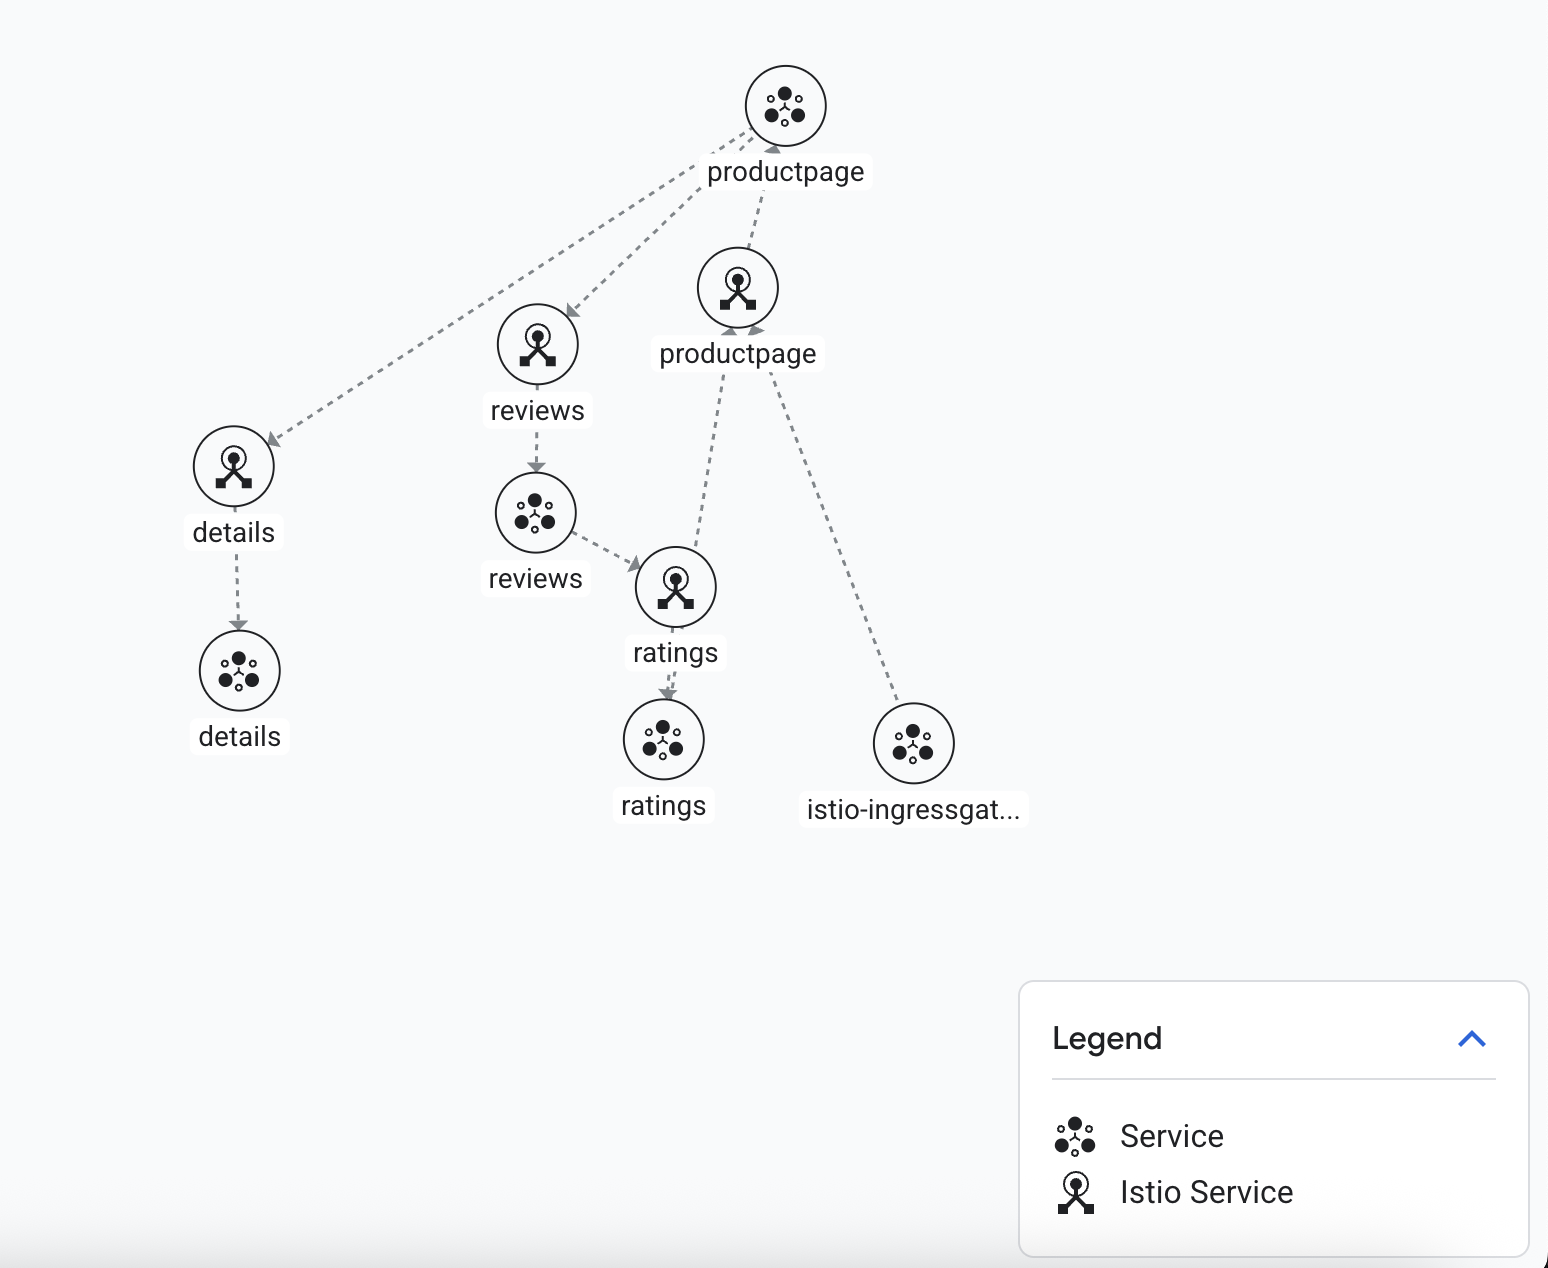
Rearrange the mesh graph so that you can easily view:
The productpage service going to productpage deployment
The productpage deployment going to reviews service
The reviews service going to three version of reviews
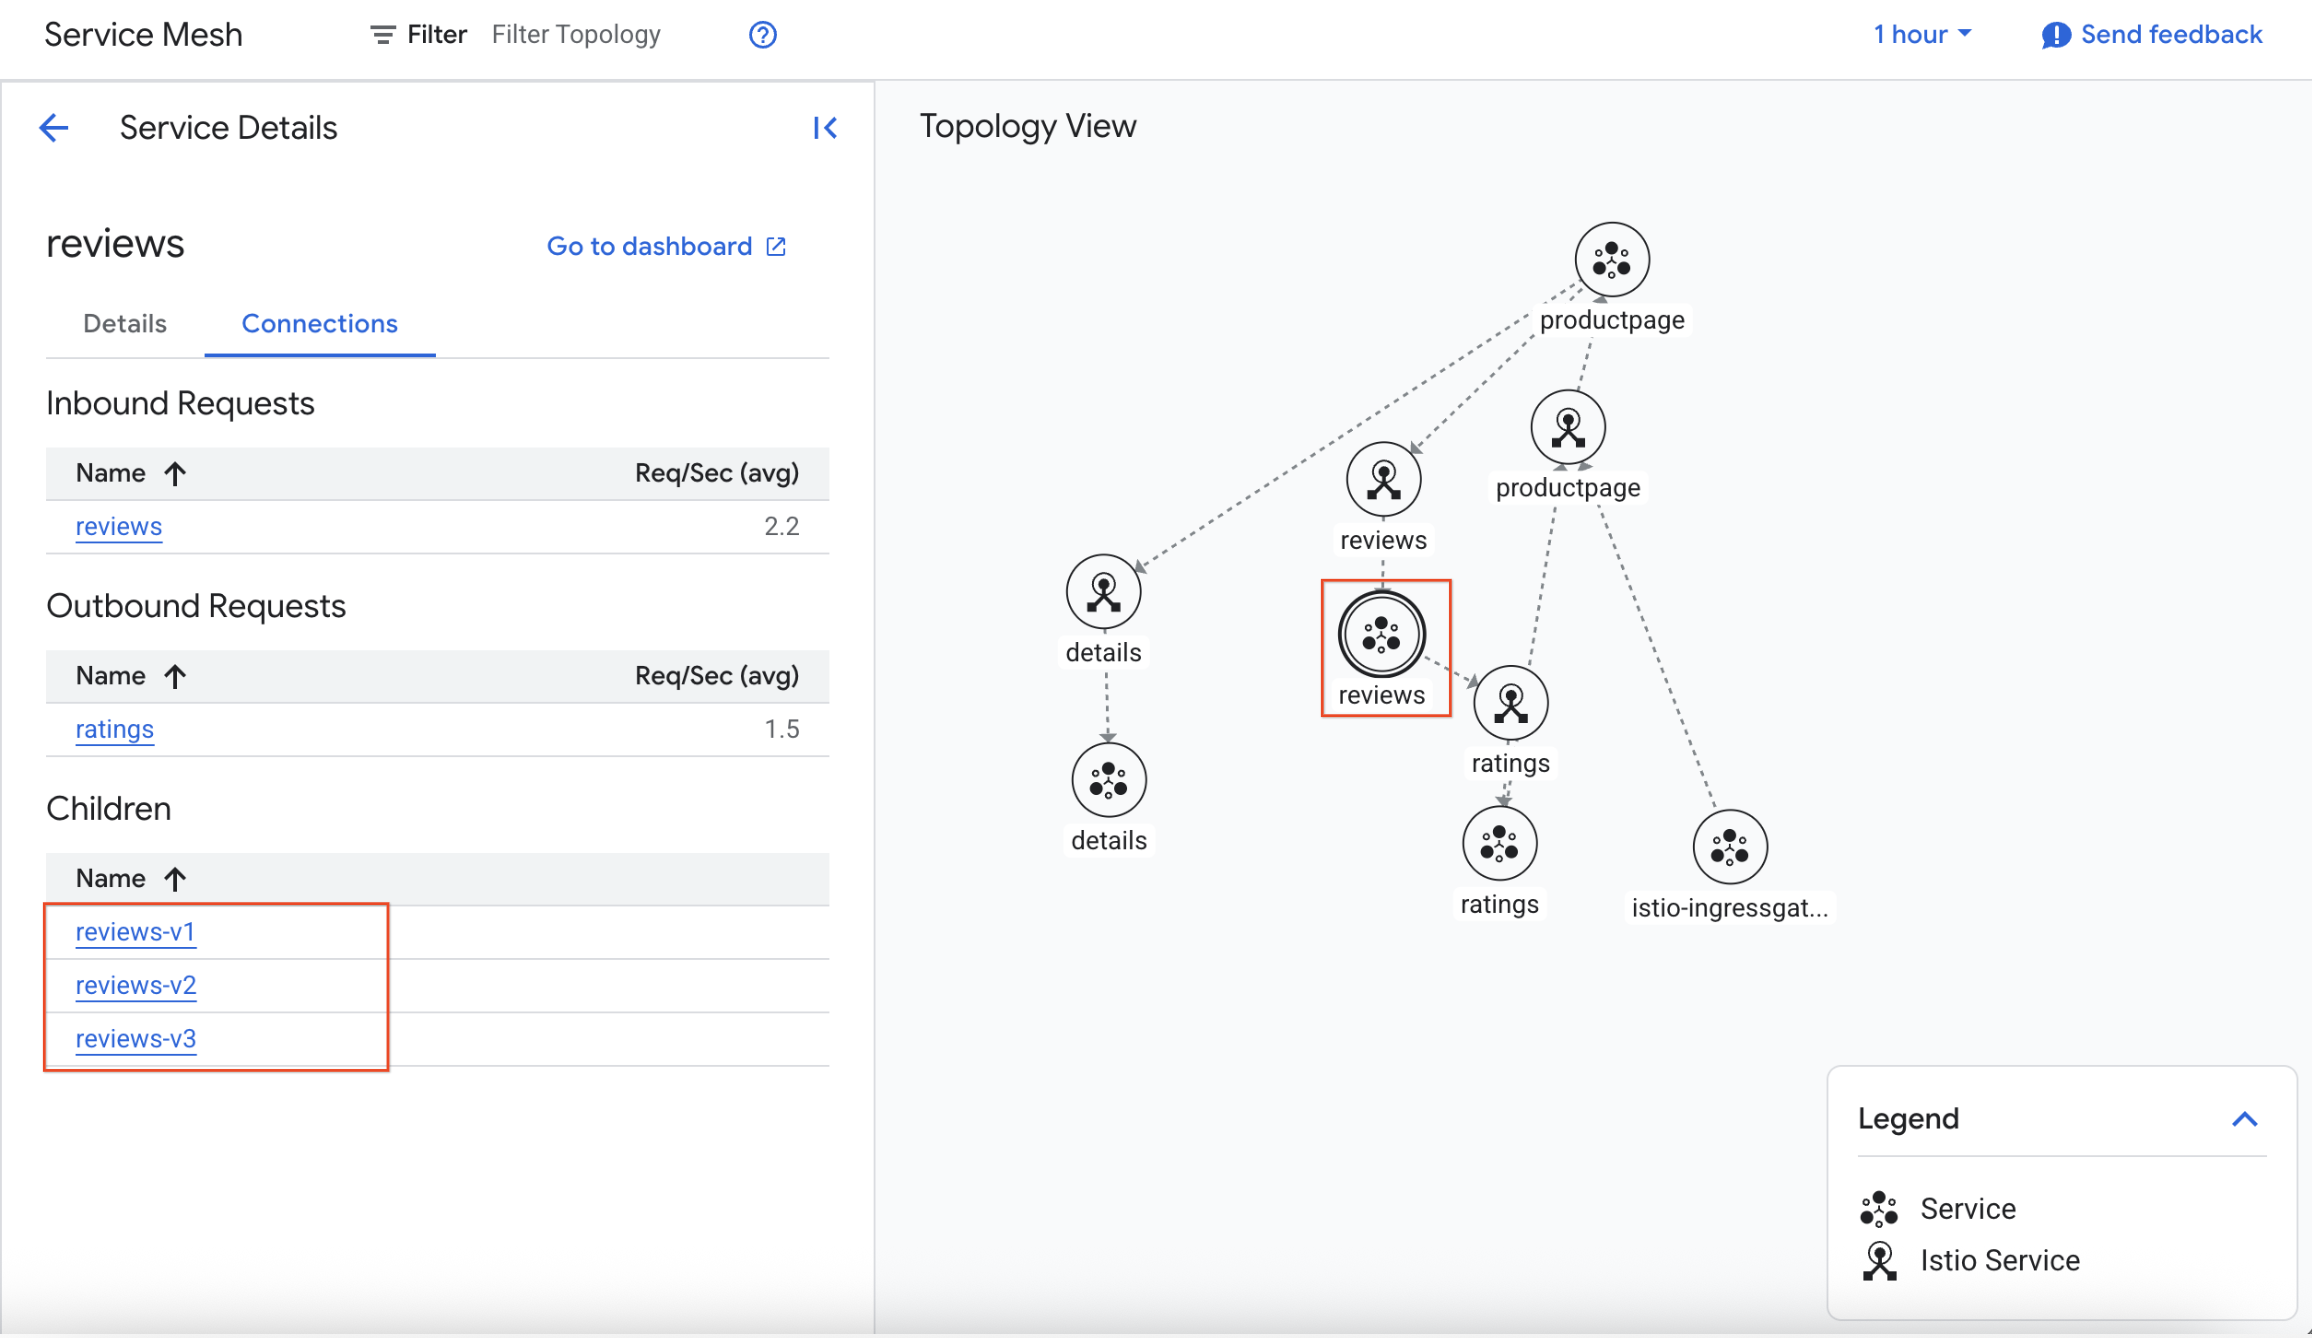
Click on the reviews service node and see relative qps for each backend
version.
Task 5. Apply default destination rules, for all available versions
In this task, you define all the available versions, called subsets, in
destination rules.
Review the configuration found in
Github. This configuration defines 4 DestinationRule
resources, 1 for each service.
Apply the configuration with the following command in Cloud Shell:
wget https://raw.githubusercontent.com/istio/istio/master/samples/bookinfo/networking/destination-rule-all.yaml
sed -i 's#istio\.io/v1#istio\.io/v1alpha3#g' destination-rule-all.yaml
kubectl apply -f destination-rule-all.yaml
Output:
destinationrule.networking.istio.io/productpage created
destinationrule.networking.istio.io/reviews created
destinationrule.networking.istio.io/ratings created
destinationrule.networking.istio.io/details created
Check that 4 DestinationRule resources were defined.
kubectl get destinationrules
Output:
NAME HOST AGE
details details 1m
productpage productpage 1m
ratings ratings 1m
reviews reviews 1m
Review the details of the destination rules:
kubectl get destinationrules -o yaml
Notice that subsets are defined within the spec of a
DestinationRule.
Wait for 1-2 minutes, then return to the Service Mesh dashboard.
Look in both the table and topology views and confirm that the traffic
continues to be evenly distributed across the three backend versions. You can
click SHOW TIMELINE to adjust the period of time that is being charted,
making it easier to zero in on the data you are interested in.
Click Check my progress to verify the objective.
Apply destination rules.
Task 6. Apply virtual services to route by default to only one version
In this task, you apply virtual services for each service that routes
all traffic to v1 of the service workload.
Review the configuration found in
Github. This configuration defines 4 VirtualService
resources, 1 for each service.
Apply the configuration with the following command in Cloud Shell:
wget https://raw.githubusercontent.com/istio/istio/master/samples/bookinfo/networking/virtual-service-all-v1.yaml
sed -i 's#istio\.io/v1#istio\.io/v1alpha3#g' virtual-service-all-v1.yaml
kubectl apply -f virtual-service-all-v1.yaml
Output:
virtualservice.networking.istio.io/productpage created
virtualservice.networking.istio.io/reviews created
virtualservice.networking.istio.io/ratings created
virtualservice.networking.istio.io/details created
Because configuration propagation is eventually consistent, wait a few
seconds for the virtual services to take effect.
Check that 4 routes, VirtualService resources, were defined:
kubectl get virtualservices
Output:
NAME GATEWAYS HOSTS AGE
bookinfo ["ingress/bookinfo-gateway"] ["*"] 19m
details ["details"] 6s
productpage ["productpage"] 7s
ratings ["ratings"] 6s
reviews ["reviews"] 7s
In Cloud Shell, get the external IP address of the
ingress gateway:
echo $GATEWAY_URL
Test the new routing configuration using the Bookinfo UI.
Open the Bookinfo site in your browser. The URL is
http://[GATEWAY_URL]/productpage, where GATEWAY_URL is the External IP
address of the ingress.
Refresh the page a few times to issue multiple requests.
Notice that the Book Reviews part of the page displays with no rating
stars, no matter how many times you refresh. This is because you configured
the mesh to route all traffic for the reviews service to the version
reviews:v1 and this version of the service does not access the star
ratings service.
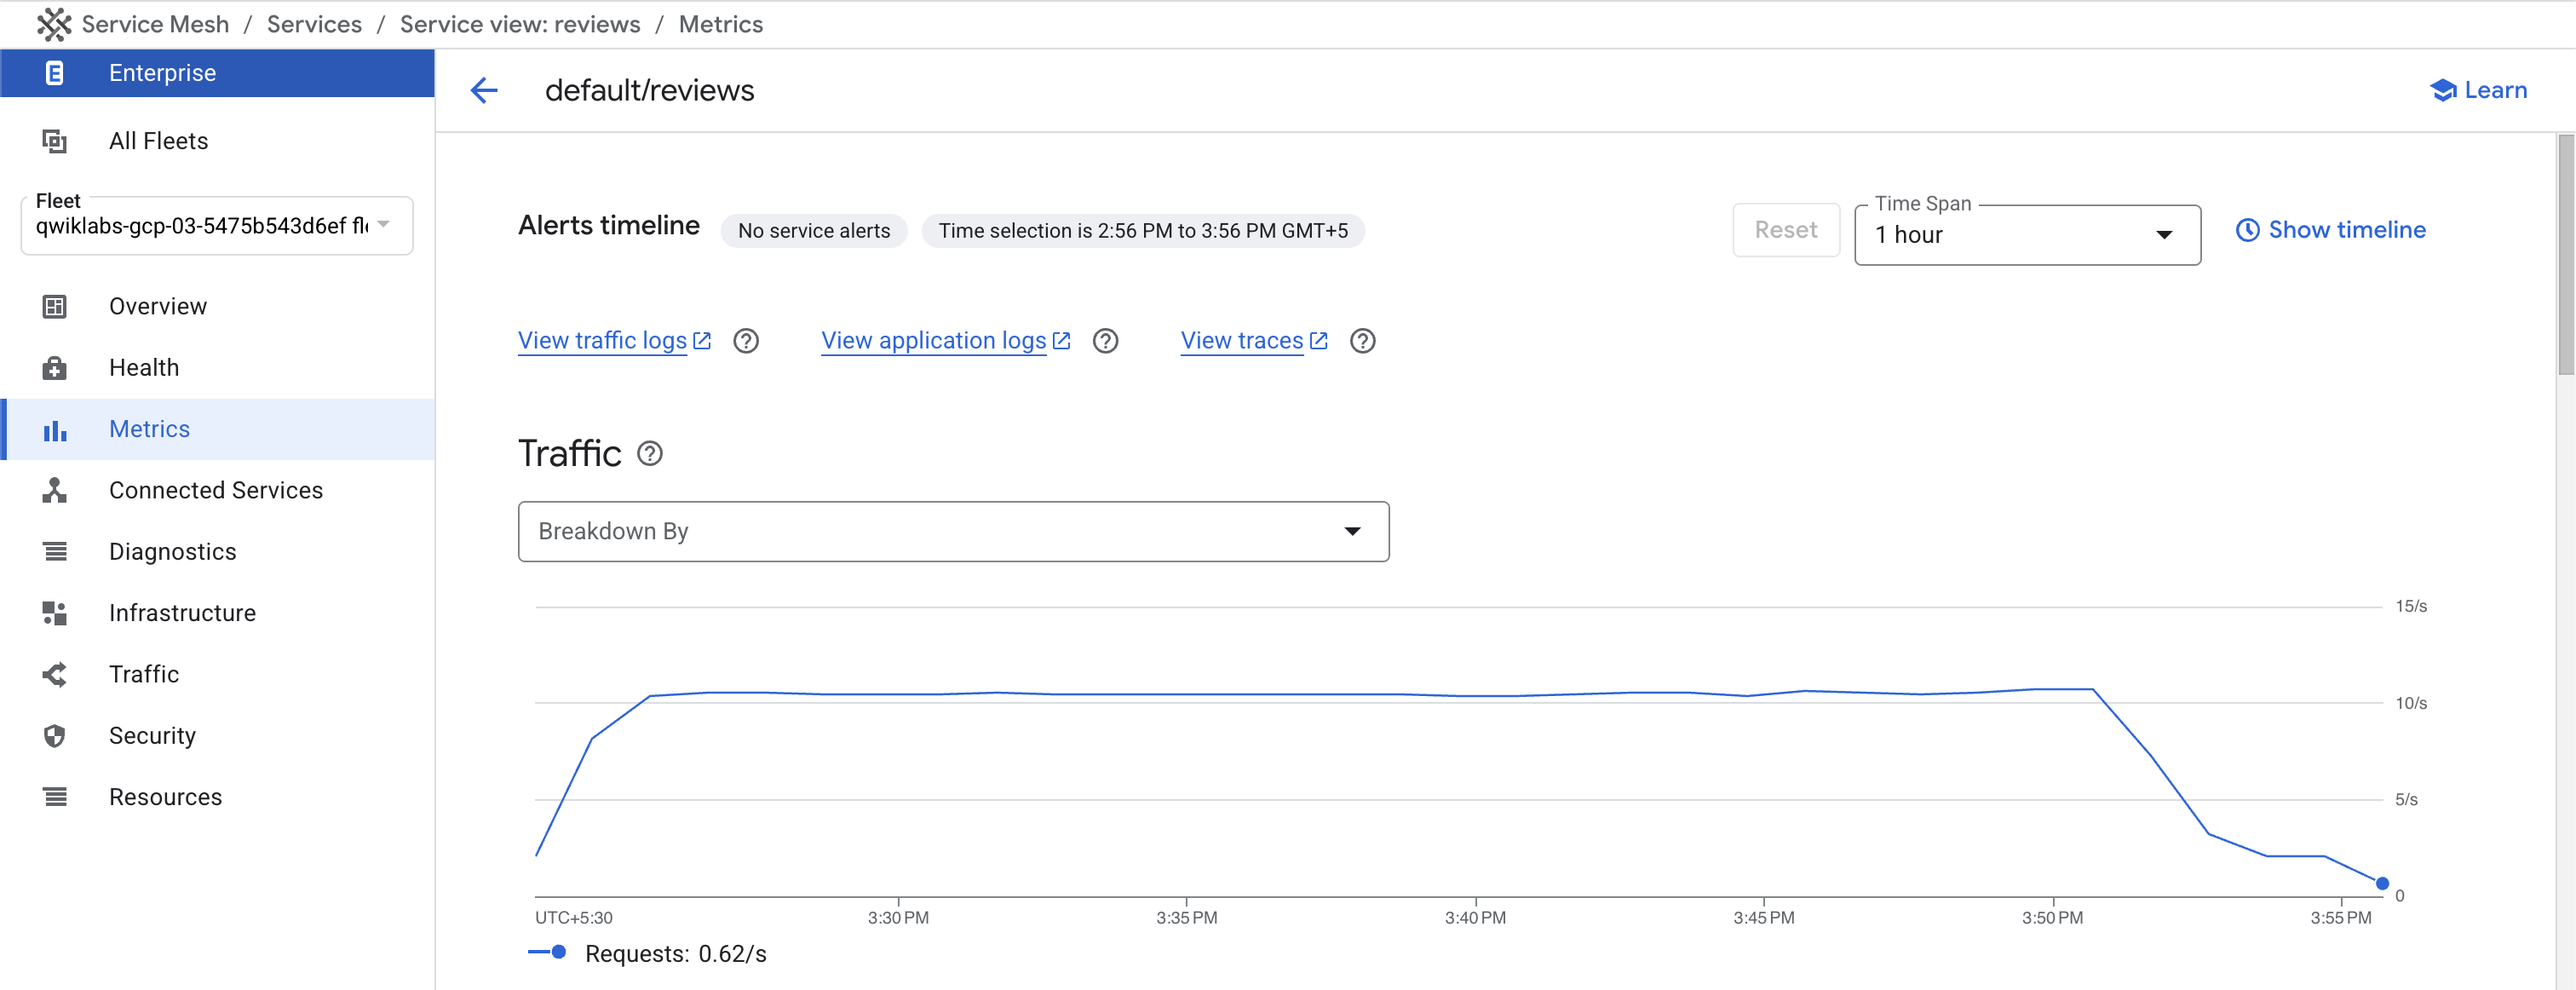
Wait for 1-2 minutes, then return to the Service Mesh dashboard by
navigating to Navigation menu > Kubernetes Engine > Service Mesh > reviews > Infrastructure.
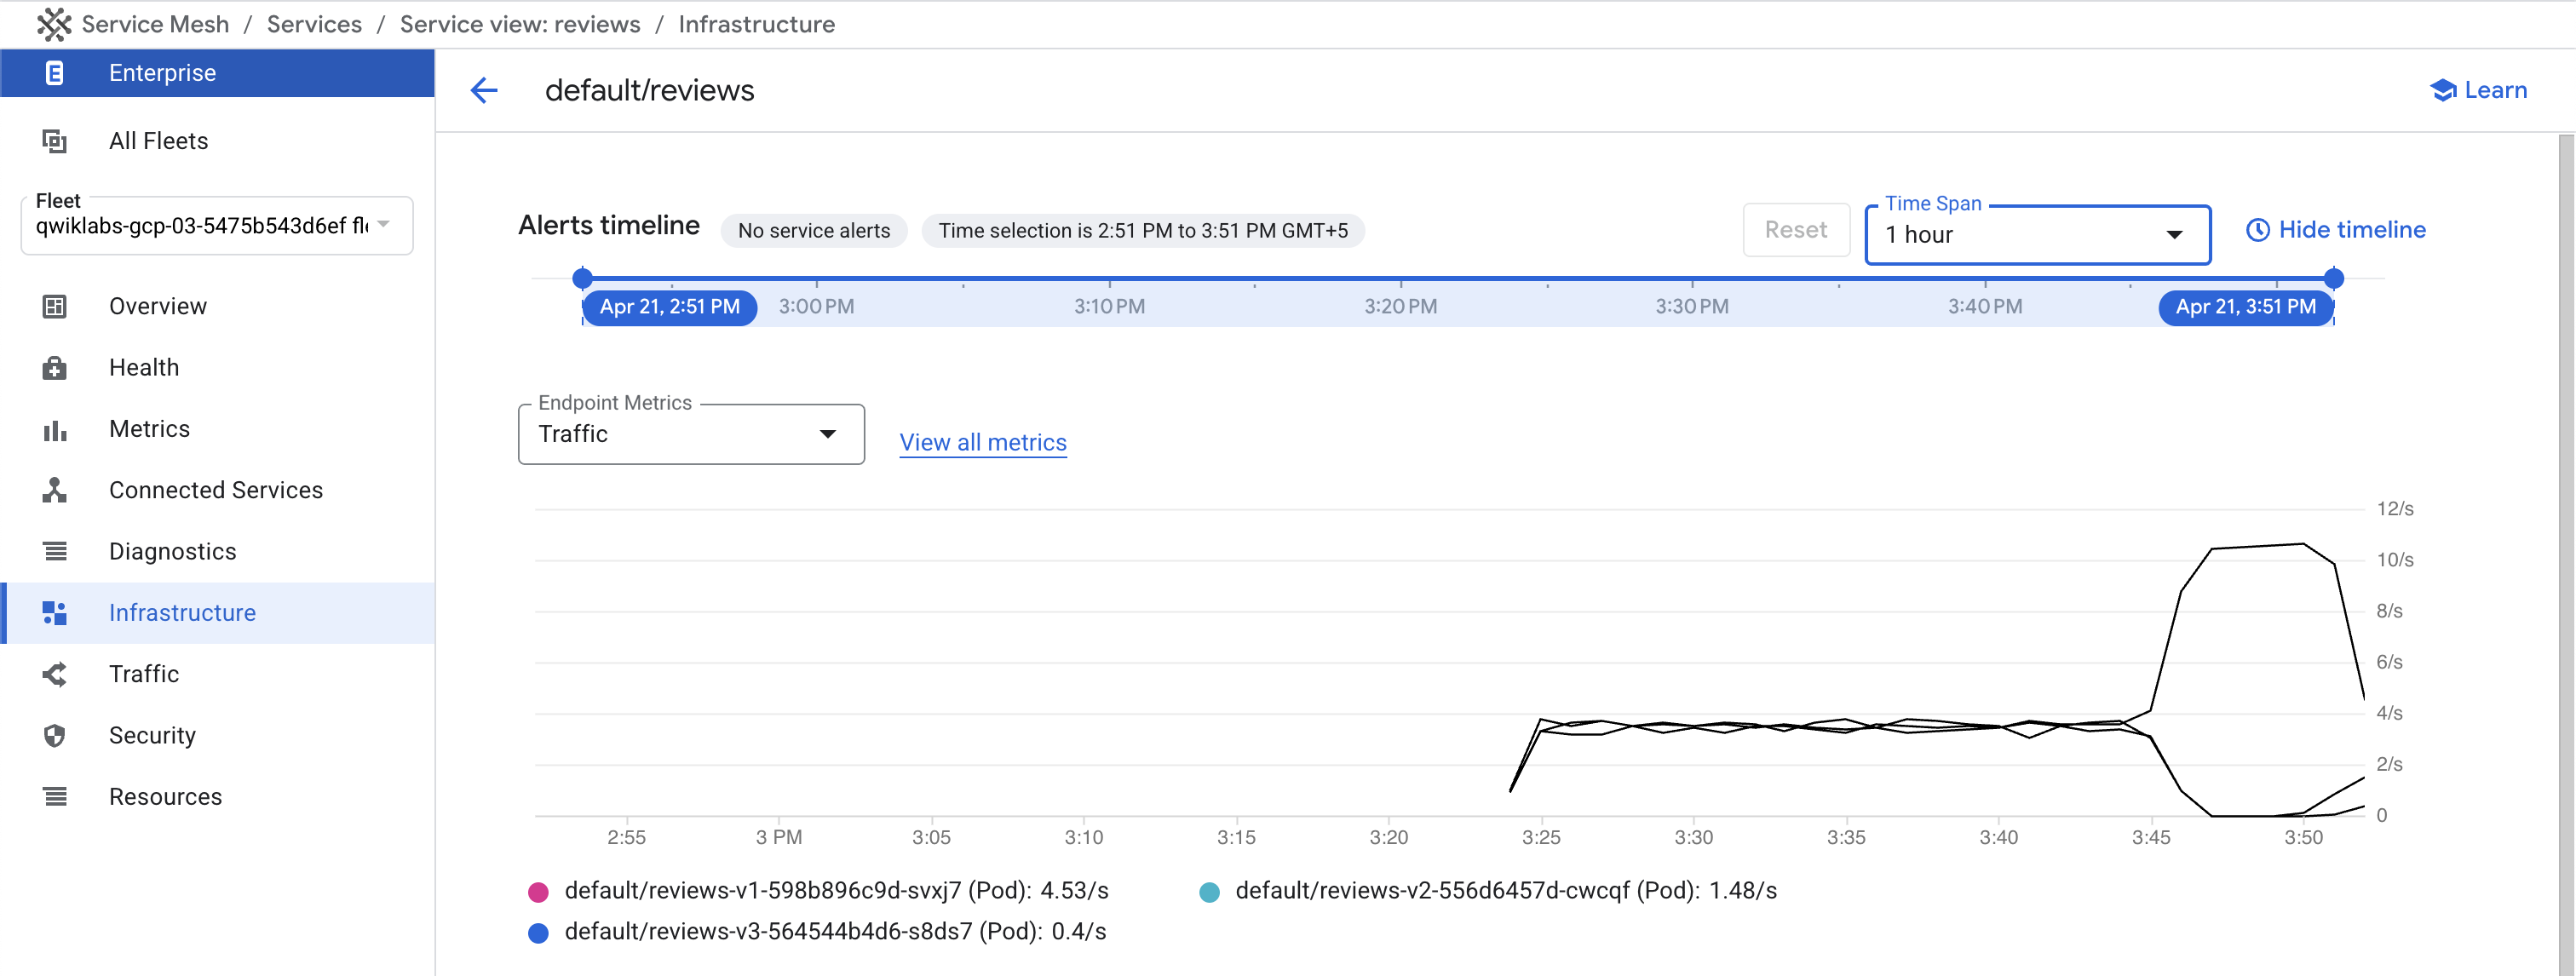
Select SHOW TIMELINE and focus the chart on the last 5 minutes of
traffic. You should see that the traffic goes from being evenly distributed
to being routed to the version 1 workload 100% of the time.
You can also see the new traffic distribution by looking at the Traffic
tab or the topology view - though these both take a couple extra minutes
before the data is shown.
Click Check my progress to verify the objective.
Apply virtual services.
Task 7. Route to a specific version of a service based on user identity
In this task, you change the route configuration so that all traffic from a
specific user is routed to a specific service version. In this case, all traffic
from user jason will be routed to the service reviews:v2, the version that
includes the star ratings feature.
Note: Istio does not have any special, built-in
understanding of user identity. This example is enabled by the fact that the
productpage service adds a custom end-user header to all outbound HTTP requests
to the reviews service.
Review the configuration found in
Github. This configuration defines 1 VirtualService resource.
Apply the configuration with the following command in Cloud Shell:
wget https://raw.githubusercontent.com/istio/istio/master/samples/bookinfo/networking/virtual-service-reviews-test-v2.yaml
sed -i 's#istio\.io/v1#istio\.io/v1alpha3#g' virtual-service-reviews-test-v2.yaml
kubectl apply -f virtual-service-reviews-test-v2.yaml
Wait for 1-2 minutes, refresh the page showing the Infrastructure telemetry,
adjust the timeline to show the current time, and then check in the Service
Mesh Dashboard and you should see that roughly 85% of requests over the last few
minutes have gone to version 1 because they are unauthenticated. About 15%
have gone to version two because they are made as jason.
In Cloud Shell, cancel the siege session by typing Ctrl+c.
Clean up from this task by removing the application virtual services:
You can wait for 1-2 minutes, refresh the Service Mesh dashboard,
adjust the timeline to show the current time, and confirm that traffic is
once again evenly balanced across versions.
Click Check my progress to verify the objective.
User-Specific Routing Configuration.
Task 8. Shift traffic gradually from one version of a microservice to another
In this task, you gradually migrate traffic from one version of a microservice
to another. For example, you might use this approach to migrate traffic from an
older version to a new version.
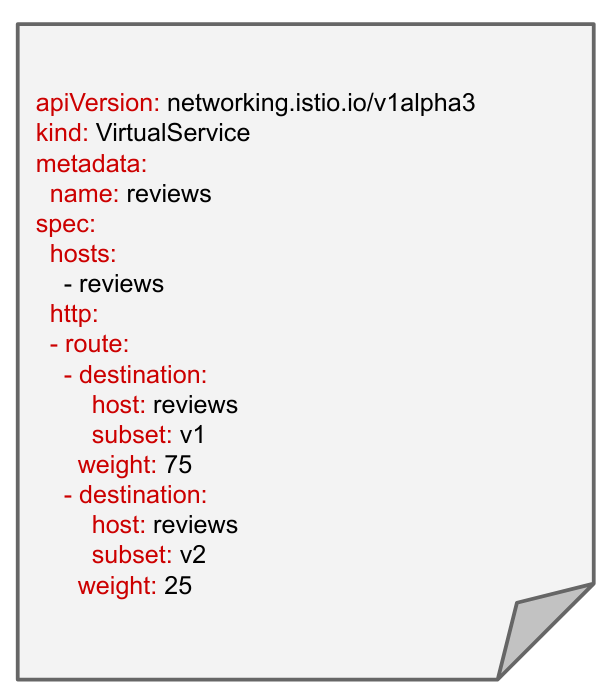
You will send 50% of traffic to reviews:v1 and 50% to reviews:v3. Then, you will
complete the migration by sending 100% of traffic to reviews:v3.
In Service Mesh, you accomplish this goal by configuring a sequence of
rules that route a percentage of traffic to one service or another.
In Cloud Shell, route all traffic to the v1 version of each service:
kubectl apply -f virtual-service-all-v1.yaml
Output:
virtualservice.networking.istio.io/productpage created
virtualservice.networking.istio.io/reviews created
virtualservice.networking.istio.io/ratings created
virtualservice.networking.istio.io/details created
Browse again to /productpage of the Bookinfo application and confirm
that you do not see stars with reviews. All traffic is being routed
to the v1 backend.
Wait 1 minute, then refresh the Service Mesh dashboard, adjust the
timeline to show the current time, and confirm that all traffic has been
routed to the v1 backend.
Transfer 50% of the traffic from reviews:v1 to reviews:v3.
wget https://raw.githubusercontent.com/istio/istio/master/samples/bookinfo/networking/virtual-service-reviews-50-v3.yaml
sed -i 's#istio\.io/v1#istio\.io/v1alpha3#g' virtual-service-reviews-50-v3.yaml
kubectl apply -f virtual-service-reviews-50-v3.yaml
Browse again to /productpage of the Bookinfo application.
Refresh your view to issue multiple requests.
Notice a roughly even distribution of reviews with no stars, from v1,
and reviews with red stars, from v3, that accesses the ratings service.
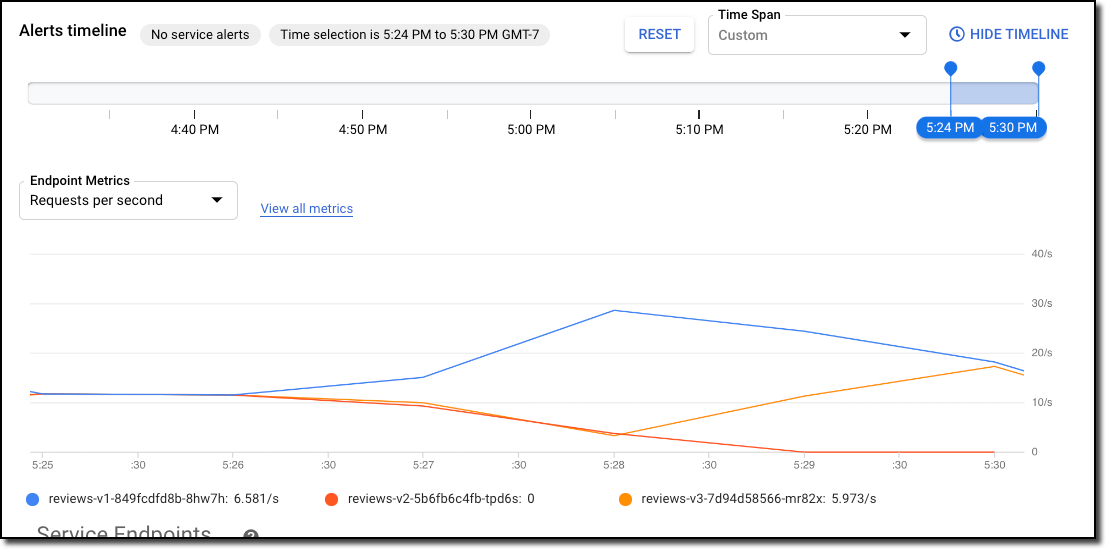
Wait 1 minute, then refresh the page, adjust the timeline to show the,
current time, and confirm in the Service Mesh dashboard that traffic
to the reviews service is split 50/50 between v1 and v3.
Transfer the remaining 50% of traffic to reviews:v3.
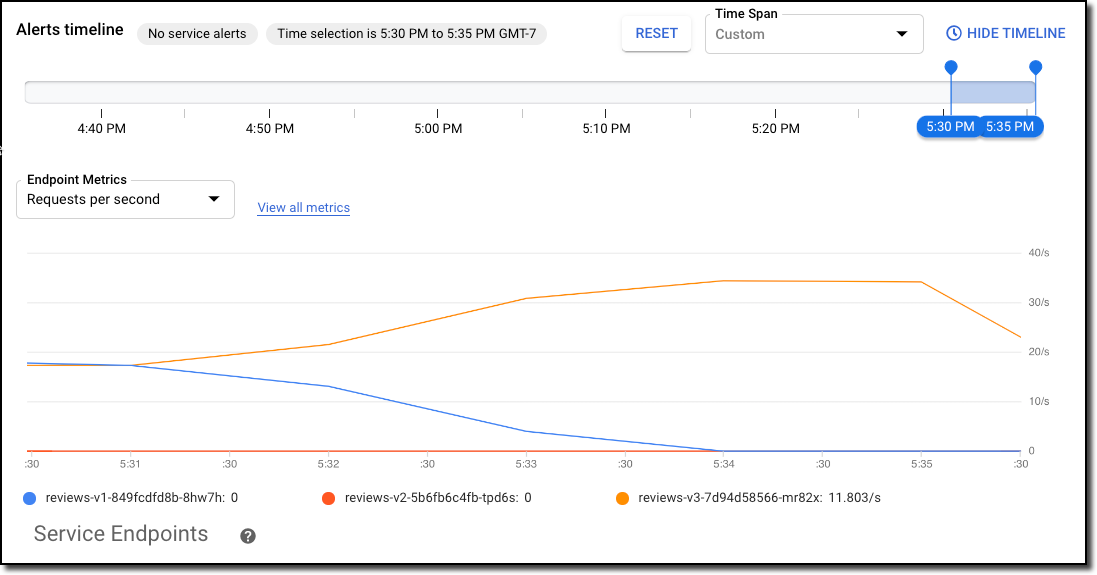
Assuming you decide that the reviews:v3 service is stable, route 100% of
the traffic to reviews:v3 by applying this virtual service:
wget https://raw.githubusercontent.com/istio/istio/master/samples/bookinfo/networking//virtual-service-reviews-v3.yaml
sed -i 's#istio\.io/v1#istio\.io/v1alpha3#g' virtual-service-reviews-v3.yaml
kubectl apply -f virtual-service-reviews-v3.yaml
In this task you migrated traffic from an old version to a new version of the
reviews service using Service Mesh weighted routing feature. This is very
different than doing version migration using the deployment features of
container orchestration platforms, which use instance scaling to manage the
traffic.
Click Check my progress to verify the objective.
Migrate traffic from v1 to v3.
Task 9. Add timeouts to avoid waiting indefinitely for service replies
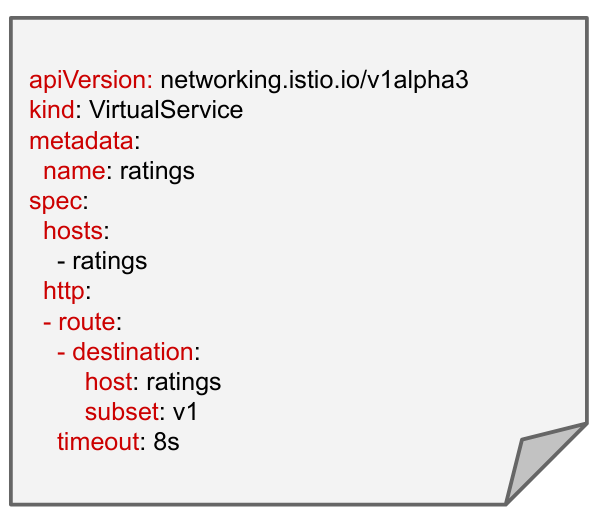
A timeout for HTTP requests can be specified using the timeout field of the
route rule. By default, the request timeout is disabled, but in this task
you override the reviews service timeout to 1 second. To see its effect,
however, you also introduce an artificial 2 second delay in calls to the
ratings service. We will start by introducing the delay.
In Cloud Shell, route all traffic to the v1 version of each service:
kubectl apply -f virtual-service-all-v1.yaml
Output:
virtualservice.networking.istio.io/productpage created
virtualservice.networking.istio.io/reviews created
virtualservice.networking.istio.io/ratings created
virtualservice.networking.istio.io/details created
Route requests to v2 of the reviews service, i.e., a version that calls the
ratings service:
Open the Bookinfo URL http://$GATEWAY_URL/productpage in your browser. You
should see the Bookinfo application working normally (with ratings stars
displayed), but there is a 2 second delay whenever you refresh the page. (If the Bookinfo application does not work normally, change the delay to 1 second and try again.)
Navigate to reviews / metrics to see that the latency is spiking to 2 seconds. (If you changed the delay to 1 second, the latency should spike to 1 second.)
Now add a half second request timeout for calls to the reviews service:
You should now see that it returns in about 1 second, instead of 2, and the
reviews are unavailable.
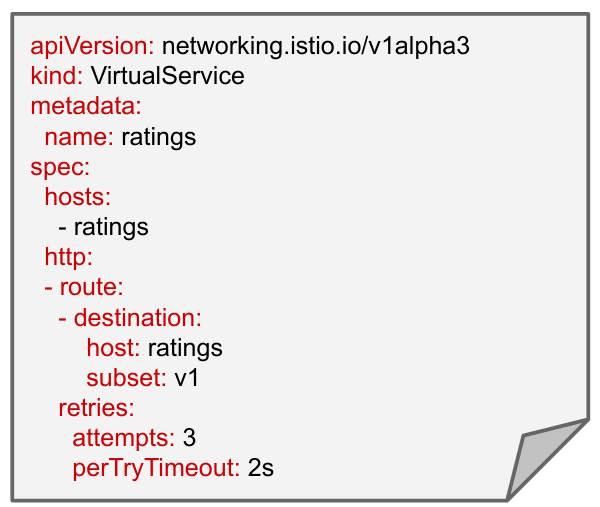
Note: The reason why the response takes 1 second, even though
the timeout is configured at half a second, is because there is a hard-coded
retry in the productpage service, so it calls the timing out reviews service
twice before returning. If you want to change the retry setting, configure
the VirtualService by executing the command shown below.
kubectl apply -f - <<EOF
apiVersion: networking.istio.io/v1alpha3
kind: VirtualService
metadata:
name: productpage
spec:
hosts:
- productpage
http:
- route:
- destination:
host: productpage
subset: v1
retries:
attempts: 1
perTryTimeout: 2s
EOF
Clean up from this exercise, by removing the application virtual services.
In this task, you used Istio to set the request timeout for calls to the
reviews microservice for half a second. By default the request timeout is
disabled. Since the reviews service subsequently calls the ratings service when
handling requests, you used Istio to inject a 2 second delay in calls to
ratings to cause the reviews service to take longer than half a second to
complete and consequently you could see the timeout in action.
You observed that instead of displaying reviews, the Bookinfo product page
(which calls the reviews service to populate the page) displayed the message:
"Sorry, product reviews are currently unavailable for this book". This was the
result of it receiving the timeout error from the reviews service.
Click Check my progress to verify the objective.
Add timeouts for rating service.
Task 10. Add circuit breakers to enhance your microservices' resiliency
This task shows you how to configure circuit breaking for connections,
requests, and outlier detection.
Circuit breaking is an important pattern for creating resilient microservice
applications. Circuit breaking allows you to write applications that limit the
impact of failures, latency spikes, and other undesirable effects of network
peculiarities.
In this task, you will configure circuit breaking rules and then test the
configuration by intentionally “tripping” the circuit breaker.
In Cloud Shell, route all traffic to the v1 version of each service:
kubectl apply -f virtual-service-all-v1.yaml
Output:
virtualservice.networking.istio.io/productpage created
virtualservice.networking.istio.io/reviews created
virtualservice.networking.istio.io/ratings created
virtualservice.networking.istio.io/details created
Create a destination rule to apply circuit breaking settings when calling
the productpage service:
In Cloud Shell, go to the first tab and run Ctrl+c to stop the siege.
Create a client to send traffic to the productpage service.
The client is a
simple load-testing client called fortio. Fortio lets you control the number
of connections, concurrency, and delays for outgoing HTTP calls. You will use
this client to “trip” the circuit breaker policies you set in the
DestinationRule:
It’s interesting to see that almost all requests made it through! That's
interesting because maxConnections: 1 and http1MaxPendingRequests: 1.
These rules indicate that if you exceed more than one connection and
request concurrently, you should see some failures when the istio-proxy
opens the circuit for further requests and connections.
However, we see
that the istio-proxy does allow for some leeway:
Code 200 : 17 (85.0 %)
Code 503 : 3 (15.0 %)
Bring the number of concurrent connections up to 3:
Now you start to see the expected circuit breaking behavior. Only 36.7% of
the requests succeeded and the rest were trapped by circuit breaking:
Code 200 : 11 (36.7 %)
Code 503 : 19 (63.3 %)
Click Check my progress to verify the objective.
Add circuit breakers.
Review
In this lab, you learned about many different ways to manage and route traffic
for different purposes. You also experimented with adjusting and viewing traffic
shifting for yourself, including some layer 7, application layer, routing,
that looks at request headers.
When you have completed your lab, click End Lab. Google Skills removes the resources you’ve used and cleans the account for you.
You will be given an opportunity to rate the lab experience. Select the applicable number of stars, type a comment, and then click Submit.
The number of stars indicates the following:
1 star = Very dissatisfied
2 stars = Dissatisfied
3 stars = Neutral
4 stars = Satisfied
5 stars = Very satisfied
You can close the dialog box if you don't want to provide feedback.
For feedback, suggestions, or corrections, please use the Support tab.
Copyright 2026 Google LLC All rights reserved. Google and the Google logo are trademarks of Google LLC. All other company and product names may be trademarks of the respective companies with which they are associated.
Lab membuat project dan resource Google Cloud untuk jangka waktu tertentu
Lab memiliki batas waktu dan tidak memiliki fitur jeda. Jika lab diakhiri, Anda harus memulainya lagi dari awal.
Di kiri atas layar, klik Start lab untuk memulai
Gunakan penjelajahan rahasia
Salin Nama Pengguna dan Sandi yang diberikan untuk lab tersebut
Klik Open console dalam mode pribadi
Login ke Konsol
Login menggunakan kredensial lab Anda. Menggunakan kredensial lain mungkin menyebabkan error atau dikenai biaya.
Setujui persyaratan, dan lewati halaman resource pemulihan
Jangan klik End lab kecuali jika Anda sudah menyelesaikan lab atau ingin mengulanginya, karena tindakan ini akan menghapus pekerjaan Anda dan menghapus project
Konten ini tidak tersedia untuk saat ini
Kami akan memberi tahu Anda melalui email saat konten tersedia
Bagus!
Kami akan menghubungi Anda melalui email saat konten tersedia
Satu lab dalam satu waktu
Konfirmasi untuk mengakhiri semua lab yang ada dan memulai lab ini
Gunakan penjelajahan rahasia untuk menjalankan lab
Menggunakan jendela Samaran atau browser pribadi adalah cara terbaik untuk menjalankan lab ini. Langkah ini akan mencegah konflik antara akun pribadi Anda dan akun Siswa, yang dapat menyebabkan tagihan ekstra pada akun pribadi Anda.
Architecting Hybrid Infrastructure with CSM: Configure fine-grained traffic control for routing to services.