Vertex AI is now Gemini Enterprise Agent Platform! We are currently updating our content to reflect this change. Please bear with us if you encounter naming inconsistencies during this transition.
Terapkan keterampilan Anda di Konsol Google Cloud
Petunjuk dan persyaratan penyiapan lab
Lindungi akun dan progres Anda. Selalu gunakan jendela browser pribadi dan kredensial lab untuk menjalankan lab ini.
Tour Google Skills and Google Cloud [ACE]
Lab
30 menit
universal_currency_alt
5 Kredit
show_chart
Pengantar
info
Lab ini mungkin menggabungkan alat AI untuk mendukung pembelajaran Anda.
Konten ini belum dioptimalkan untuk perangkat seluler.
Untuk pengalaman terbaik, kunjungi kami dengan komputer desktop menggunakan link yang dikirim melalui email.
Overview
Google Cloud is a suite of cloud services hosted on Google's infrastructure. From computing and storage, to data analytics, machine learning, and networking, Google Cloud offers a wide variety of services and APIs that can be integrated with any cloud-computing application or project—be it personal or enterprise-grade.
In this introductory-level lab, you will take your first steps with Google Cloud by getting hands-on practice with the Google Cloud console—an in-browser UI that lets you access and manage Google Cloud services. You will identify key features of Google Cloud and also learn the ins and outs of the Google Skills environment. If you are new to cloud computing or looking for an overview of Google Cloud and Google Skills, you are in the right place. Read on to learn about the specifics of this lab and areas that you will get hands-on practice with.
What you will learn
In this lab, you will do the following:
Learn about the Google Skills platform and identify key features of a lab environment.
Learn about (and possibly purchase) Google Skills credits and launch an instance of a lab.
Learn how to access the Google Cloud console with specific credentials.
Learn about Google Cloud projects and identify common misconceptions that surround them.
Learn how to use the Google Cloud navigation menu to identify types of Google Cloud services.
Learn about primitive roles and use the Cloud IAM service to inspect actions available to specific users.
Learn about Cloud Shell and run commands that use the gcloud toolkit.
Learn about the API library and examine its chief features.
Use tools that are pre-installed in Cloud Shell and run commands like touch, nano, and cat to create, edit, and output the content of files.
Prerequisites
This is an introductory level lab and the first lab you should take if you're unfamiliar with Google Cloud or Google Skills. If you are already experienced with Google Skills and the Google Cloud console, check out the following labs (if you decide to take one, make sure you end your lab now):
Once you're ready, scroll down to get your lab set up.
Lab fundamentals
Features and components
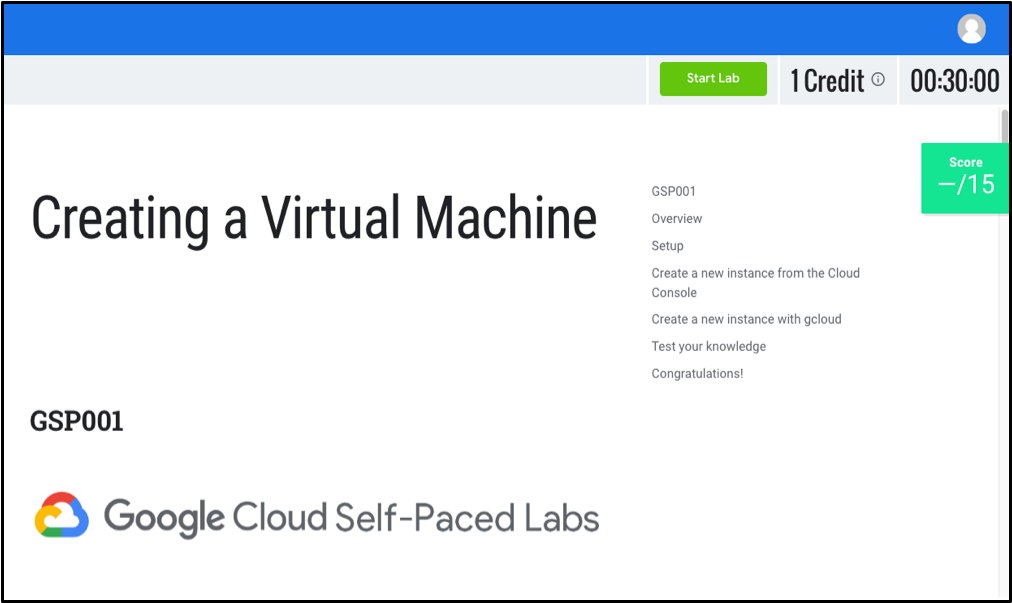
Regardless of topic or expertise level, all labs share a common interface. This lab that you're taking should look quite similar to the following:
Note: You are not taking the "Creating a Virtual Machine" lab show above, it used merely as an example to highlight common features across Google Skills.
Read the following lab component definitions and then locate them in the top-right corner of the interface.
Start Lab (button)
Clicking this will create a temporary Google Cloud environment with all the necessary services and credentials enabled so you can get dive in and get hands-on practice with the lab's material. Once clicked, you will start a countdown timer that gives you a set amount of time to complete the lab's steps. Once the timer hits 00:00:00, your lab environment and temporary credentials will be deleted.
Credit
The price of a lab. 1 Credit is usually equivalent to 1 US dollar (the more credits you purchase, the bigger the discount you receive.) Introductory level labs (like this one) cost 1 credit, fundamental level cost 5, advanced 7, and expert cost 9 credits. The more specialized labs cost more because they involve heavier computing tasks and demand more Google Cloud resources.
Time
Specifies the amount of time you have to complete a lab. As mentioned earlier, once you click the "Start Lab" button the timer will count down until it reaches 00:00:00. When it does, your temporary Google Cloud environment and resources will be deleted. Ample time is given to complete a lab, but make sure you don't work on something else while a lab is running—you risk losing all of your hard work!
Score
Most, but not all labs include a score. This feature is called "activity tracking" and ensures you complete specified steps in a lab. To pass a lab with activity tracking, you need to complete all the steps in order (only then will you receive completion credit.)
Purchasing credits
If you haven't already, click on the Start Lab button now. If you have an "Access Code" (a coupon that covers the cost of a single lab regardless of expertise level) or have already purchased credits, you can skip down to the next section "Starting a Lab". Otherwise, click BUY CREDITS. This will take you to a new page that offers different credit packages.
Enter in the amount of credits you want to buy and click Pay with Credit Card. This will take you to a secure panel, prompting you to enter in your credit card information.
Enter in your credit card information and click Pay. You're all set to take this and any other labs! You can always buy more credits by clicking on the profile icon in the top right corner and selecting "Buy Credits". You will also be prompted to purchase more if you run out and try to start a new lab.
Starting a Lab
Now that we understand the key features and components of a lab, click on the Start Lab button in the top-right corner. If you have an Access Code, enter it in now and click Launch with an Access code. Otherwise, click Launch with 1 Credit.
It may take a moment for the Google Cloud environment and credentials to spin up—please be patient. Once the timer in the top right corner starts ticking and the Start Lab button turns into a red End Lab button, everything is in place and you're all set to log in to the Google Cloud Console.
Make sure that you do not click the End Lab button until you have completed all the tasks required of you. Once clicked, your temporary credentials will be invalidated and you will no longer be able to access the work you've done throughout the lab. Only when you reach the end and have made sure that you've completed all the necessary steps will you click the End Lab button. You must click this button when you finish—if you do not, you won't be able to take another lab afterwards (Google Skills has protections in place that prevent concurrent enrollment.)
Test your understanding
Answer the following multiple choice questions to reinforce your understanding of the concepts we've covered so far.
Accessing the Google Cloud console
Key Terms
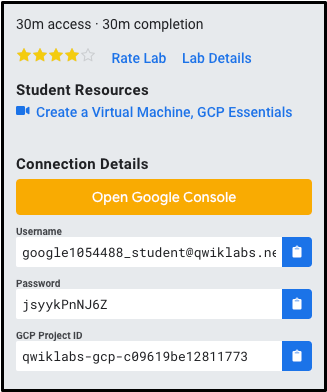
Now that your lab instance is up and running, take a look at the Connection Details panel on the left-hand side. It should be populated with an Open Google console button and Username, Password, and Google Cloud Project ID fields.
Before we go any further, let's examine each of these components.
Open Google console
This is a button that takes you to the Google Cloud console—the web console and central development hub for Google Cloud. As you start working in Google Cloud, you will be doing the majority of your work from this interface. Most of the Google Cloud labs use the console in some form or another.
Google Cloud Project ID
A Google Cloud Project is an organizing entity for your Google Cloud resources. It often times contains resources and services—for example, it may hold a pool of virtual machines, a set of databases, and a network that connects them with one another. Projects also contain settings and permissions, which specify security rules and who has access to what resources.
A Google Cloud Project ID is a unique identifier that is used to link Google Cloud resources and APIs to your specific project. Project IDs are unique across Google Cloud, meaning that there can only be one qwiklabs-gcp-xxx...., which makes it globally identifiable.
Username and Password
These are credentials representing an identity in the Google Cloud Identity and Access Management (IAM) service that has access permissions (a role or roles), which allow you to work with Google Cloud resources in the project you've been allocated. These credentials are temporary, and will only work for the access time of the lab. This means that once the timer hits 0, you will no longer be able to access your Google Cloud project with those credentials.
Signing in to Google Cloud
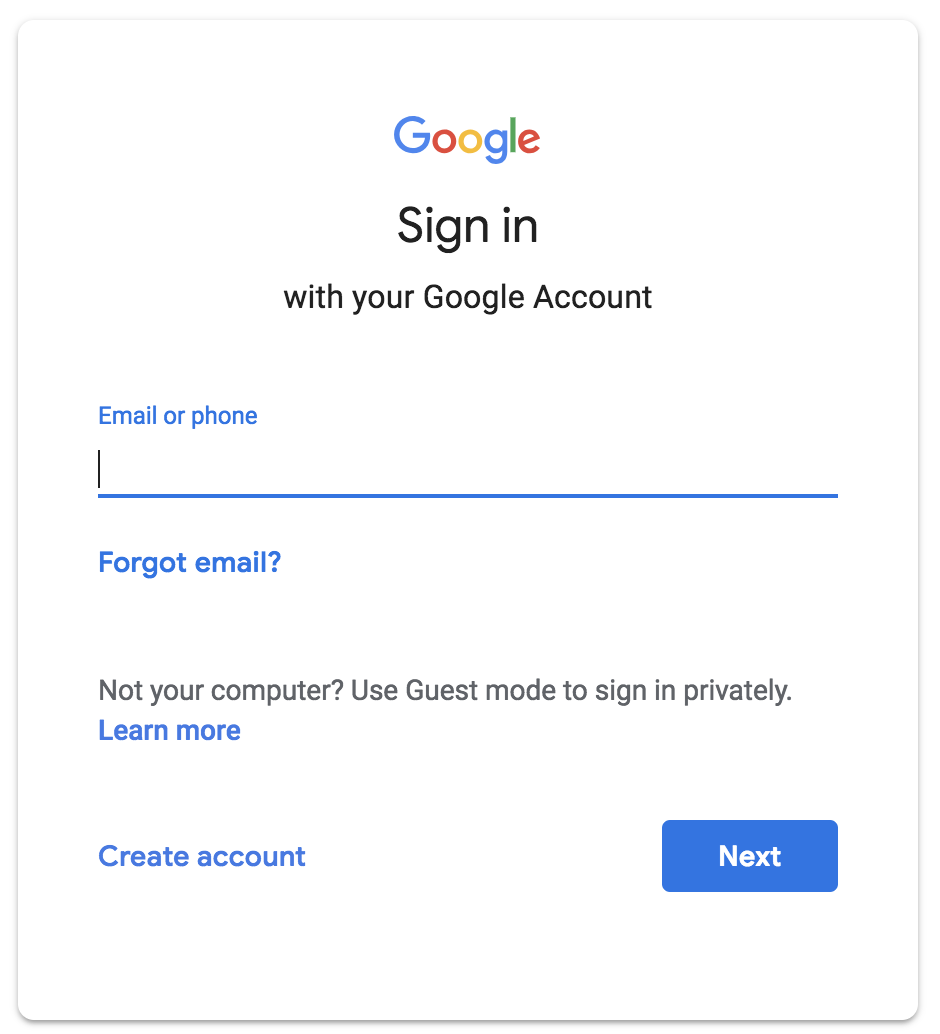
Now that you have a better understanding of the Connection Details panel, let's use the details it contains to sign in to the Google Cloud console. Click on the Open Google Console button. This will open the Google Cloud sign in page in a new browser tab.
You should now be on a page that resembles the following:
If you've ever signed in to a Google application like Gmail, this page should look familiar. To sign in to the console, copy the Username from the Connection Details and paste it in to the "Email or phone" field and hit enter.
Wait! Make sure that you used the googlexxxxxx_student@qwiklabs.net email to sign in, NOT your personal or company email address!
Go back and copy the Password from the provisioned credentials on the Google Skills lab page and paste it in to the Google Cloud sign in "Password" field and hit enter.
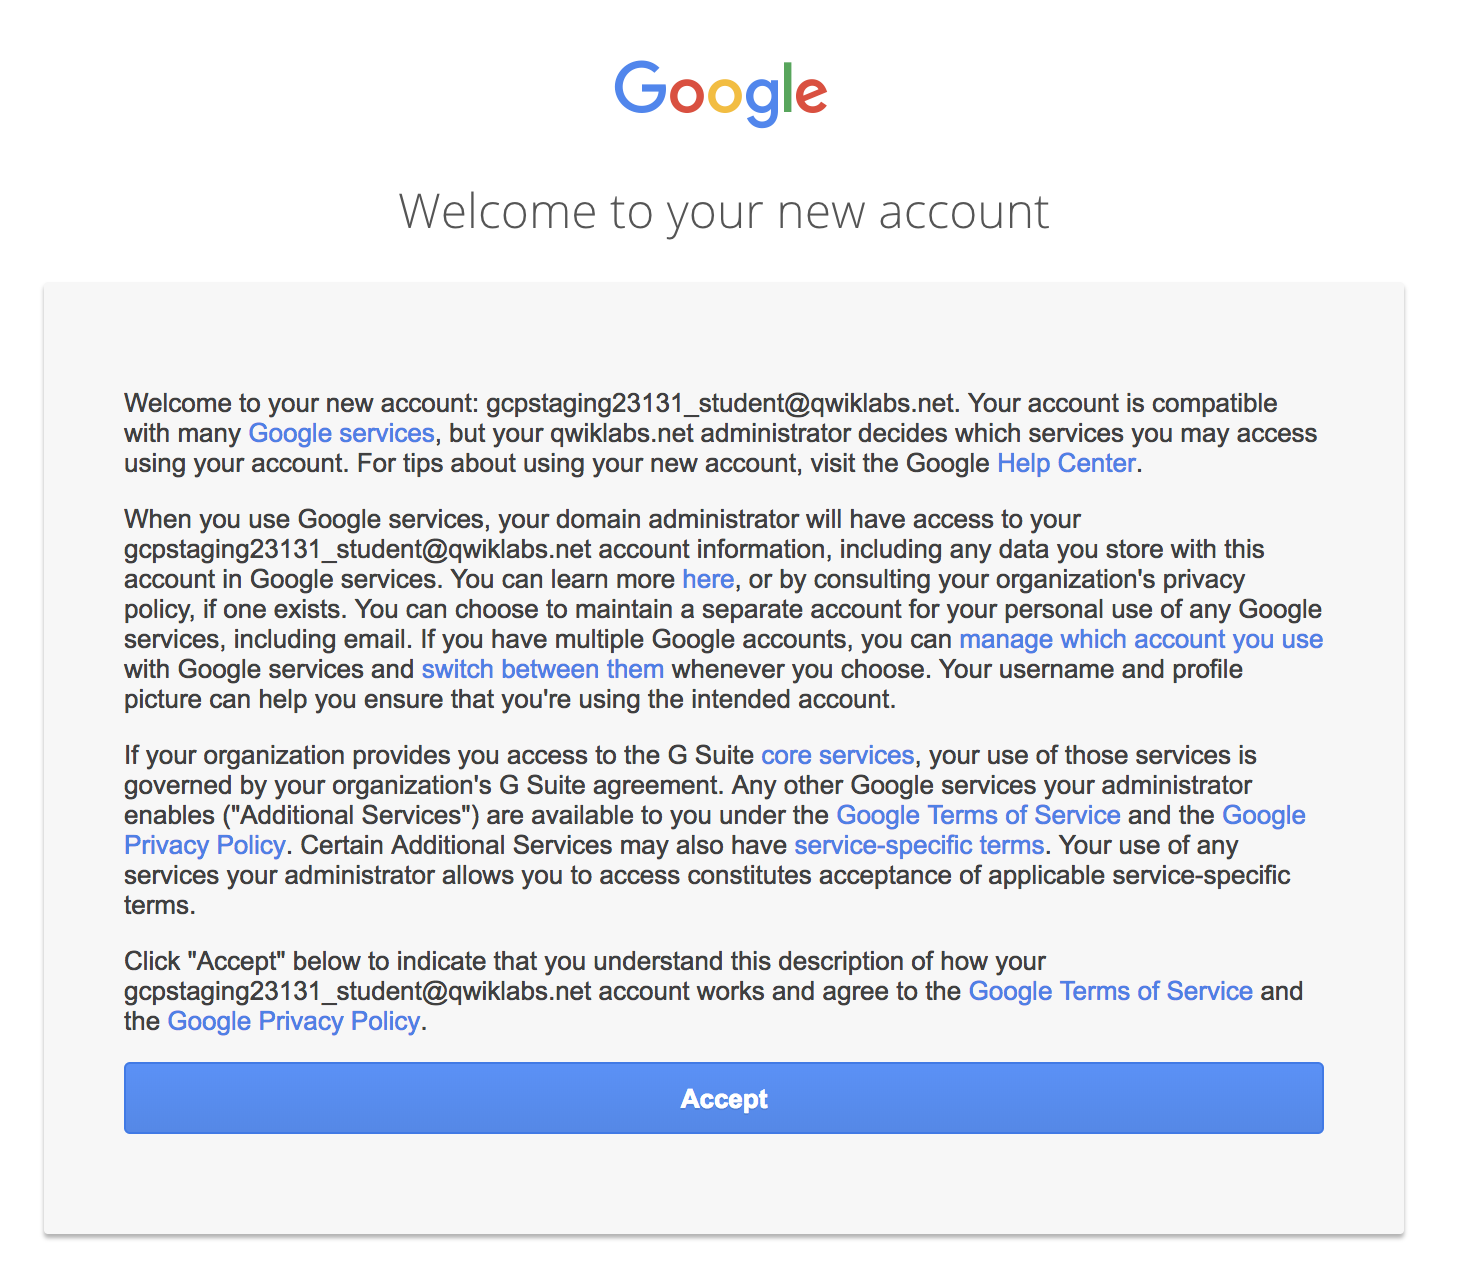
If you successfully logged in, your page should resemble the following:
Go ahead and click Accept to indicate your acknowledgment of Google's terms of service and privacy policy. You will then be brought to a "Protect your account" page. Since this is a temporary account, don't worry about updating recovery phone numbers or emails. Click Done.
You will now be brought to the "Updates to Terms of Service" page—for email updates regarding future announcements check the No box. Check the Yes box to agree to the Google Cloud's terms of service.
And just like that, you've successfully accessed the Google Cloud Console with your Google Skills credentials! Your page should now resemble the following:
Test your understanding
Answer the following multiple choice questions to reinforce your understanding of the concepts we've covered so far.
Now that we're signed in to our Google Cloud console and understand the basics of our credentials, let's learn a little bit more about Google Cloud projects.
Projects in the Google Cloud console
We touched on Google Cloud projects earlier when we examined the components of the "Connection Details" panel. Here's the definition once again:
A Google Cloud Project is an organizing entity for your Google Cloud resources. It often times contains resources and services—for example, it may hold a pool of virtual machines, a set of databases, and a network that connects them with one another. Projects also contain settings and permissions, which specify security rules and who has access to what resources.
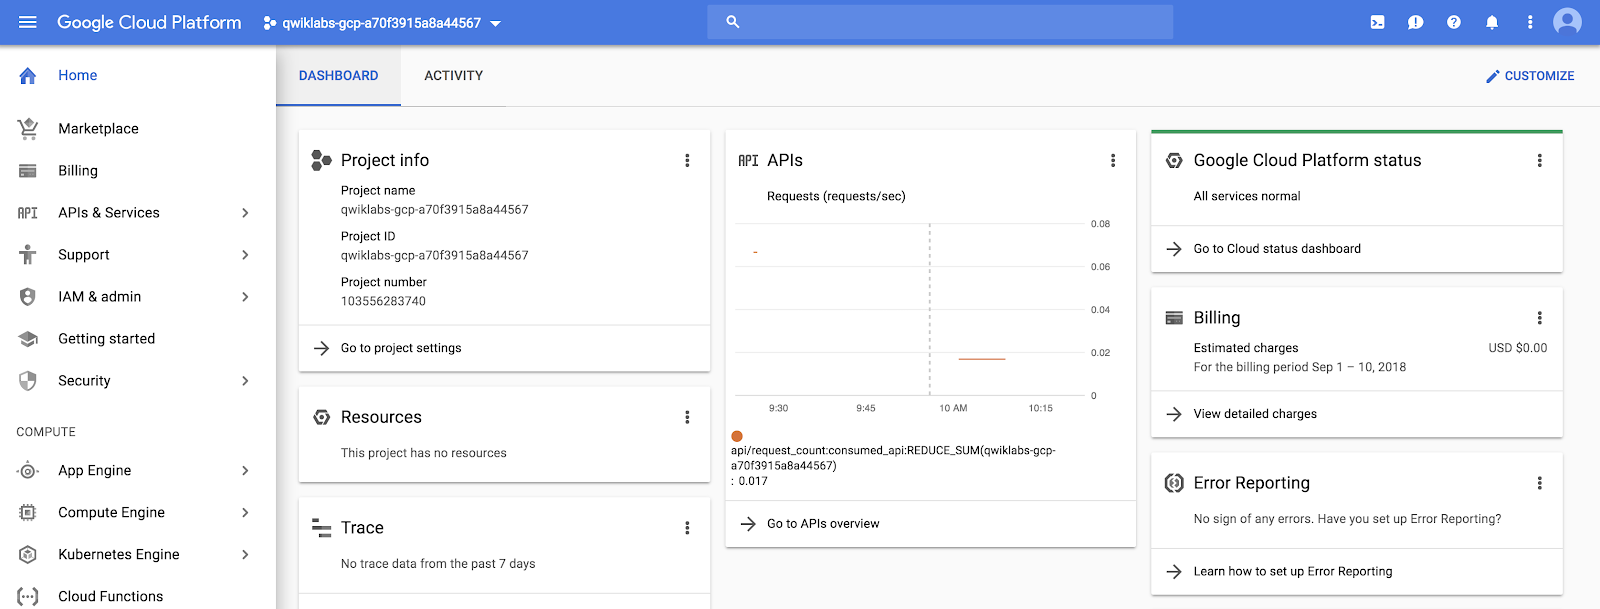
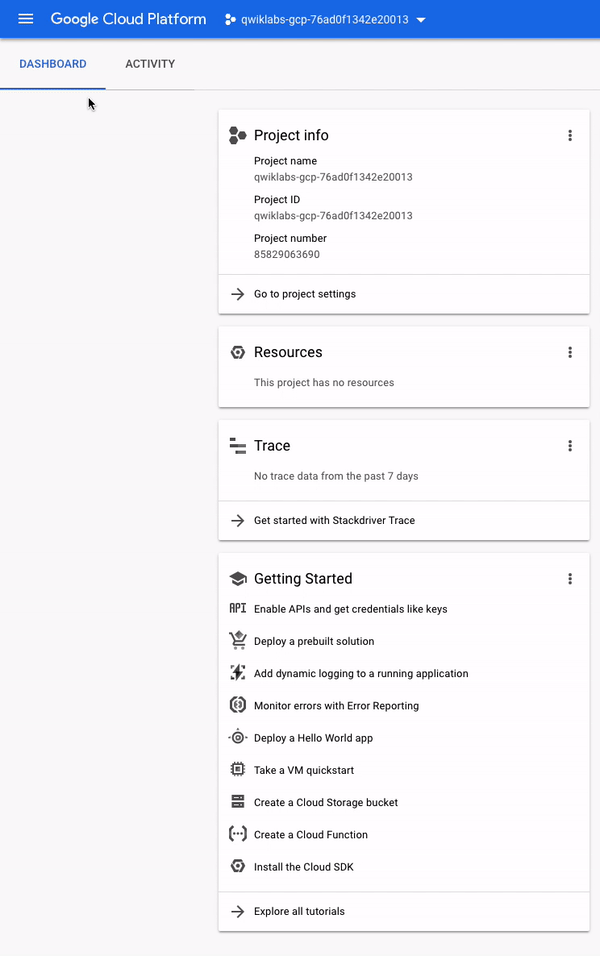
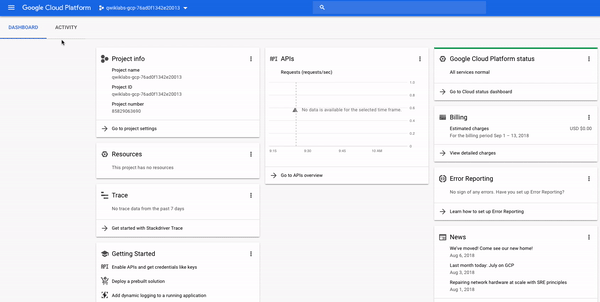
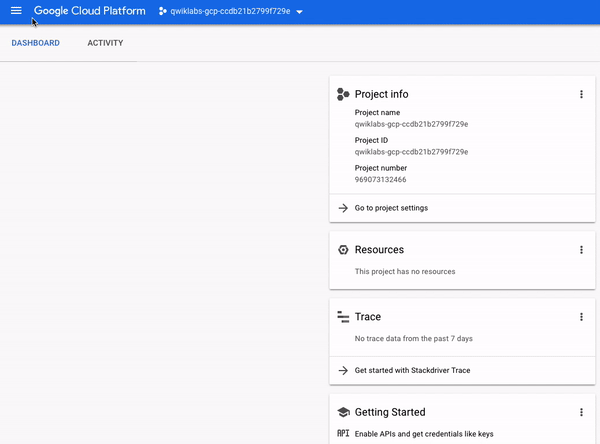
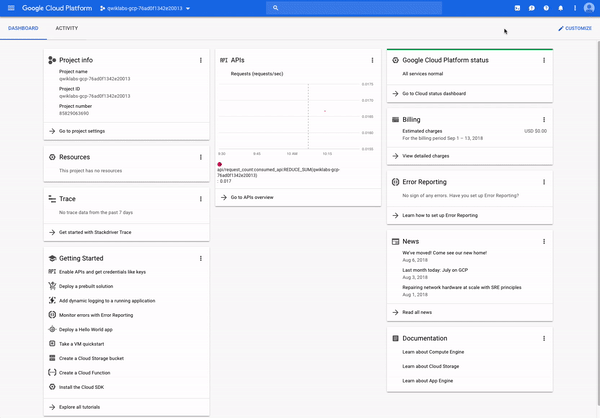
If you look in the top-left side of the console, you will see a panel called Project info which should resemble the following:
As you see, your project has a name, ID, and number. These identifiers are frequently used when interacting with Google Cloud services. You are working out of one project so you can get practice with a specific service or feature of Google Cloud.
You probably haven't noticed it, but you actually have access to more than one Google Cloud project. In fact, in some labs you may be provisioned more than one project to accomplish the tasks assigned. If you click on the drop-down menu with your project name and select ALL, you will see that there is a "Qwiklabs Resources" project visible as well:
It's not uncommon for large enterprises or experienced users of Google Cloud to have dozens to thousands of Google Cloud projects. Organizations use Google Cloud in different ways, so projects are a good way to separate cloud-computing services (by team or product for example.)
"Qwiklabs Resources" is a project that contains files, datasets, and machine images for certain labs and can be accessed from every Google Skills lab environment. It's important to note that "Qwiklabs Resources" is shared (read only) with all lab users, meaning you won't be able to delete or modify it.
The Google Cloud project that you are working out of and whose name resembles qwiklabs-gcp-xxx... is temporary, meaning the project and everything it contains will be deleted once the lab ends. Whenever you start a new lab, you will be given access to one or more new Google Cloud project(s), and there (not "Qwiklabs Resources") is where you will run all of the lab steps.
Test your understanding
Answer the following multiple choice questions to reinforce your understanding of the concepts we've covered so far.
Navigation Menu and Services
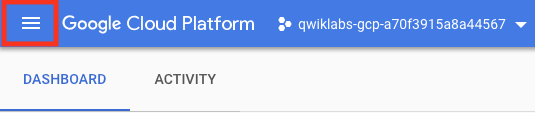
In the top-left corner, you will notice a three-line icon that resembles the following:
Clicking on this will reveal (or hide) a navigation menu that points to GC's core services. If the menu isn't exposed, click on the icon now and scroll through to see the types of services offered:
The navigation menu is an important component of the GC console—it offers quick access to the platform's services and also outlines its offerings. If you scroll through the menu, you will see that there are seven categories of GC services:
Compute: houses a variety of machine types that support any type of workload. The different computing options let you decide how involved you want to be with operational details and infrastructure amongst other things.
Storage: data storage and database options for structured or unstructured, relational or non relational data.
Networking: services that balance application traffic and provision security rules amongst other things.
Cloud Operations: a suite of cross-cloud logging, monitoring, trace, and other service reliability tools.
Tools: services for developers managing deployments and application build pipelines.
Big Data: services that allow you to process and analyze large datasets.
Artificial Intelligence: a suite of APIs that run specific artificial intelligence and machine learning tasks on the Google Cloud.
This link will take you to documentation that covers each of these categories in more depth if you are interested.
Roles and Permissions
Earlier we mentioned that besides cloud computing services, Google Cloud also houses a collection of permissions and roles that define who has access to what resources. We can use the Cloud Identity and Access Management (IAM) service to inspect and modify such roles and permissions.
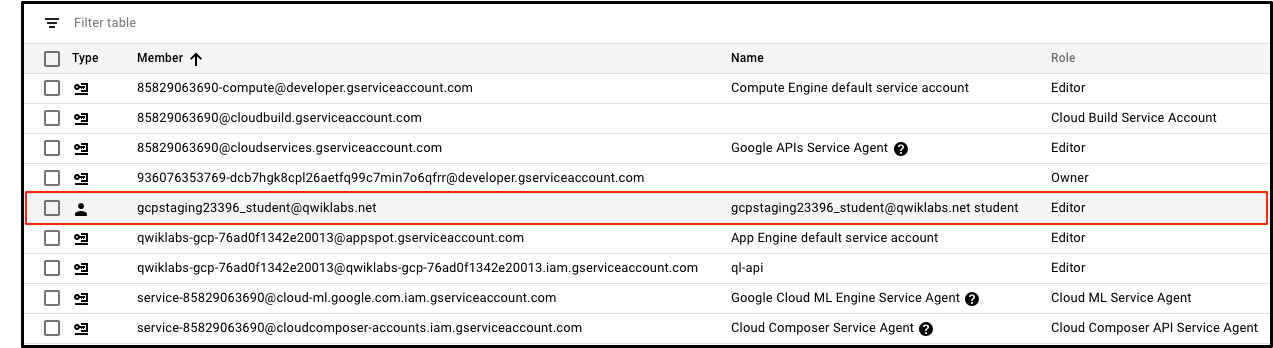
If closed, open up the navigation menu. Then near the top click IAM & admin. This will take you to a page that contains a list of users, which specifies permissions and roles granted to certain accounts. Try to sift through these and find the "@qwiklabs" username you signed in with:
You should find something similar:
The member field is set to "google23396_student@qwiklabs.net" (which matches the username you logged in with) and the name field is set to "google23396_student@qwiklabs.net student". You will see that the Role field is set to "Editor", which is one of three primitive roles offered by Google Cloud. Primitive roles set project-level permissions and unless otherwise specified, they control access and management to all Google Cloud services.
The following table pulls definitions from the roles documentation, which gives a brief overview of viewer, editor, and owner role permissions:
Role Name
Permissions
roles/viewer
Permissions for read-only actions that do not affect state, such as viewing (but not modifying) existing resources or data.
roles/editor
All viewer permissions, plus permissions for actions that modify state, such as changing existing resources.
roles/owner
All editor permissions and permissions for the following actions:
Manage roles and permissions for a project and all resources within the project.
Set up billing for a project.
So as an editor you will be able to create, modify, and delete Google Cloud resources. However, you won't be able to add or delete members from Google Cloud projects.
Test your understanding
Answer the following multiple choice questions to reinforce your understanding of the concepts we've covered so far.
APIs and Services
Google Cloud APIs are a key part of the Google Cloud. Like services, the 200+ APIs in areas that range from business administration to machine learning all easily integrate with Google Cloud projects and applications.
APIs are "Application Programming Interfaces" that you can call directly or via our client libraries. Cloud APIs use resource-oriented design principles as described in our Google API Design Guide.
When Google Skills provisions a new Google Cloud Project for a lab instance, it enables most APIs behind the scenes so you can work on the lab's tasks right away. Be aware that when you create your own Google Cloud projects outside of Google Skills, you will have to enable certain APIs yourself.
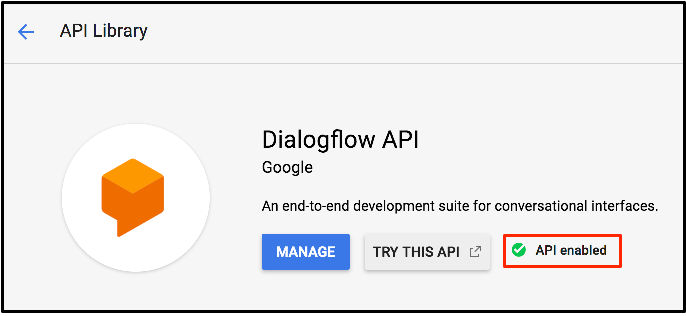
Most Cloud APIs provide you with detailed information on your project’s usage of that API, including traffic levels, error rates, and even latencies, helping you to quickly triage problems with applications that use Google services. You can view this information by opening the navigation menu and clicking on APIs & Services > Library:
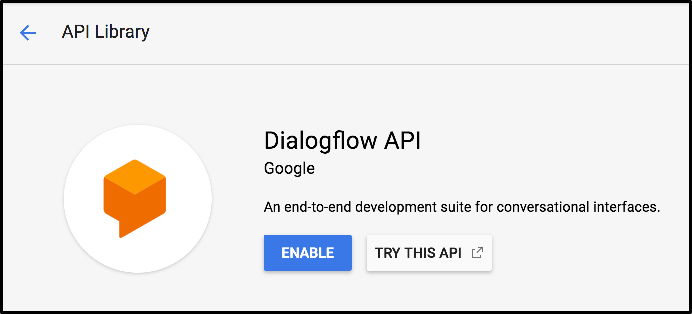
If you take a look at the left-hand menu with the header "CATEGORY", you will see all the different type of categories offered. In the API search bar, type in Dialogflow and select the Dialogflow API. You should now be on the following page:
The Dialogflow API allows you to build rich conversational applications (e.g. for Google Assistant) without having to worry about the underlying machine learning and natural language understanding schema.
Now click Enable. This will take you to a new page, hit the back button in your browser and you will see that the API is now enabled:
Now click on Try this API. This will open a new tab that will reveal the documentation for the Dialogflow API and will specify the methods available to you. Examine some of these and close the tab when you're finished.
If you're interested in learning more about APIs, please see new the new hands-on tool in Google Cloud called APIs Explorer. We've also created a lab APIs Explorer: Qwik Start that will give you hands-on experience with the tool using a simple example.
Open the navigation menu and click Home to go back to main page of the Google Cloud console.
Test your understanding
Answer the following multiple choice question to reinforce your understanding of the concepts we've covered so far.
Cloud Shell
Now that you understand the key features of Google Cloud and the console, you will get hands-on practice with Cloud Shell. Cloud Shell is an in-browser command prompt execution environment that allows you to enter commands at a terminal prompt to manage resources and services in your Google Cloud project.
Cloud Shell lets you run all of your shell commands without leaving the console and comes with pre-installed command line tools.
In the top-right corner of the console, click on the Activate Cloud Shell button and then click Continue if prompted:
A new, black window should appear at the bottom of the console with messages and prompts that resemble the following:
Welcome to Cloud Shell! Type "help" to get started.
Your Cloud Platform project in this session is set to qwiklabs-gcp-76ad0f1342e20013.
Use "gcloud config set project [PROJECT_ID]" to change to a different project.
gcpstaging23396_student@cloudshell:~ (qwiklabs-gcp-76ad0f1342e20013)$
You now have a Cloud Shell session up and running. Copy and paste (or type in) the following into Cloud Shell and hit enter:
gcloud auth list
Click on Authorize.
You should receive see a similar output, where ACTIVE ACCOUNT is set to your Google Cloud IAM identity (gcpstagingxxxxx_student@qwiklabs.net):
Credentialed Accounts
ACTIVE ACCOUNT
* gcpstaging23396_student@qwiklabs.net
To set the active account, run:
$ gcloud config set account `ACCOUNT`
As mentioned earlier, Cloud Shell comes preinstalled with specific command line tools. The main Google Cloud toolkit is gcloud, which is used for many tasks on the platform, like resource management and user authentication.
You just ran a gcloud command—auth list—which lists the credentialed account(s) in your Google Cloud project. This account name matches the lab username you signed in to the console with earlier.
Besides pre-installed toolkits, Cloud Shell also comes with the standard unix command line interface (CLI) tools and text editors like nano. We can use these to create and edit files right inside Cloud Shell.
Run the following touch command to create a file called test.txt:
touch test.txt
touch won't generate any output. Run the unix command ls to list the files in our current directory:
ls
You should receive the following output:
README-cloudshell.txt test.txt
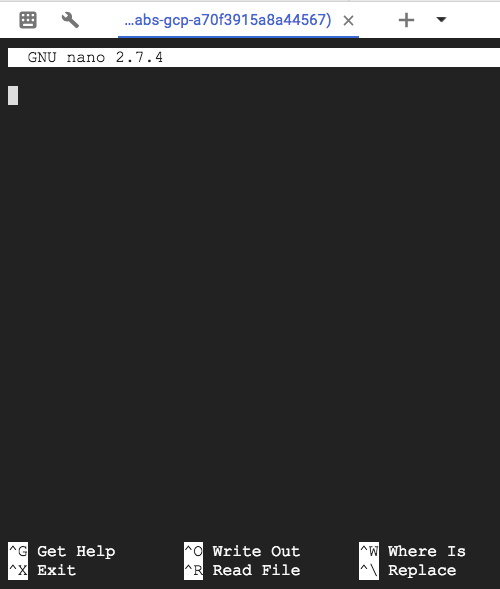
We see our new test.txt file added to our working directory. Let's make some edits to it using the nano text editor that we referenced earlier. To edit a file, type in nano followed by the filename you want to edit in Cloud Shell:
nano test.txt
This will open the blank file with the Nano text editor:
Go ahead and type in a message, like the following:
Google Cloud and Google Skills are the best!
Once you have that written in, hold the CNTRL+X keys. Then type in Y followed by the Enter key to save the file with the new message.
Another helpful command is cat, which will output the contents of a file. Run the following command to make sure that our file was updated correctly:
cat test.txt
You should see the following output in your Cloud Shell session:
Google Cloud and Google Skills are the best!
And just like that, you were able to create, edit, and output the contents of a file all in Cloud Shell (all without having to leave your browser.)
End your lab
When you have completed your lab, click End Lab. Google Skills removes the resources you’ve used and cleans the account for you.
You will be given an opportunity to rate the lab experience. Select the applicable number of stars, type a comment, and then click Submit.
The number of stars indicates the following:
1 star = Very dissatisfied
2 stars = Dissatisfied
3 stars = Neutral
4 stars = Satisfied
5 stars = Very satisfied
You can close the dialog box if you don't want to provide feedback.
For feedback, suggestions, or corrections, please use the Support tab.
Copyright 2026 Google LLC All rights reserved. Google and the Google logo are trademarks of Google LLC. All other company and product names may be trademarks of the respective companies with which they are associated.
Lab membuat project dan resource Google Cloud untuk jangka waktu tertentu
Lab memiliki batas waktu dan tidak memiliki fitur jeda. Jika lab diakhiri, Anda harus memulainya lagi dari awal.
Di kiri atas layar, klik Start lab untuk memulai
Gunakan penjelajahan rahasia
Salin Nama Pengguna dan Sandi yang diberikan untuk lab tersebut
Klik Open console dalam mode pribadi
Login ke Konsol
Login menggunakan kredensial lab Anda. Menggunakan kredensial lain mungkin menyebabkan error atau dikenai biaya.
Setujui persyaratan, dan lewati halaman resource pemulihan
Jangan klik End lab kecuali jika Anda sudah menyelesaikan lab atau ingin mengulanginya, karena tindakan ini akan menghapus pekerjaan Anda dan menghapus project
Konten ini tidak tersedia untuk saat ini
Kami akan memberi tahu Anda melalui email saat konten tersedia
Bagus!
Kami akan menghubungi Anda melalui email saat konten tersedia
Satu lab dalam satu waktu
Konfirmasi untuk mengakhiri semua lab yang ada dan memulai lab ini
Gunakan penjelajahan rahasia untuk menjalankan lab
Menggunakan jendela Samaran atau browser pribadi adalah cara terbaik untuk menjalankan lab ini. Langkah ini akan mencegah konflik antara akun pribadi Anda dan akun Siswa, yang dapat menyebabkan tagihan ekstra pada akun pribadi Anda.
In this first hands-on lab you will access Google Skills and the Google Cloud console and use the basic Google Cloud features: Projects, Resources, IAM Users, Roles, Permissions, APIs, and Cloud Shell.