GSP1358

Overview
Google Antigravity is a standalone desktop application tailored for managing and orchestrating AI agents that execute complex knowledge and coding tasks. Serving as a central command center, it provides a unified platform to launch, monitor, and manage agent activities independently of your IDE.
Through this interface, you can run agents synchronously or asynchronously to perform various development operations, including:
- Executing system commands
- Performing file read and write operations
- Conducting web searches
- Integrating with external tools using skills and Model Context Protocol (MCP) servers
- Managing concurrent subagents
- Interacting with Chrome browsers
- Generating plans and visual artifacts
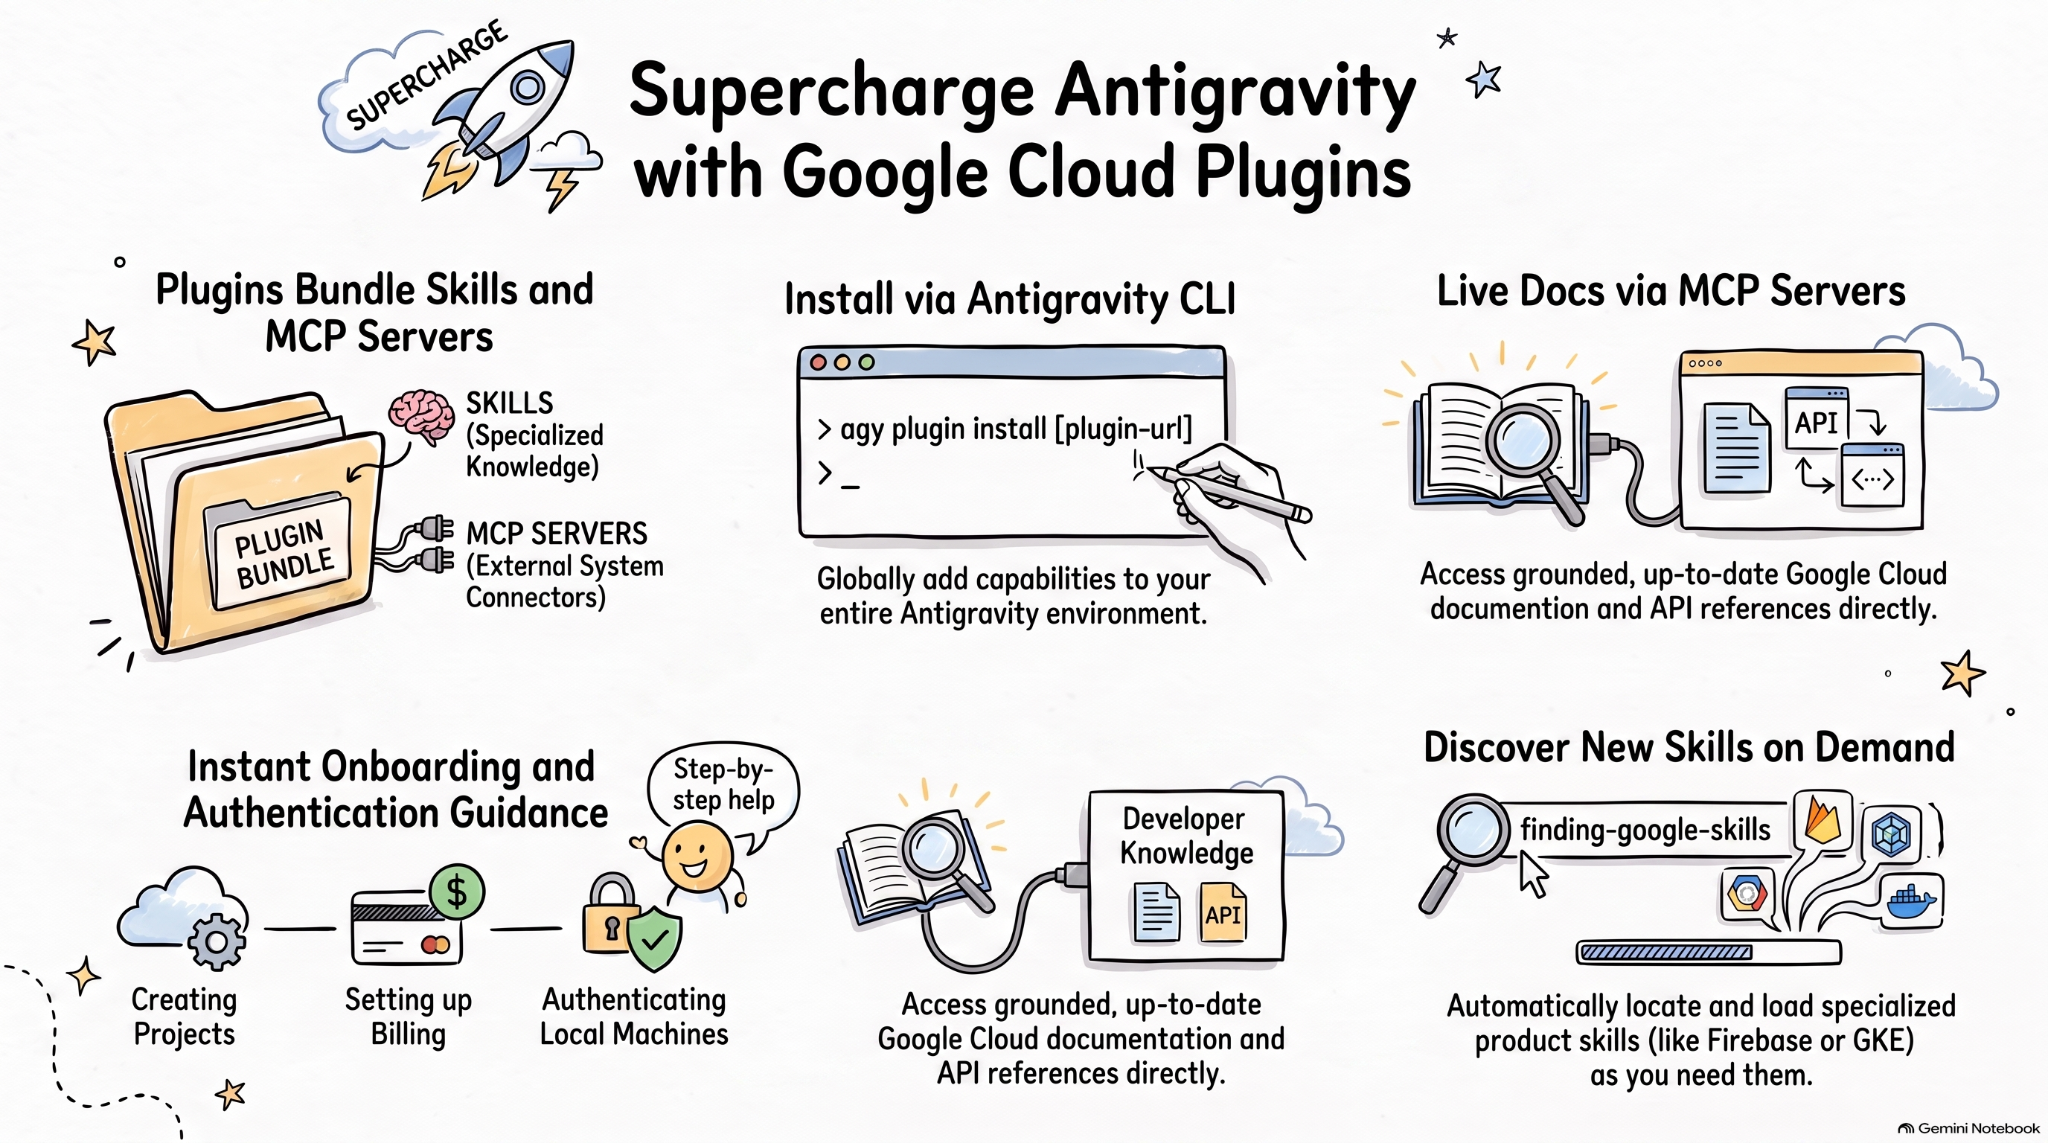
Agent skills are a lightweight, open format for extending AI agent capabilities with specialized knowledge and workflows. The Model Context Protocol (MCP) is a standard for connecting AI applications to external systems.
The Agent plugins specification is an open, vendor-neutral specification for packaging agent skills and MCP servers into portable plugins.
Google Cloud plugins for AI coding agents package relevant Google Cloud skills and MCP servers into installable bundles for more effective AI agents on Google Cloud.
In this lab, you learn about the Google Cloud Developer plugin and how to install and use this plugin in Google Antigravity.
Objectives
In this lab, you learn how to perform the following tasks:
- Configure and authenticate the Google Antigravity application with your lab environment.
- Select and configure your assigned Gemini model .
- Explore the structure of agent plugins, skills, and Model Context Protocol (MCP) servers.
- Install and inspect the Google Cloud Developer plugin in Antigravity.
- Exercise the skills and Developer Knowledge MCP server bundled in the Google Cloud Developer plugin.
Setup and requirements
Note: If you opened these lab instructions before clicking Start Lab, refresh your browser page to ensure that your student credentials and Google Cloud project ID render correctly in the copyable code blocks.
Before you click the Start Lab button
Read these instructions. Labs are timed and you cannot pause them. The timer, which starts when you click Start Lab, shows how long Google Cloud resources are made available to you.
This hands-on lab lets you do the lab activities in a real cloud environment, not in a simulation or demo environment. It does so by giving you new, temporary credentials you use to sign in and access Google Cloud for the duration of the lab.
To complete this lab, you need:
- Access to a standard internet browser (Chrome browser recommended).
Note: Use an Incognito (recommended) or private browser window to run this lab. This prevents conflicts between your personal account and the student account, which may cause extra charges incurred to your personal account.
- Time to complete the lab—remember, once you start, you cannot pause a lab.
Note: Use only the student account for this lab. If you use a different Google Cloud account, you may incur charges to that account.
Task 1. Configure and authenticate Google Antigravity
In this task, you launch the Google Antigravity application on your local machine, sign in with your ephemeral student credentials, configure your assigned Gemini model, and authorize the gcloud command-line interface to connect with your lab environment.
Note: As part of its standard security model, Antigravity prompts you for confirmation (such as Proceed, Run, or Submit) before writing files, executing terminal commands, or starting background tasks. Whenever prompted, review the proposed action and click the confirmation button to proceed.
Prerequisites
To complete this lab, you must have the following software installed on your local machine:
Important for existing users: If you have previously installed or signed into Google Antigravity on your machine, you must sign out of your existing session before starting. In Antigravity, navigate to Settings (gear icon) > Account > Sign Out, and relaunch the application.
Open and authenticate Antigravity 2.0
First, launch the Google Antigravity application on your local machine and sign in using your student credentials to establish a local connection to the lab environment.
- Open the Google Antigravity application on your local machine.
- On the setup screen, click Use business account.
- Click Continue with Google Cloud.
- In the browser window that opens, sign in using the student credentials provided for this lab:
- Click Sign in.
- If prompted, click Open Antigravity in the browser prompt to return to the application.
- Under Select billing model, select Pay as you go, and for Provide Google Cloud Project, enter . Click Next.
- For Choose Region, select Global, and click Next.
- On the Terms of Service & Data Use screen, click Finish to accept the terms.
Troubleshooting Account & Permission Errors:
If sending any prompt (such as the setup prompt below) fails with Permission 'aiplatform.endpoints.predict' denied or Agent terminated due to error, you are likely signed in with a personal Google account instead of your temporary student account, or an incorrect Project ID was entered. Click Settings > Account > Sign Out, relaunch Antigravity, click Use business account, click Continue with Google Cloud, and enter your assigned lab Project ID and student credentials.
After completing the setup, you are presented with your local Antigravity environment.
Authenticate the gcloud CLI and project
Because Antigravity runs locally on your machine, you must authenticate the gcloud CLI and set the active Google Cloud project. This connects the application to the provisioned ephemeral Google Cloud project to allow local development and check your progress.
-
In the Antigravity chat panel, paste and send the following prompt:
Please configure and verify the local gcloud environment with the following actions:
1. Verify that the gcloud CLI is installed and available on system PATH (e.g. `gcloud --version`), and install or guide me to install it if it is missing.
2. Run `gcloud auth login --update-adc` to initiate authentication and update local Application Default Credentials (ADC).
3. Check the currently active gcloud project using `gcloud config get-value project`.
4. If the active project is not set to {{{project_0.project_id | Project ID}}}, update it by running 'gcloud config set project {{{project_0.project_id | Project ID}}}.
5. Verify the final configuration by running `gcloud config list` and reporting the active account and project ID back to me.
-
When Antigravity proposes the setup commands, click Proceed in the chat UI.
-
In the browser window that opens, select your student email account and click Allow to authorize access.
-
Confirm that the final output matches your active student account () and your lab project ID ().
At this point, both the gcloud CLI and local application SDKs are fully configured, authenticated, and ready for use.
Select your Gemini model
- In the Antigravity application interface, navigate to the model selector or settings panel.
- Ensure that your active coding agent model is set to your assigned lab model: .
Verify your progress
-
In the Antigravity chat panel, paste and send the following prompt to generate the task completion summary file and upload it to the grading bucket:
Please write a summary_task1.md file in my project directory that lists:
- My active student user account email
- My active Google Cloud project ID
- My active Gemini model: {{{project_0.startup_script.gemini_flash_model_name | Model Name}}}
Once written, upload this file to the grading storage bucket by running:
gcloud storage cp summary_task1.md gs://{{{project_0.project_id | project_id}}}-grading/
-
When Antigravity proposes the file creation and upload commands, click Run in the chat panel.
-
Click Check my progress to verify the objective.
Verify Local Environment Setup
Task 2. Explore agent plugins
In this task, you review the structure of agent plugins and how the Google Cloud Developer plugin packages skills and MCP servers.
Agent plugins provide a portable package format to bundle agent skills and MCP servers into a directory structure like the following:
my-plugin/
├── plugin.json
├── skills/
│ └── my-skill/
│ ├── SKILL.md
│ ├── scripts/
│ └── references/
├── mcp.json
└── com.example.client/
-
plugin.json identifies the plugin.
-
skills/ contains agent skills.
-
mcp.json describes MCP servers.
- Reverse-domain extension namespaces allow individual clients to add custom behavior.
The Google Agent Skills repository contains agent skills for Google products and technologies, including Google Cloud. It also contains Google Cloud plugins that bundle agent skills and MCP servers into installable packages such as the Google Cloud Developer plugin.
The Google Cloud Developer plugin provides Google Cloud guidance for coding agents running on , including project onboarding, authentication and credential selection, and safety-critical validation for gcloud CLI commands. It also includes the Google Developer Knowledge MCP server for grounded, up-to-date Google Cloud documentation.
Task 3. Install the Google Cloud Developer plugin
In this task, you install the Google Cloud Developer plugin using the Antigravity CLI so that its skills and MCP server are available across your Antigravity environment.
Antigravity CLI provides a direct command to install agent plugins for the Antigravity ecosystem (Antigravity, Antigravity CLI, and Antigravity IDE).
-
In your local terminal, run the following command to install the Google Cloud Developer plugin:
agy plugin install https://github.com/google/skills/plugins/cloud/google-cloud-developer
The output confirms that the command installs the plugin along with five skills and one MCP server:
Cloning plugin from https://github.com/google/skills.git...
[ok] google-cloud-developer
✔ skills : 5 processed
- agents : skipped (not found)
- commands : skipped (not found)
✔ mcpServers : 1 processed
- hooks : skipped (not found)
Task 4. Explore the Google Cloud Developer plugin
In this task, you inspect the installed Google Cloud Developer plugin files, verify the registered skills in the Antigravity interface, and confirm the Developer Knowledge MCP server configuration.
Verify the plugin in Antigravity CLI
Antigravity CLI installs plugins globally in the ~/.gemini/config/plugins/ folder. This makes the plugin available to Antigravity, Antigravity CLI, and Antigravity IDE.
In the ~/.gemini/config/plugins/google-cloud-developer folder, the Google Cloud Developer plugin includes the plugin manifest file, skills, and MCP server configuration:
google-cloud-developer/
├── ...
├── skills/
│ ├── finding-google-skills/
│ ├── gcloud/
│ ├── google-cloud-recipe-auth/
│ ├── google-cloud-recipe-onboarding/
│ └── retrieving-developer-knowledge/
├── mcp.json
└── plugin.json
Inspect skills and MCP servers in Antigravity
-
In the Antigravity chat panel, send the following prompt to list the installed skills:
Which skills are available?
Antigravity lists its built-in skills along with the five skills from the Google Cloud Developer plugin:
...
2. Google Cloud Developer Plugin Skills
Installed via the google-cloud-developer plugin in
~/.gemini/config/plugins/google-cloud-developer/skills/:
finding-google-skills: Dynamically locates and loads specialized Google product skills on-demand from the remote catalog index (e.g., GKE, BigQuery, Vertex AI, Firebase).
gcloud: Validation guardrails, syntax rules, and data reduction for executing gcloud CLI commands safely.
google-cloud-recipe-auth: Guidance on authentication and authorization patterns (ADC, service accounts, IAM, and workload identity).
google-cloud-recipe-onboarding: Step-by-step walkthrough for onboarding new Google Cloud projects, billing accounts, and first deployments.
retrieving-developer-knowledge: Integration with the developer-knowledge MCP server to retrieve official Google developer documentation and API references.
-
In the Antigravity navigation sidebar, click Settings (⚙️), and then select Customizations to view the installed plugin skills:
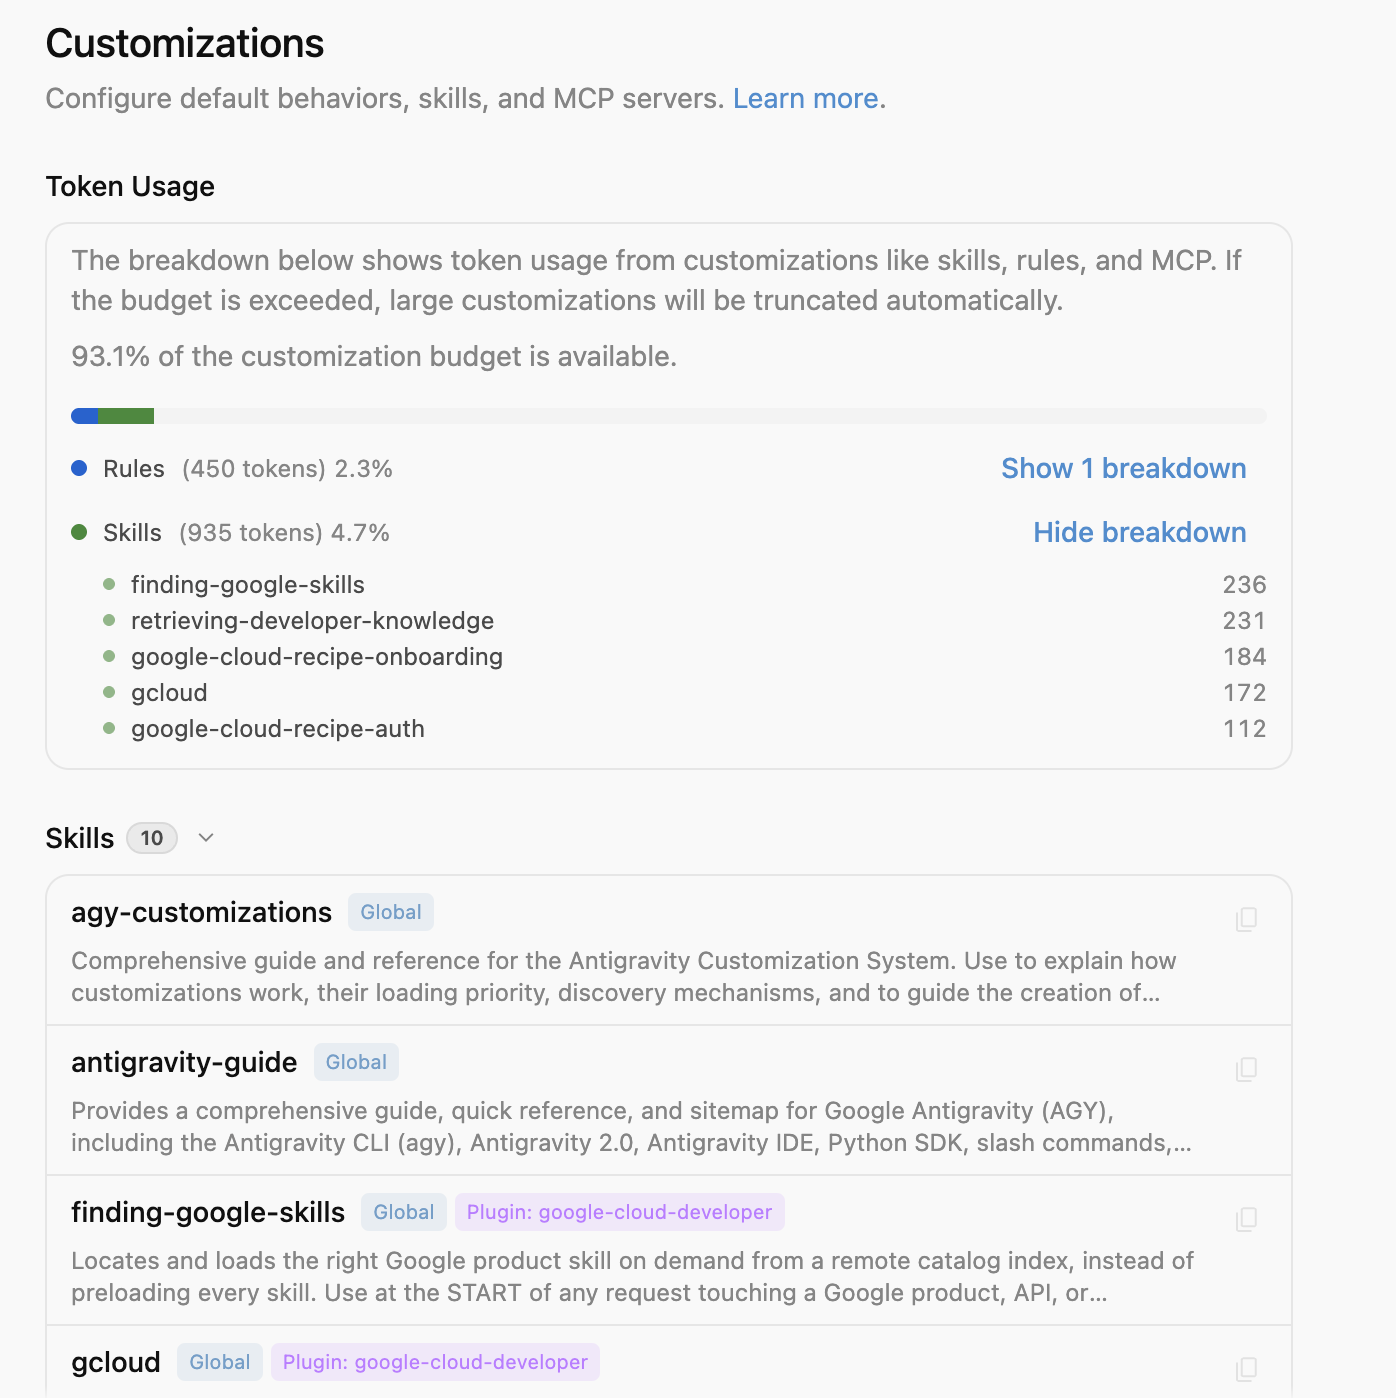
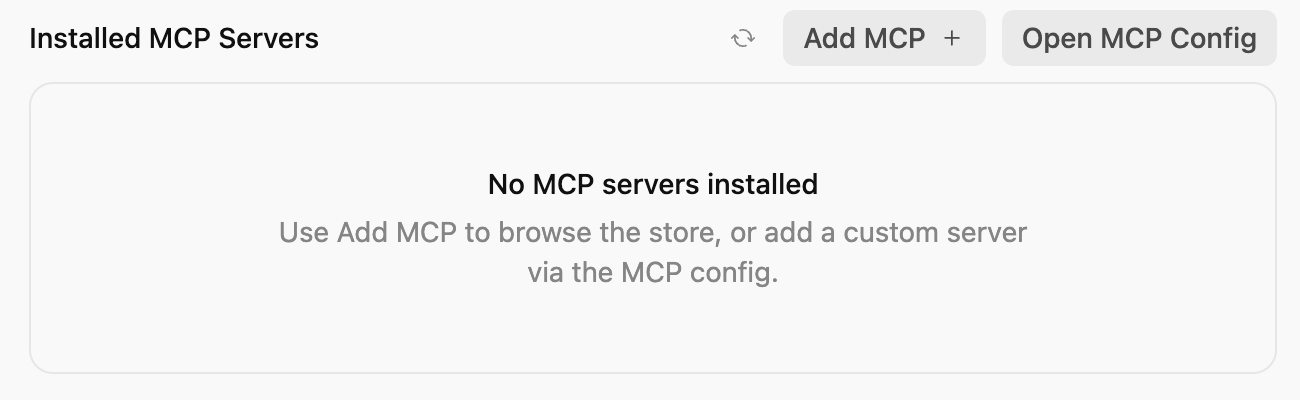
Note: In Customizations, the Installed MCP Servers section currently does not display MCP servers bundled as part of a plugin.
-
In the Antigravity chat panel, send the following prompt to ask about the available MCP servers:
Which MCP servers are available?
Antigravity recognizes the Developer Knowledge MCP server that the plugin installs:
Based on your Antigravity configuration and cached tool definitions, here are the MCP servers and their statuses:
1. Actively Configured Plugin Server
Configured in
~/.gemini/config/plugins/google-cloud-developer/mcp.json
:
developer-knowledge
Type / URL: Streamable HTTP (https://developerknowledge.googleapis.com/mcp)
Provided Tools:
search_documents: Search official Google developer documentation
get_documents: Retrieve document content
answer_query: Synthesize developer query answers
Task 5. Exercise the Google Cloud Developer plugin
In this task, you test how the Google Cloud Developer plugin activates specialized skills and queries the Developer Knowledge MCP server across common Google Cloud development scenarios using .
Note: The lab environment pre-enables the Developer Knowledge API (developerknowledge.googleapis.com) required by the Developer Knowledge MCP server for your Google Cloud lab project.
You can run the following prompts in the Antigravity chat panel or Antigravity CLI because Antigravity CLI installs the plugin globally.
Test onboarding guidance
-
In the Antigravity chat panel, send the following prompt aligned with your active sandbox project to see recommended steps for configuring your environment and deploying a service to Cloud Run:
I have an existing Google Cloud project. What are the recommended first steps to configure my environment and deploy my first service to Cloud Run?
Antigravity activates the google-cloud-recipe-onboarding skill:
Worked for 1m ˅
Explored 1 file ˅
> Analyzed google-cloud-recipe-onboarding/SKILL.md
The agent returns step-by-step guidance for configuring your project environment, enabling required APIs, and deploying to Cloud Run.
Test authentication guidance
-
In the Antigravity chat panel, send the following prompt to ask how to authenticate your local machine with Google Cloud:
How can I authenticate my local machine with Google Cloud?
Antigravity activates the google-cloud-recipe-auth skill:
Worked for 1m ˅
Explored 1 file ˅
> Analyzed google-cloud-recipe-auth/SKILL.md
The agent responds with the recommended authentication commands for both the CLI and Application Default Credentials (ADC):
To authenticate your local machine with Google Cloud, there are two primary methods depending on whether you want to use the CLI or run code/client libraries locally:
1. Authenticate the CLI (gcloud)
Use this to run gcloud, bq, and gsutil management commands in your terminal:
gcloud auth login
This opens a web browser asking you to log in with your Google Account and grant permissions.
If you are on a remote server without a web browser, use:
...
Query official documentation with Developer Knowledge
-
In the Antigravity chat panel, send the following prompt to ask a question that requires grounded answers from official Google Cloud documentation:
What's the difference between Cloud Run and GKE according to the official docs?
Antigravity activates the retrieving-developer-knowledge skill and invokes the developer-knowledge MCP server:
Exploring 2 files ˅
* Analyzed retrieving-developer-knowledge/SKILL.md
* Analyzed answer_query.json
MCP Tool: developer-knowledge / answer_query ˅
Tool arguments
{
"query": "What is the difference between Cloud Run and Google Kubernetes Engine (GKE) according to official Google Cloud documentation?"
}
Discover other Google skills on demand
-
In the Antigravity chat panel, send the following prompt to test on-demand skill discovery by asking about Firebase:
I want to start using Firebase
Antigravity activates the finding-google-skills skill to search the Google Agent Skills catalog and fetch the relevant Firebase skill:
Explored 1 file ˅
* Analyzed finding-google-skills/SKILL.md
Ran `curl -sS https://raw.githubusercontent.com/google/skills/main/index.json | jq -r '.skills[ >`
Exploring 3 files, 2 searches ˅
* Reading skills catalog
* Searched firebase
* Fetching Firebase skill
Verify your progress
-
In the Antigravity chat panel, paste and send the following prompt to generate the task completion summary file and upload it to the grading bucket:
Please write a summary_task2.md file in my project directory that documents:
- Confirmation that the google-cloud-developer plugin is installed, listing its 5 bundled skills (finding-google-skills, gcloud, google-cloud-recipe-auth, google-cloud-recipe-onboarding, retrieving-developer-knowledge) and the developer-knowledge MCP server
- Active Gemini model: {{{project_0.startup_script.gemini_flash_model_name | Model Name}}}
- A brief summary of the results from exercising the 4 plugin prompts:
1. Onboarding guidance for configuring an existing project and deploying to Cloud Run (google-cloud-recipe-onboarding)
2. Local machine authentication with Google Cloud (google-cloud-recipe-auth)
3. Official documentation comparison between Cloud Run and GKE via the developer-knowledge MCP server (retrieving-developer-knowledge)
4. On-demand discovery of Firebase skills (finding-google-skills)
Once written, upload this file to the grading storage bucket by running:
gcloud storage cp summary_task2.md gs://{{{project_0.project_id | project_id}}}-grading/
-
When Antigravity proposes the file creation and upload commands, click Run in the chat panel.
-
Click Check my progress to verify the objective.
Verify Google Cloud Developer Plugin Installation and Usage
Clean up your local environment
After completing the lab, sign out of your temporary student account in Google Antigravity while keeping the Google Cloud Developer plugin installed on your machine.
- In the Antigravity navigation sidebar, click Settings (⚙️).
- In the settings navigation menu, select Account.
- Under Account, click Sign Out to sign out of your student account.
Congratulations!
Congratulations! You have successfully configured and used the Google Cloud Developer plugin in Antigravity.
Next steps / Learn more
Google Cloud training and certification
...helps you make the most of Google Cloud technologies. Our classes include technical skills and best practices to help you get up to speed quickly and continue your learning journey. We offer fundamental to advanced level training, with on-demand, live, and virtual options to suit your busy schedule. Certifications help you validate and prove your skill and expertise in Google Cloud technologies.
Manual Last Updated on November 3, 2026
Lab Last Tested on November 4, 2026
Copyright 2026 Google LLC. All rights reserved. Google and the Google logo are trademarks of Google LLC. All other company and product names may be trademarks of the respective companies with which they are associated.