GSP529

Overview
In a challenge lab you’re given a scenario and a set of tasks. Instead of following step-by-step instructions, you will use the skills learned from the labs in the course to figure out how to complete the tasks on your own! An automated scoring system (shown on this page) will provide feedback on whether you have completed your tasks correctly.
When you take a challenge lab, you will not be taught new Google Cloud concepts. You are expected to extend your learned skills, like changing default values and reading and researching error messages to fix your own mistakes.
To score 100% you must successfully complete all tasks within the time period!
This lab is recommended for students who enrolled in the Develop AI-Powered Prototypes in Google AI Studio course. Are you ready for the challenge?
Setup and requirements
Before you click the Start Lab button
Read these instructions. Labs are timed and you cannot pause them. The timer, which starts when you click Start Lab, shows how long Google Cloud resources are made available to you.
This hands-on lab lets you do the lab activities in a real cloud environment, not in a simulation or demo environment. It does so by giving you new, temporary credentials you use to sign in and access Google Cloud for the duration of the lab.
To complete this lab, you need:
- Access to a standard internet browser (Chrome browser recommended).
Note: Use an Incognito (recommended) or private browser window to run this lab. This prevents conflicts between your personal account and the student account, which may cause extra charges incurred to your personal account.
- Time to complete the lab—remember, once you start, you cannot pause a lab.
Note: Use only the student account for this lab. If you use a different Google Cloud account, you may incur charges to that account.
Open Google AI Studio
-
Click Start Lab. The lab panel will display the temporary credentials for this lab.
-
Note: If this is a paid lab, you will be prompted to select a payment method.
-
Open Google AI Studio in an Incognito window. The Google sign-in page will appear.
-
Tip: For easier access, arrange the lab and AI Studio tabs in separate, side-by-side windows.
-
Copy the Username below and paste it into the Email field, then click Next.
{{{user_0.username | "Username"}}}
-
Copy the Password below and paste it into the Enter your password field, then click Next.
{{{user_0.password | "Password"}}}
-
Accept any on-screen terms and conditions to proceed.
You are now logged into Google AI Studio using your temporary student account.
Challenge scenario
You are a Solutions Developer participating in a weekend game jam. Your initial goal is to build a simple Fantasy Character Creator to be used in a new fantasy game. As the jam progresses, you'll get new requirements to iteratively add features—like character portraits, backstories, and stats—until you have a complete, interactive character playing card prototype.
Note: AI-generated results in Google AI Studio can vary with each run. The goal of this challenge lab is to prototype and explore what's possible, not to build a fully polished application.
Your challenge
The real test: can you "vibe code" your way through this entire challenge, bringing the app to life using only natural language prompts without writing a single line of code?
Your tasks will be to:
- Build the initial V1 of the Fantasy Character Creator app.
- Add a feature to generate and regenerate character portraits.
- Refine the app's user interface with a fantasy theme.
- Add a feature to generate character backstories.
- Transform the UI into a player card with stats and add a feature to save characters to a deck.
- Save and download the final application prototype.
Task 1. Generate the core application from a prompt
Your first task is to build the initial version of the app. Use a single text prompt to generate an application that has a button. When clicked, the button should generate and display a random fantasy character with a unique Name and a Class (e.g., 'Mage', 'Rogue', 'Warrior'). After completing the steps in this task, save your application. This allows the lab to verify that the required changes have been made.
To enable Drive access, in the Add files menu, click Drive. In the pop-up window, select your student account (for example, [student-username]) and grant the necessary permissions.
Click Check my progress to verify the objective.
Generate the core application from a prompt
Task 2. Add the character portraits feature
The V1 app is a good start, but it needs visuals. Your next task is to add a character portrait feature. Use the Code Assistant to add buttons to Generate and Regenerate a "cartoon/video game style" portrait of the currently displayed character. After completing the steps in this task, save your application. This allows the lab to verify that the required changes have been made.
Click Check my progress to verify the objective.
Add the character portraits feature to the application
Task 3. Refine the UI
With the core text and image features in place, it's time to improve the user interface. Use the Code Assistant to give your app the look and feel of an "ancient alchemist's workbench," using a dark, textured background and a stylized, fantasy-style font for the character's name. After completing the steps in this task, save your application. This allows the lab to verify that the required changes have been made.
Click Check my progress to verify the objective.
Improve the user interface with required specifics
Task 4. Add the character backstory feature
The character needs more depth. Your next feature request is to add lore. Use the Code Assistant to add a "Generate Backstory" button. When clicked, this button should generate a unique, one-to-two-sentence origin story for the character currently on screen. After completing the steps in this task, save your application. This allows the lab to verify that the required changes have been made.
Click Check my progress to verify the objective.
Add the character backstory feature to the application
Task 5. Add player card, stats, and "save to deck" functionality
For the final version, you must transform the app into a full-featured character card. Your task is to prompt the Code Assistant to reformat the entire UI into a bordered player card. This card must include new, randomly generated stats for Health, Mana, and Strength. Finally, you must add a "Save to Deck" feature that lets a user save their favorite characters into a "My Deck" list within the app. After completing the steps in this task, save your application. This allows the lab to verify that the required changes have been made.
Click Check my progress to verify the objective.
Add player card, stats, and 'save to deck' functionality to the application
Task 6. Save your prototype
Your prototype is complete! As the final step, save your application with the name Fantasy Character Generator and download the source code as a ZIP file. The lab will check your saved application to verify your final progress.
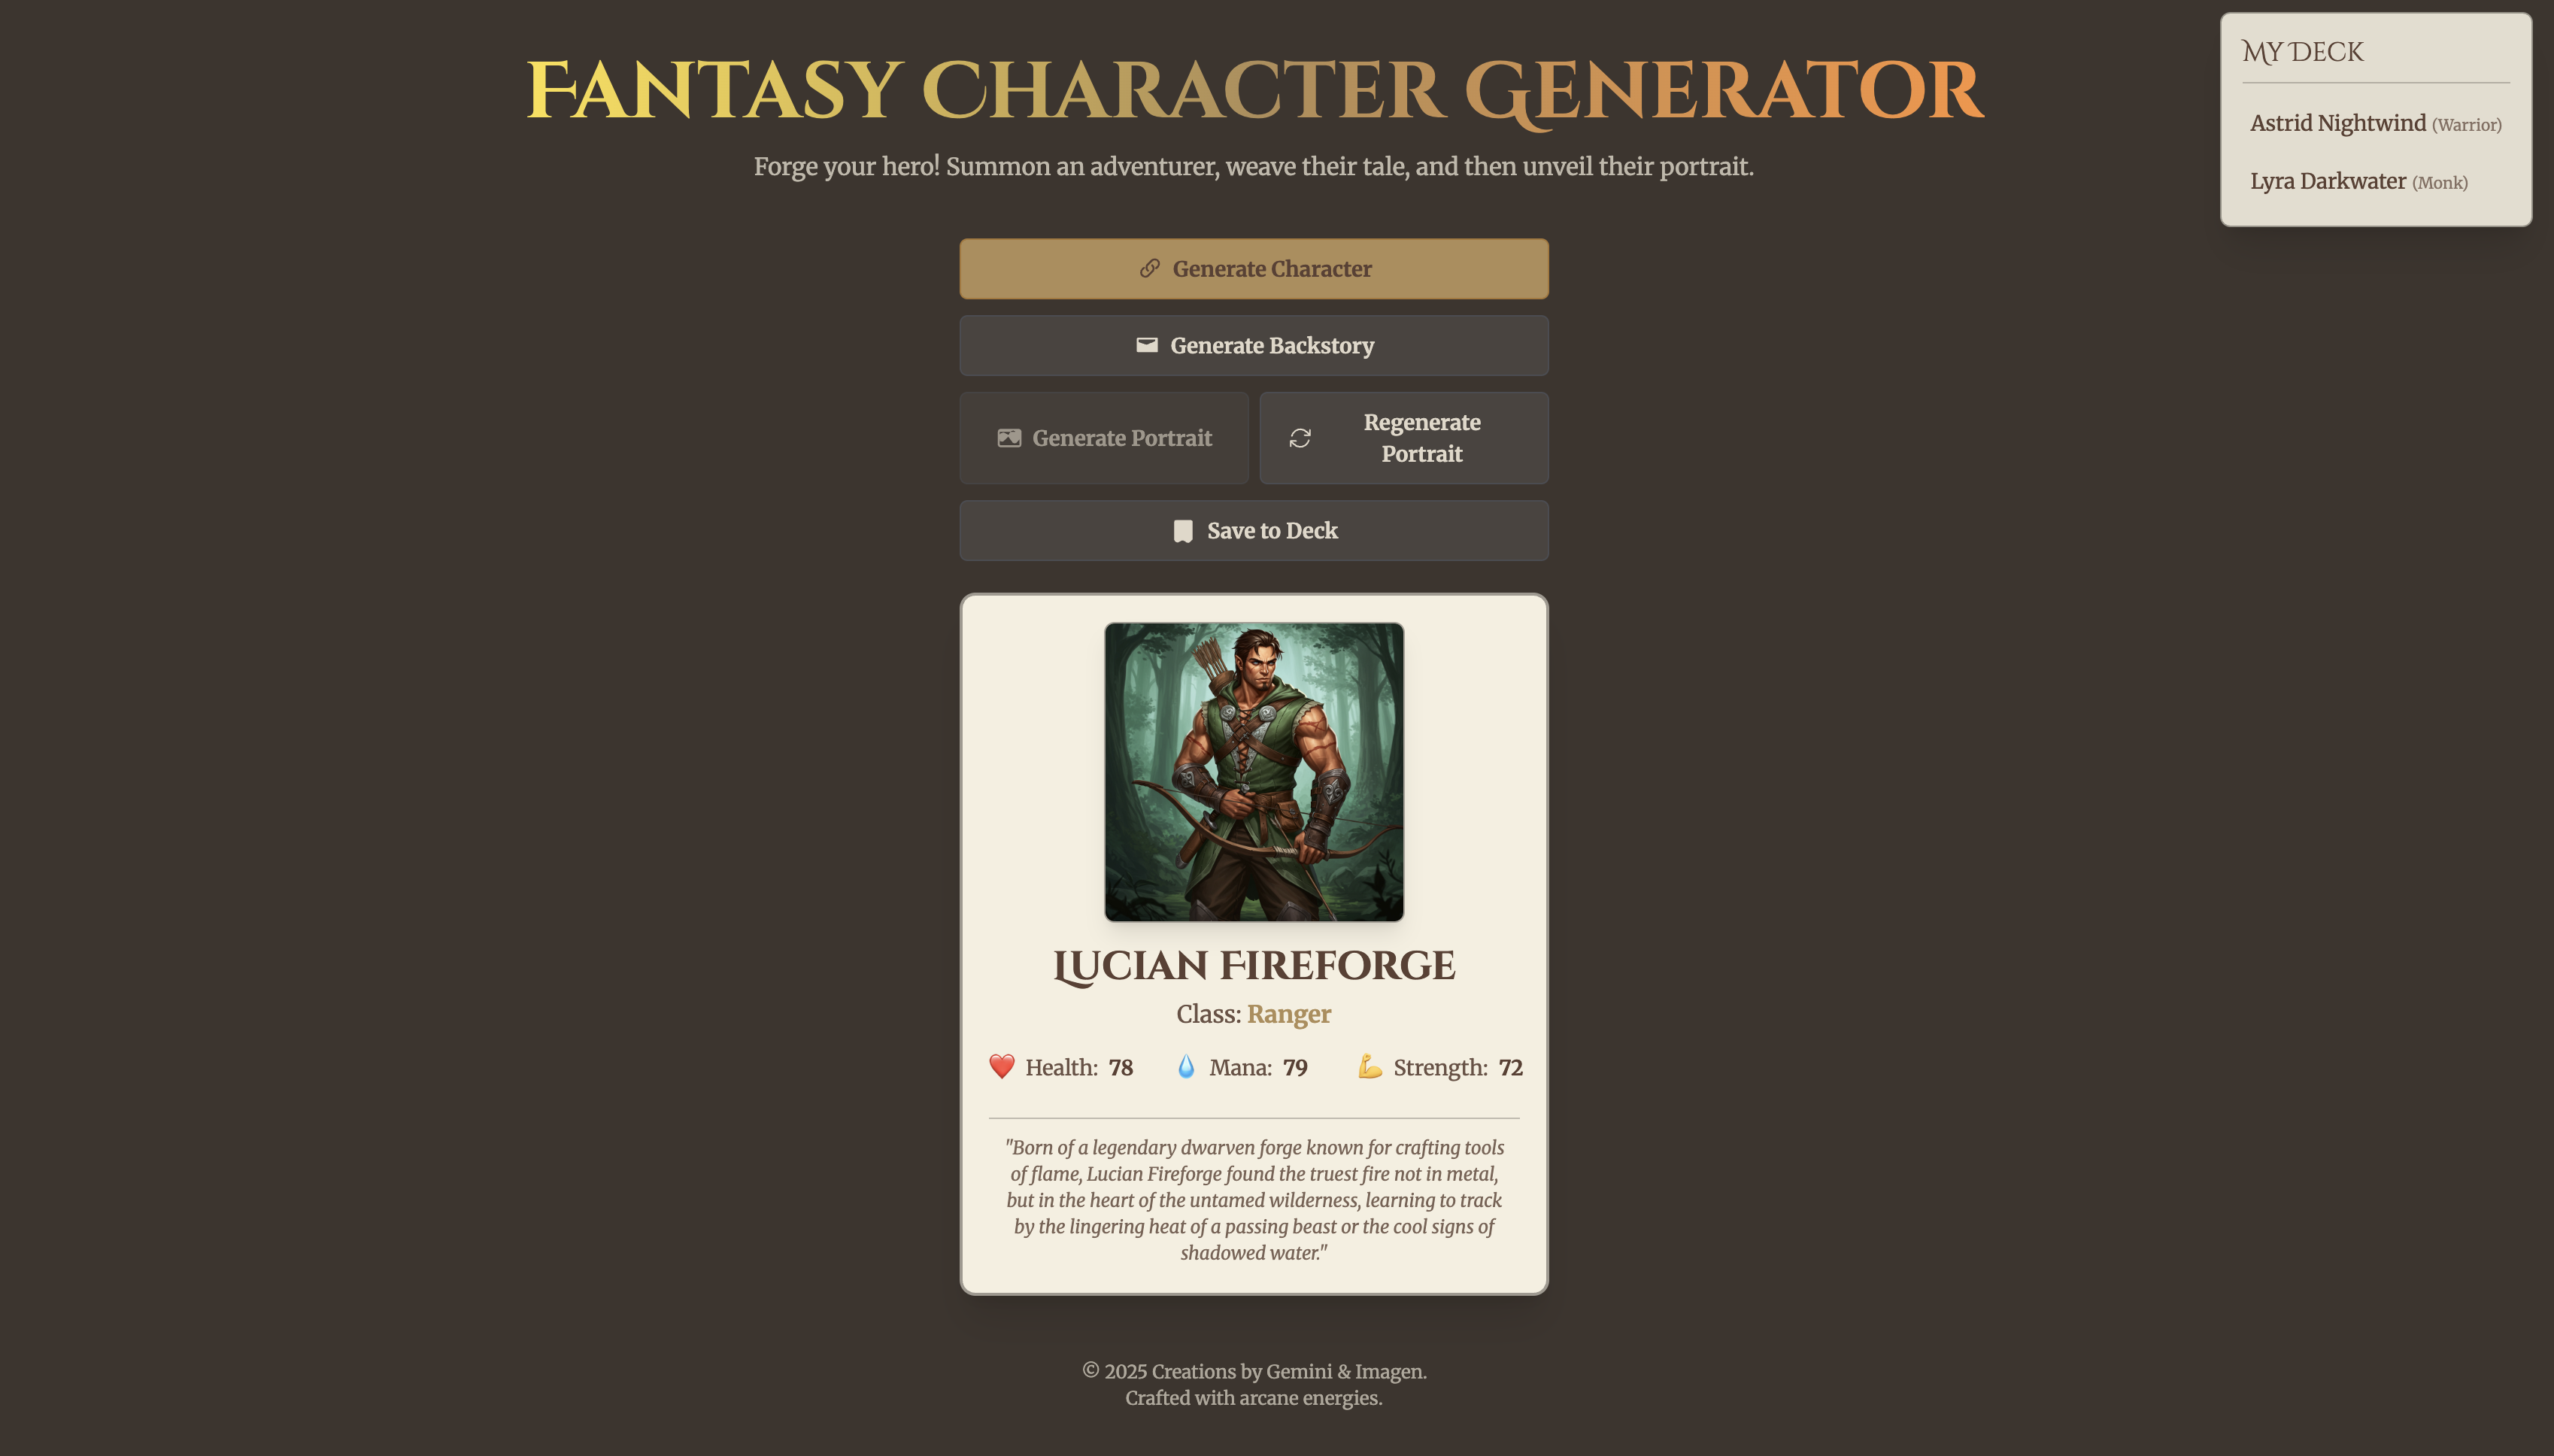
If you ran through all the steps correctly, your app should more or less resemble the following:
Optional: Keep Experimenting!
Congratulations on building a complete app! The core challenge is over, but your journey as a developer doesn't have to end here. If you have extra time, why not try prompting the Code Assistant to add even more features?
Here are a few ideas to get you started:
-
Add More Stats: Can you modify the app to include stats for
Intelligence and Charisma?
-
Add Character Races: Can you add a dropdown to select a race (like
Elf, Dwarf, or Human) that influences the character's starting stats?
-
Generate a course: Can you add a "Generate course Hook" button that creates a mini-adventure based on the character's backstory?

Congratulations!
Congratulations on successfully completing the game jam challenge! You've proven you can "vibe code" a complex, multimodal application from scratch, starting with a simple concept and iteratively adding features, logic, and style. You used Gemini models for text generation, image generation, and in-context code modification to build a complete, interactive character card application, demonstrating your mastery of Google AI Studio.
Google Cloud training and certification
...helps you make the most of Google Cloud technologies. Our classes include technical skills and best practices to help you get up to speed quickly and continue your learning journey. We offer fundamental to advanced level training, with on-demand, live, and virtual options to suit your busy schedule. Certifications help you validate and prove your skill and expertise in Google Cloud technologies.
Manual Last Updated May 05, 2026
Lab Last Tested May 05, 2026
Copyright 2026 Google LLC. All rights reserved. Google and the Google logo are trademarks of Google LLC. All other company and product names may be trademarks of the respective companies with which they are associated.


