GSP1318

概览
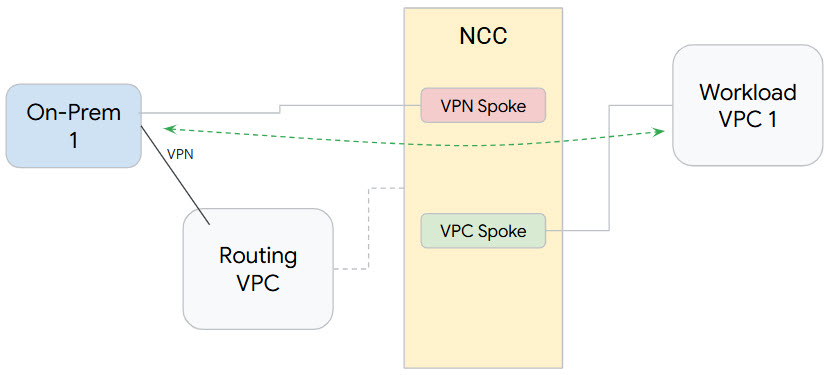
了解如何通过支持 VPC spoke 和动态路由交换,使用 Network Connectivity Center (NCC) 大规模建立本地连接。将 VPC 定义为 VPC spoke 后,您就可以通过 NCC hub 将其连接到多个 VPC 网络。若要与用户的本地网络建立网络连接,您可以将路由器设备虚拟 NIC、高可用性 VPN 隧道或互连 VLAN 连接附加到与 NCC VPC spoke 相同的 NCC hub。
hub 资源提供集中式连接管理模型,可用于 spoke 之间的连接。
在本实验中,您将使用 NCC hub 构建一个逻辑中心辐射型拓扑,以在本地网络与工作负载 VPC 之间实现混合连接。
学习内容
在本实验中,您将学习如何执行以下任务:
- 配置高可用性 VPN 隧道
- 配置 Network Connectivity Center,并将 VPC 配置为 spoke
- 配置 Network Connectivity Center,并将高可用性 VPN 隧道配置为混合 spoke
- 验证数据路径
设置和要求
点击“开始实验”按钮前的注意事项
请阅读以下说明。实验是计时的,并且您无法暂停实验。计时器在您点击开始实验后即开始计时,显示 Google Cloud 资源可供您使用多长时间。
此实操实验可让您在真实的云环境中开展实验活动,免受模拟或演示环境的局限。为此,我们会向您提供新的临时凭据,您可以在该实验的规定时间内通过此凭据登录和访问 Google Cloud。
为完成此实验,您需要:
- 能够使用标准的互联网浏览器(建议使用 Chrome 浏览器)。
注意:请使用无痕模式(推荐)或无痕浏览器窗口运行此实验。这可以避免您的个人账号与学生账号之间发生冲突,这种冲突可能导致您的个人账号产生额外费用。
注意:请仅使用学生账号完成本实验。如果您使用其他 Google Cloud 账号,则可能会向该账号收取费用。
如何开始实验并登录 Google Cloud 控制台
-
点击开始实验按钮。如果该实验需要付费,系统会打开一个对话框供您选择支付方式。左侧是“实验详细信息”窗格,其中包含以下各项:
- “打开 Google Cloud 控制台”按钮
- 剩余时间
- 进行该实验时必须使用的临时凭据
- 帮助您逐步完成本实验所需的其他信息(如果需要)
-
点击打开 Google Cloud 控制台(如果您使用的是 Chrome 浏览器,请右键点击并选择在无痕式窗口中打开链接)。
该实验会启动资源并打开另一个标签页,显示“登录”页面。
提示:将这些标签页安排在不同的窗口中,并排显示。
注意:如果您看见选择账号对话框,请点击使用其他账号。
-
如有必要,请复制下方的用户名,然后将其粘贴到登录对话框中。
{{{user_0.username | "<用户名>"}}}
您也可以在“实验详细信息”窗格中找到“用户名”。
-
点击下一步。
-
复制下面的密码,然后将其粘贴到欢迎对话框中。
{{{user_0.password | "<密码>"}}}
您也可以在“实验详细信息”窗格中找到“密码”。
-
点击下一步。
重要提示:您必须使用实验提供的凭据。请勿使用您的 Google Cloud 账号凭据。
注意:在本实验中使用您自己的 Google Cloud 账号可能会产生额外费用。
-
继续在后续页面中点击以完成相应操作:
- 接受条款及条件。
- 由于这是临时账号,请勿添加账号恢复选项或双重验证。
- 请勿注册免费试用。
片刻之后,系统会在此标签页中打开 Google Cloud 控制台。
注意:如需访问 Google Cloud 产品和服务,请点击导航菜单,或在搜索字段中输入服务或产品的名称。

激活 Cloud Shell
Cloud Shell 是一种装有开发者工具的虚拟机。它提供了一个永久性的 5GB 主目录,并且在 Google Cloud 上运行。Cloud Shell 提供可用于访问您的 Google Cloud 资源的命令行工具。
-
点击 Google Cloud 控制台顶部的激活 Cloud Shell  。
。
-
在弹出的窗口中执行以下操作:
- 继续完成 Cloud Shell 信息窗口中的设置。
- 授权 Cloud Shell 使用您的凭据进行 Google Cloud API 调用。
如果您连接成功,即表示您已通过身份验证,且项目 ID 会被设为您的 Project_ID 。输出内容中有一行说明了此会话的 Project_ID:
Your Cloud Platform project in this session is set to {{{project_0.project_id | "PROJECT_ID"}}}
gcloud 是 Google Cloud 的命令行工具。它已预先安装在 Cloud Shell 上,且支持 Tab 自动补全功能。
- (可选)您可以通过此命令列出活跃账号名称:
gcloud auth list
- 点击授权。
输出:
ACTIVE: *
ACCOUNT: {{{user_0.username | "ACCOUNT"}}}
To set the active account, run:
$ gcloud config set account `ACCOUNT`
- (可选)您可以通过此命令列出项目 ID:
gcloud config list project
输出:
[core]
project = {{{project_0.project_id | "PROJECT_ID"}}}
注意:如需查看在 Google Cloud 中使用 gcloud 的完整文档,请参阅 gcloud CLI 概览指南。
环境变量
为本实验启用 region 和 zone 环境变量:
region="{{{project_0.default_region | Region}}}"
zone="{{{project_0.default_zone | Zone}}}"
启用 Network Connectivity API
在使用 Network Connectivity Center 执行任何任务之前,您必须先启用 Network Connectivity API。
gcloud services enable networkconnectivity.googleapis.com
验证现有 Google Cloud 资源
我们已为您提供以下资源,供您在本实验中使用:
- “路由 VPC”是指未配置为 NCC VPC spoke 的 VPC。
- “工作负载 VPC”是指已配置为 NCC spoke 的 VPC。
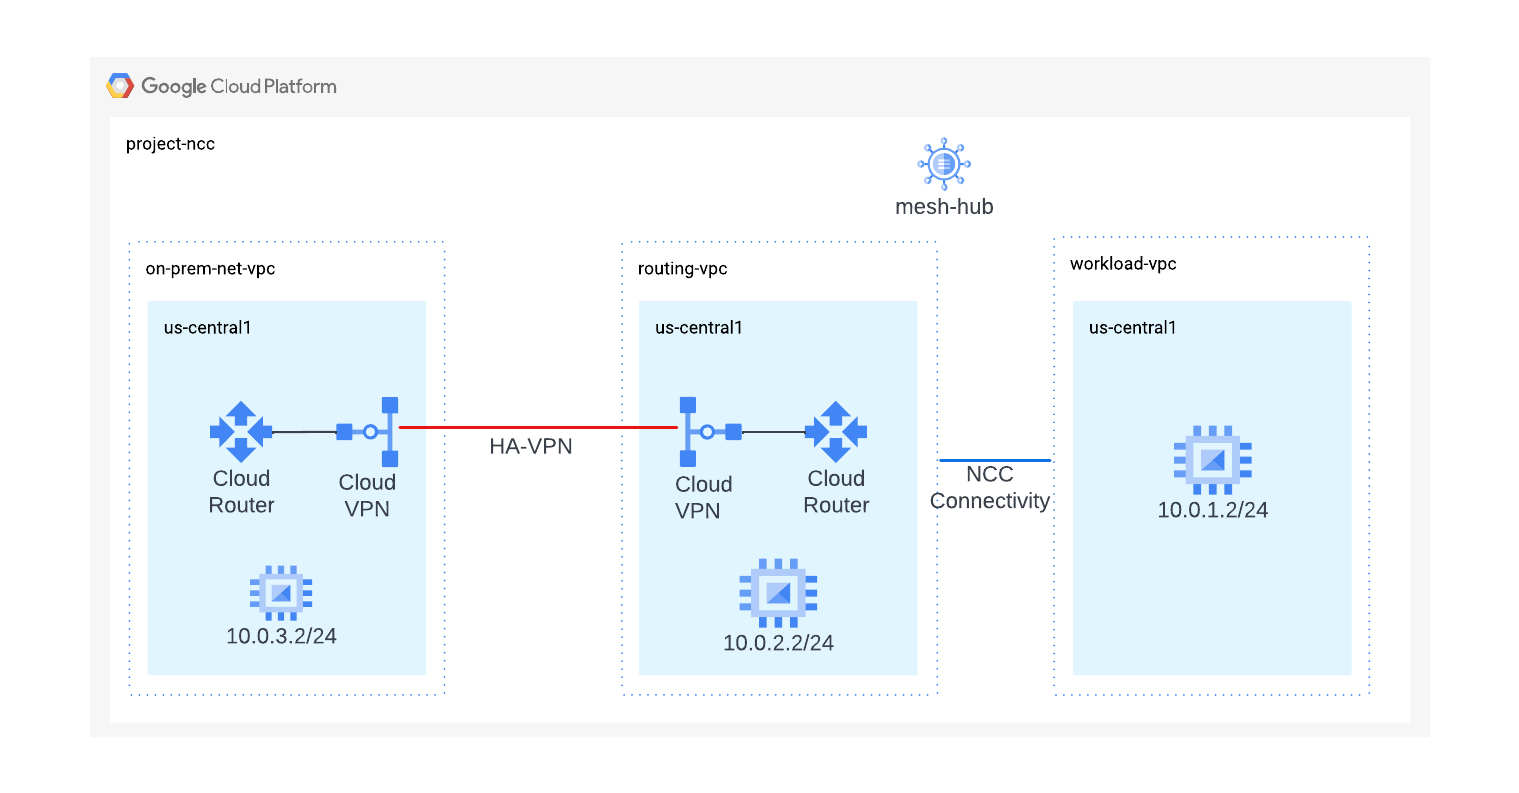
任务 1. 设置混合连接
在本部分中,您将配置高可用性 VPN 隧道,在本地和路由 VPC 网络之间建立连接。
- 在路由 VPC 中配置具有 BGP 的 Cloud Router 路由器:
routing_vpc_network_name="routing-vpc"
routing_vpc_router_name="routing-vpc-cr"
routing_vpc_router_asn=64525
gcloud compute routers create "${routing_vpc_router_name}" \
--region="${region}" \
--network="${routing_vpc_network_name}" \
--asn="${routing_vpc_router_asn}"
- 在本地 VPC 中配置具有 BGP 的 Cloud Router 路由器:
on_prem_network_name="on-prem-net-vpc"
on_prem_router_name="on-prem-router"
on_prem_router_asn=64526
gcloud compute routers create "${on_prem_router_name}" \
--region="${region}" \
--network="${on_prem_network_name}" \
--asn="${on_prem_router_asn}"
- 在路由 VPC 中配置 VPN 网关:
routing_vpn_gateway_name="routing-vpc-vpn-gateway"
gcloud compute vpn-gateways create "${routing_vpn_gateway_name}" \
--region="${region}" \
--network="${routing_vpc_network_name}"
- 在本地 VPC 中配置 VPN 网关:
on_prem_gateway_name="on-prem-vpn-gateway"
gcloud compute vpn-gateways create "${on_prem_gateway_name}" \
--region="${region}" \
--network="${on_prem_network_name}"
- 在路由 VPC 和本地 VPC 中配置 VPN 隧道:
secret_key=$(openssl rand -base64 24)
routing_vpc_tunnel_name="routing-vpc-tunnel"
on_prem_tunnel_name="on-prem-tunnel"
gcloud compute vpn-tunnels create "${routing_vpc_tunnel_name}" \
--vpn-gateway="${routing_vpn_gateway_name}" \
--peer-gcp-gateway="${on_prem_gateway_name}" \
--router="${routing_vpc_router_name}" \
--region="${region}" \
--interface=0 \
--shared-secret="${secret_key}"
gcloud compute vpn-tunnels create "${on_prem_tunnel_name}" \
--vpn-gateway="${on_prem_gateway_name}" \
--peer-gcp-gateway="${routing_vpn_gateway_name}" \
--router="${on_prem_router_name}" \
--region="${region}" \
--interface=0 \
--shared-secret="${secret_key}"
点击检查我的进度,验证已完成以下目标:
配置 Cloud Router 路由器、VPN 网关和 VPN 隧道以设置混合连接
- 创建 BGP 会话,在路由 VPC 和本地 Cloud Router 路由器之间建立 BGP 对等互连
interface_hub_name="if-hub-to-prem"
hub_router_ip="169.254.1.1"
gcloud compute routers add-interface "${routing_vpc_router_name}" \
--interface-name="${interface_hub_name}" \
--ip-address="${hub_router_ip}" \
--mask-length=30 \
--vpn-tunnel="${routing_vpc_tunnel_name}" \
--region="${region}"
bgp_hub_name="bgp-hub-to-prem"
prem_router_ip="169.254.1.2"
gcloud compute routers add-bgp-peer "${routing_vpc_router_name}" \
--peer-name="${bgp_hub_name}" \
--peer-ip-address="${prem_router_ip}" \
--interface="${interface_hub_name}" \
--peer-asn="${on_prem_router_asn}" \
--region="${region}"
interface_prem_name="if-prem-to-hub"
gcloud compute routers add-interface "${on_prem_router_name}" \
--interface-name="${interface_prem_name}" \
--ip-address="${prem_router_ip}" \
--mask-length=30 \
--vpn-tunnel="${on_prem_tunnel_name}" \
--region="${region}"
bgp_prem_name="bgp-prem-to-hub"
gcloud compute routers add-bgp-peer "${on_prem_router_name}" \
--peer-name="${bgp_prem_name}" \
--peer-ip-address="${hub_router_ip}" \
--interface="${interface_prem_name}" \
--peer-asn="${routing_vpc_router_asn}" \
--region="${region}"
默认情况下,不会向混合 spoke 通告 NCC hub 子网。在下一步中,将 Cloud Router 路由器配置为向本地网络通告 NCC 子网路由。
- 向本地 Cloud Router 路由器通告 VPC spoke 子网
vpc_spoke_subnet_ip_range="10.0.1.0/24"
gcloud compute routers update "${routing_vpc_router_name}" \
--advertisement-mode custom \
--set-advertisement-groups=all_subnets \
--set-advertisement-ranges="${vpc_spoke_subnet_ip_range}" \
--region="${region}"
- 向路由 VPC Cloud Router 路由器通告本地子网:
gcloud compute routers update "${on_prem_router_name}" \
--advertisement-mode custom \
--set-advertisement-groups=all_subnets \
--region="${region}"
更新本地 Cloud Router 路由器的 BGP 对等互连配置,使其以 MED 值“111”来通告前缀。在后面的部分中,您将了解 NCC 如何处理 BGP MED 值。
on_prem_router_name="on-prem-router"
bgp_prem_name="bgp-prem-to-hub"
gcloud compute routers update-bgp-peer "${on_prem_router_name}" \
--peer-name="${bgp_prem_name}" \
--advertised-route-priority="111" \
--region="${region}"
- 检查路由 VPC 隧道的状态。
gcloud compute vpn-tunnels describe routing-vpc-tunnel \
--region="${region}" \
--format='flattened(status,detailedStatus)'
- 检查路由 VPC Cloud Router 路由器的状态。
gcloud compute routers get-status routing-vpc-cr \
--region="${region}"
点击检查我的进度,验证已完成以下目标:
更新路由器以设置混合连接
任务 2. Network Connectivity Center hub
使用 gcloud 命令配置 NCC hub。NCC hub 将充当控制平面,负责在各个 VPC spoke 之间构建路由配置。
- 使用
gcloud 命令创建 NCC hub
hub_name="mesh-hub"
gcloud network-connectivity hubs create "${hub_name}"
- 描述新创建的 NCC hub,并记下名称和关联的路径。
gcloud network-connectivity hubs describe mesh-hub
createTime: '2025-05-02T08:50:18.521689807Z'
exportPsc: false
name: projects/qwiklabs-gcp-02-xxxxxxx/locations/global/hubs/mesh-hub
policyMode: PRESET
presetTopology: MESH
routeTables:
- projects/qwiklabs-gcp-02-xxxxxxx/locations/global/hubs/mesh-hub/routeTables/default
state: ACTIVE
uniqueId: eff43930-6232-426a-9954-4db8fa462e07
updateTime: '2025-05-02T08:50:41.651321236Z'
- NCC hub 引入了一个路由表,可定义用于创建数据连接的控制平面。查找 NCC hub 的路由表名称:
gcloud network-connectivity hubs route-tables list --hub=mesh-hub
-
查找 NCC 默认路由表的 URI。
gcloud network-connectivity hubs route-tables describe default --hub=mesh-hub
-
列出 NCC hub 默认路由表的内容。在定义 NCC 混合 spoke 或 VPC spoke 之前,NCC hub 的路由表将为空。
gcloud network-connectivity hubs route-tables routes list --hub=mesh-hub --route_table=default
NCC hub 的路由表应为空。
点击检查我的进度,验证已完成以下目标:
Network Connectivity Center hub
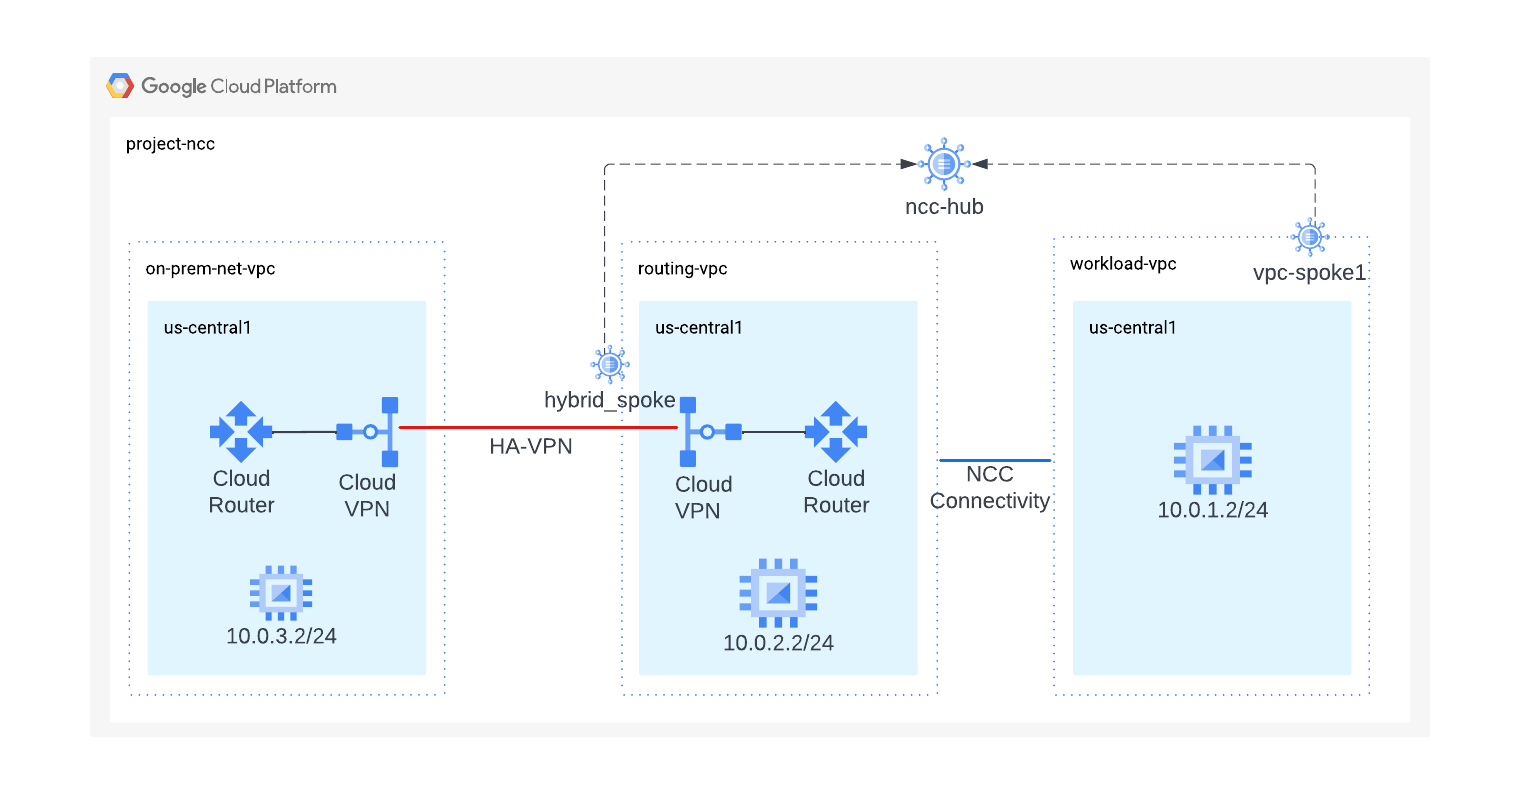
任务 3. 具有混合 spoke 和 VPC spoke 的 NCC
在本部分中,您将使用 gCloud 命令配置两个 NCC spoke,一个是 VPC spoke,另一个是混合 (VPN) spoke。
将工作负载 VPC 配置为 NCC spoke
- 将工作负载 VPC 配置为 NCC spoke,并将其分配给之前创建的 NCC hub。
vpc_spoke_name="workload-vpc-spoke"
vpc_spoke_network_name="workload-vpc"
gcloud network-connectivity spokes linked-vpc-network create "${vpc_spoke_name}" \
--hub="${hub_name}" \
--vpc-network="${vpc_spoke_network_name}" \
--global
使用 –global 标志后,用户在配置新的 NCC spoke 时无需指定完整的 URI 路径。
- 使用以下 gcloud 命令,将 VPN 隧道配置为混合 spoke,以加入 mesh-hub。
vpn_spoke_name="hybrid-spoke"
routing_vpc_tunnel_name="routing-vpc-tunnel"
region="{{{project_0.default_region | Region}}}"
hub_name="mesh-hub"
gcloud network-connectivity spokes linked-vpn-tunnels create "${vpn_spoke_name}" \
--region="${region}" \
--hub="${hub_name}" \
--vpn-tunnels="${routing_vpc_tunnel_name}"
- 列出 NCC hub 默认路由表的内容,验证 mesh-hub 的 spoke 配置。
gcloud network-connectivity hubs list-spokes mesh-hub
- 列出 NCC hub 默认路由表的内容,分析 mesh-hub 的默认路由表。
gcloud network-connectivity hubs route-tables routes list --hub=mesh-hub \
--route_table=default
与 NCC 混合 spoke 进行动态路由交换时,Cloud Router 路由器已获知的具有 BGP MED 值的前缀会在 NCC spoke 中传播。
- 使用以下 gcloud 命令,查看“111”的优先级值。
gcloud network-connectivity hubs route-tables routes list \
--hub=mesh-hub \
--route_table=default \
--effective-location={{{project_0.default_region | Region}}} \
--filter=10.0.3.0/24
点击检查我的进度,验证已完成以下目标:
具有混合 spoke 和 VPC spoke 的 NCC
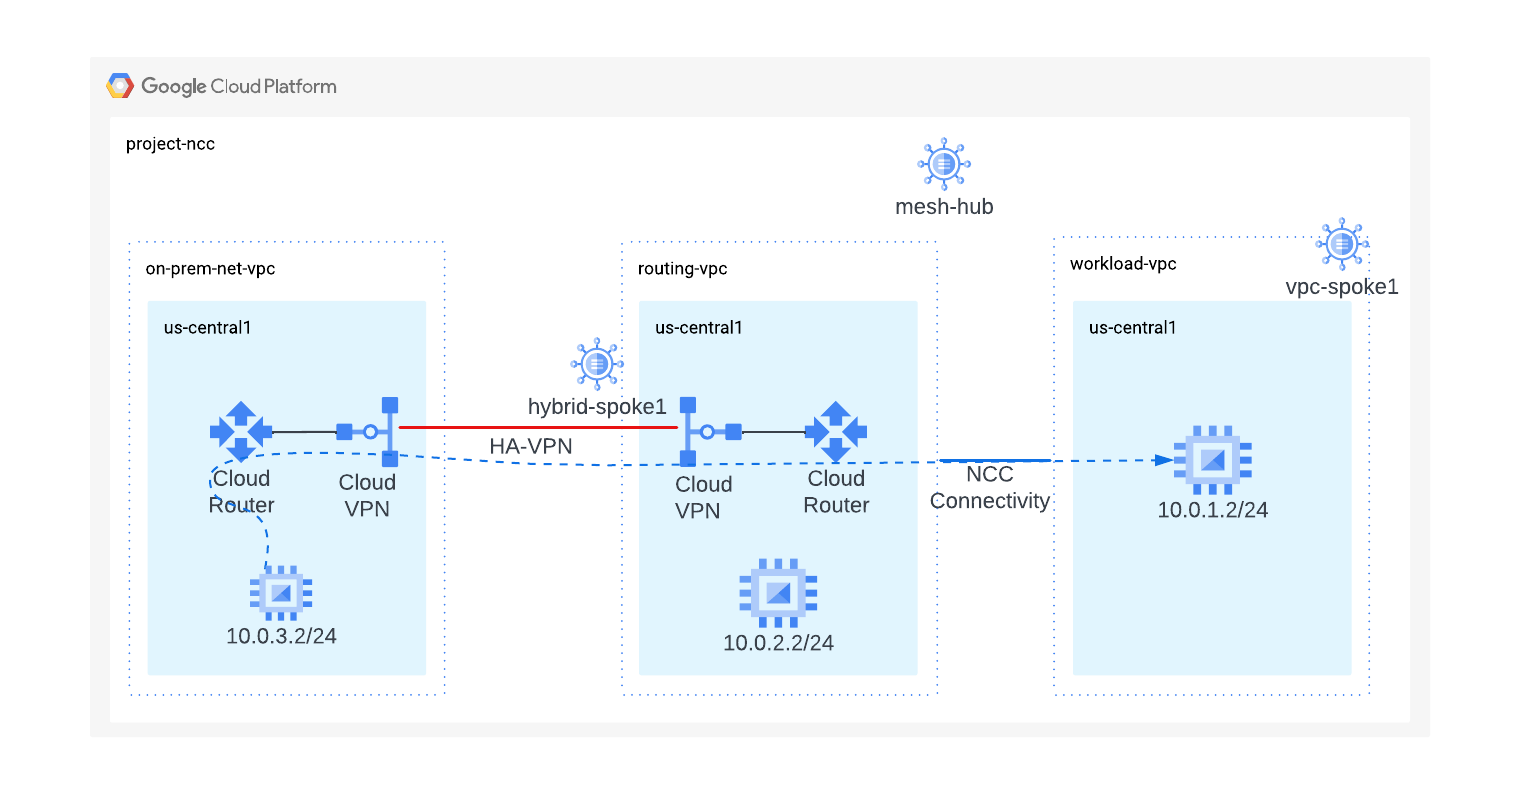
任务 4. 验证数据路径
此任务将验证 NCC 混合 spoke 与 VPC spoke 之间的数据路径。
- 使用以下 gcloud 命令的输出登录本地虚拟机:
gcloud compute instances list --filter="name=vm3-onprem"
- 登录本地网络中的虚拟机实例:
gcloud compute ssh vm3-onprem --zone={{{project_0.default_zone | Zone}}}
-
如果系统提示,请输入 Y,然后按两次 Enter 键将口令留空。
-
在 vm3-onprem 终端上,使用 curl 命令,与 workload-vpc 中托管的虚拟机建立网络会话:
curl 10.0.1.2 -v
- 如需返回您的 Cloud Shell 实例,请运行以下命令:
exit
任务 5. 删除资源
在生产环境中,您需要删除不使用的资源,以免产生费用。在本实验中,您将学习如何通过简单步骤移除 NCC spoke 和 hub:
删除 spoke
- 删除 NCC spoke:
gcloud network-connectivity spokes delete workload-vpc-spoke --global \
--quiet
gcloud network-connectivity spokes delete hybrid-spoke \
--quiet \
--region {{{project_0.default_region | Region}}}
- 删除 NCC hub:
gcloud network-connectivity hubs delete mesh-hub --quiet
- 删除高可用性 VPN 隧道:
gcloud compute vpn-tunnels delete on-prem-tunnel \
--region={{{project_0.default_region | Region}}} \
--quiet
gcloud compute vpn-tunnels delete routing-vpc-tunnel \
--region={{{project_0.default_region | Region}}} \
--quiet
- 删除 Cloud Router 路由器:
gcloud compute routers delete routing-vpc-cr --region {{{project_0.default_region | Region}}} --quiet
gcloud compute routers delete on-prem-router --region {{{project_0.default_region | Region}}} --quiet
恭喜!
您已了解如何使用 Network Connectivity Center 构建中心辐射型拓扑,将现有的 Google Cloud 资源连接到本地资源,并验证数据可以通过 NCC 混合 spoke 和 VPC spoke 进行传输。
后续步骤/了解详情
Google Cloud 培训和认证
…可帮助您充分利用 Google Cloud 技术。我们的课程会讲解各项技能与最佳实践,可帮助您迅速上手使用并继续学习更深入的知识。我们提供从基础到高级的全方位培训,并有点播、直播和虚拟三种方式选择,让您可以按照自己的日程安排学习时间。各项认证可以帮助您核实并证明您在 Google Cloud 技术方面的技能与专业知识。
上次更新手册的时间:2025 年 6 月 25 日
上次测试实验的时间:2025 年 6 月 25 日
版权所有 2026 Google LLC 保留所有权利。Google 和 Google 徽标是 Google LLC 的商标。其他所有公司名和产品名可能是其各自相关公司的商标。


