GSP1318

Overview
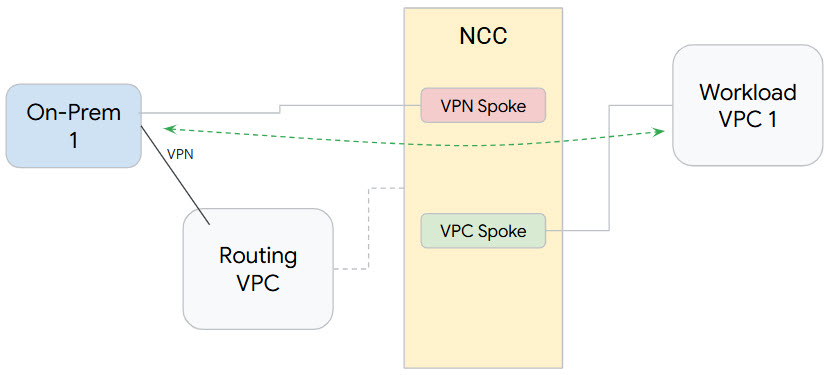
Explore how Network Connectivity Center (NCC) can be used to establish on-prem connectivity at scale through the support for VPC Spokes and dynamic route exchange. When you define a VPC as a VPC spoke, this enables you to connect it to multiple VPC networks together via the NCC Hub. To establish network connectivity with a user's on-prem network, you can attach Router appliance virtual NIC, HA VPN tunnels or Interconnect VLAN attachments to the same NCC hub as NCC VPC spokes.
The hub resource provides a centralized connectivity management model to interconnect spokes.
In this lab you'll build a logical hub and spoke topology with the NCC hub that will implement hybrid connectivity between the on-premise network and a workload VPC.
What you'll learn
In this lab, you learn how to perform the following tasks:
- Configure a HA VPN tunnel
- Configure Network Connectivity Center with VPC as spoke
- Configure Network Connectivity Center with HA-VPN tunnels as a hybrid spoke
- Validate Data Path
Setup and requirements
Before you click the Start Lab button
Read these instructions. Labs are timed and you cannot pause them. The timer, which starts when you click Start Lab, shows how long Google Cloud resources are made available to you.
This hands-on lab lets you do the lab activities in a real cloud environment, not in a simulation or demo environment. It does so by giving you new, temporary credentials you use to sign in and access Google Cloud for the duration of the lab.
To complete this lab, you need:
- Access to a standard internet browser (Chrome browser recommended).
Note: Use an Incognito (recommended) or private browser window to run this lab. This prevents conflicts between your personal account and the student account, which may cause extra charges incurred to your personal account.
- Time to complete the lab—remember, once you start, you cannot pause a lab.
Note: Use only the student account for this lab. If you use a different Google Cloud account, you may incur charges to that account.
How to start your lab and sign in to the Google Cloud console
-
Click the Start Lab button. If you need to pay for the lab, a dialog opens for you to select your payment method.
On the left is the Lab Details pane with the following:
- The Open Google Cloud console button
- Time remaining
- The temporary credentials that you must use for this lab
- Other information, if needed, to step through this lab
-
Click Open Google Cloud console (or right-click and select Open Link in Incognito Window if you are running the Chrome browser).
The lab spins up resources, and then opens another tab that shows the Sign in page.
Tip: Arrange the tabs in separate windows, side-by-side.
Note: If you see the Choose an account dialog, click Use Another Account.
-
If necessary, copy the Username below and paste it into the Sign in dialog.
{{{user_0.username | "Username"}}}
You can also find the Username in the Lab Details pane.
-
Click Next.
-
Copy the Password below and paste it into the Welcome dialog.
{{{user_0.password | "Password"}}}
You can also find the Password in the Lab Details pane.
-
Click Next.
Important: You must use the credentials the lab provides you. Do not use your Google Cloud account credentials.
Note: Using your own Google Cloud account for this lab may incur extra charges.
-
Click through the subsequent pages:
- Accept the terms and conditions.
- Do not add recovery options or two-factor authentication (because this is a temporary account).
- Do not sign up for free trials.
After a few moments, the Google Cloud console opens in this tab.
Note: To access Google Cloud products and services, click the Navigation menu or type the service or product name in the Search field.

Activate Cloud Shell
Cloud Shell is a virtual machine that is loaded with development tools. It offers a persistent 5GB home directory and runs on the Google Cloud. Cloud Shell provides command-line access to your Google Cloud resources.
-
Click Activate Cloud Shell  at the top of the Google Cloud console.
-
Click through the following windows:
- Continue through the Cloud Shell information window.
- Authorize Cloud Shell to use your credentials to make Google Cloud API calls.
When you are connected, you are already authenticated, and the project is set to your Project_ID, . The output contains a line that declares the Project_ID for this session:
Your Cloud Platform project in this session is set to {{{project_0.project_id | "PROJECT_ID"}}}
gcloud is the command-line tool for Google Cloud. It comes pre-installed on Cloud Shell and supports tab-completion.
- (Optional) You can list the active account name with this command:
gcloud auth list
- Click Authorize.
Output:
ACTIVE: *
ACCOUNT: {{{user_0.username | "ACCOUNT"}}}
To set the active account, run:
$ gcloud config set account `ACCOUNT`
- (Optional) You can list the project ID with this command:
gcloud config list project
Output:
[core]
project = {{{project_0.project_id | "PROJECT_ID"}}}
Note: For full documentation of gcloud, in Google Cloud, refer to the gcloud CLI overview guide.
Environment variables
Enable region and zone environment variables for this lab:
region="{{{project_0.default_region | Region}}}"
zone="{{{project_0.default_zone | Zone}}}"
Enable the Network Connectivity API
Before you can perform any tasks using Network Connectivity Center, you must enable the Network Connectivity API.
gcloud services enable networkconnectivity.googleapis.com
Verify existing Google Cloud resources
Resources have been made available for you for this lab:
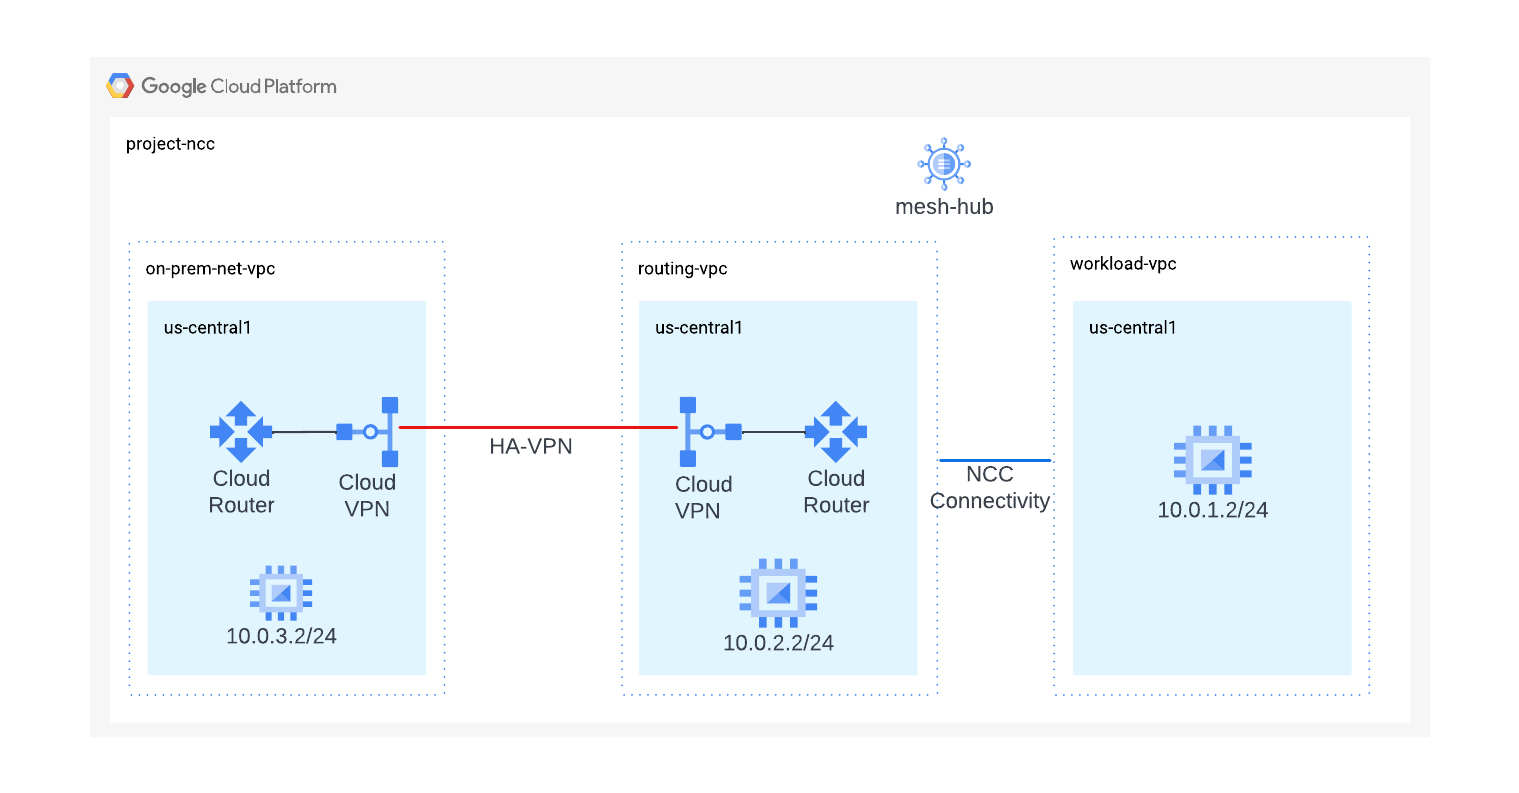
- "Routing VPC" identifies a VPC that is NOT configured as an NCC VPC spoke.
- "Workload VPC" identifies a VPC configured as NCC spoke.
Task 1. Set up hybrid connectivity
In this section, you'll configure an HA VPN tunnel to connect the on-prem and routing VPC networks together.
- Configure a Cloud Router with BGP in the routing VPC:
routing_vpc_network_name="routing-vpc"
routing_vpc_router_name="routing-vpc-cr"
routing_vpc_router_asn=64525
gcloud compute routers create "${routing_vpc_router_name}" \
--region="${region}" \
--network="${routing_vpc_network_name}" \
--asn="${routing_vpc_router_asn}"
- Configure a Cloud Router with BGP in the On-Prem VPC:
on_prem_network_name="on-prem-net-vpc"
on_prem_router_name="on-prem-router"
on_prem_router_asn=64526
gcloud compute routers create "${on_prem_router_name}" \
--region="${region}" \
--network="${on_prem_network_name}" \
--asn="${on_prem_router_asn}"
- Configure a VPN Gateway in the routing VPC:
routing_vpn_gateway_name="routing-vpc-vpn-gateway"
gcloud compute vpn-gateways create "${routing_vpn_gateway_name}" \
--region="${region}" \
--network="${routing_vpc_network_name}"
- Configure a VPN Gateway in the On-Prem VPC:
on_prem_gateway_name="on-prem-vpn-gateway"
gcloud compute vpn-gateways create "${on_prem_gateway_name}" \
--region="${region}" \
--network="${on_prem_network_name}"
- Configure a VPN tunnel in the routing VPC and on-prem VPC:
secret_key=$(openssl rand -base64 24)
routing_vpc_tunnel_name="routing-vpc-tunnel"
on_prem_tunnel_name="on-prem-tunnel"
gcloud compute vpn-tunnels create "${routing_vpc_tunnel_name}" \
--vpn-gateway="${routing_vpn_gateway_name}" \
--peer-gcp-gateway="${on_prem_gateway_name}" \
--router="${routing_vpc_router_name}" \
--region="${region}" \
--interface=0 \
--shared-secret="${secret_key}"
gcloud compute vpn-tunnels create "${on_prem_tunnel_name}" \
--vpn-gateway="${on_prem_gateway_name}" \
--peer-gcp-gateway="${routing_vpn_gateway_name}" \
--router="${on_prem_router_name}" \
--region="${region}" \
--interface=0 \
--shared-secret="${secret_key}"
Click Check my progress to verify the objective.
Configure a Cloud Routers, VPN Gateway and VPN tunnel to set up hybrid connectivity
- Create BGP sessions to BGP peer the routing vpc and the on-prem cloud routers
interface_hub_name="if-hub-to-prem"
hub_router_ip="169.254.1.1"
gcloud compute routers add-interface "${routing_vpc_router_name}" \
--interface-name="${interface_hub_name}" \
--ip-address="${hub_router_ip}" \
--mask-length=30 \
--vpn-tunnel="${routing_vpc_tunnel_name}" \
--region="${region}"
bgp_hub_name="bgp-hub-to-prem"
prem_router_ip="169.254.1.2"
gcloud compute routers add-bgp-peer "${routing_vpc_router_name}" \
--peer-name="${bgp_hub_name}" \
--peer-ip-address="${prem_router_ip}" \
--interface="${interface_hub_name}" \
--peer-asn="${on_prem_router_asn}" \
--region="${region}"
interface_prem_name="if-prem-to-hub"
gcloud compute routers add-interface "${on_prem_router_name}" \
--interface-name="${interface_prem_name}" \
--ip-address="${prem_router_ip}" \
--mask-length=30 \
--vpn-tunnel="${on_prem_tunnel_name}" \
--region="${region}"
bgp_prem_name="bgp-prem-to-hub"
gcloud compute routers add-bgp-peer "${on_prem_router_name}" \
--peer-name="${bgp_prem_name}" \
--peer-ip-address="${hub_router_ip}" \
--interface="${interface_prem_name}" \
--peer-asn="${routing_vpc_router_asn}" \
--region="${region}"
By default, NCC Hub subnets are not announced to hybrid spokes. In the next step, configure the cloud router to announce NCC subnet routes to the on-premise network.
- Advertise VPC spoke subnets to on prem cloud router
vpc_spoke_subnet_ip_range="10.0.1.0/24"
gcloud compute routers update "${routing_vpc_router_name}" \
--advertisement-mode custom \
--set-advertisement-groups=all_subnets \
--set-advertisement-ranges="${vpc_spoke_subnet_ip_range}" \
--region="${region}"
- Advertise on-prem subnets to routing vpc cloud router:
gcloud compute routers update "${on_prem_router_name}" \
--advertisement-mode custom \
--set-advertisement-groups=all_subnets \
--region="${region}"
Update the on-prem cloud router BGP peering configuration to announce prefixes with a MED value of "111." In a later section, you'll observe NCC's behavior with BGP Med values.
on_prem_router_name="on-prem-router"
bgp_prem_name="bgp-prem-to-hub"
gcloud compute routers update-bgp-peer "${on_prem_router_name}" \
--peer-name="${bgp_prem_name}" \
--advertised-route-priority="111" \
--region="${region}"
- Check the status of the routing vpc tunnel.
gcloud compute vpn-tunnels describe routing-vpc-tunnel \
--region="${region}" \
--format='flattened(status,detailedStatus)'
- Check the status of the routing vpc cloud router.
gcloud compute routers get-status routing-vpc-cr \
--region="${region}"
Click Check my progress to verify the objective.
Update the routers to set up hybrid connectivity
Task 2. Network Connectivity Center Hub
Configure a NCC Hub using gcloud commands. The NCC Hub will serve as the control plane responsible for building routing configuration between each VPC spoke.
- Create a NCC hub using the
gcloud command
hub_name="mesh-hub"
gcloud network-connectivity hubs create "${hub_name}"
- Describe the newly created NCC Hub. Note the name and associated path.
gcloud network-connectivity hubs describe mesh-hub
createTime: '2025-05-02T08:50:18.521689807Z'
exportPsc: false
name: projects/qwiklabs-gcp-02-xxxxxxx/locations/global/hubs/mesh-hub
policyMode: PRESET
presetTopology: MESH
routeTables:
- projects/qwiklabs-gcp-02-xxxxxxx/locations/global/hubs/mesh-hub/routeTables/default
state: ACTIVE
uniqueId: eff43930-6232-426a-9954-4db8fa462e07
updateTime: '2025-05-02T08:50:41.651321236Z'
- NCC Hub introduced a routing table that defines the control plane for creating data connectivity. Find the name of NCC Hub's routing table:
gcloud network-connectivity hubs route-tables list --hub=mesh-hub
-
Find the URI of the NCC default route table.
gcloud network-connectivity hubs route-tables describe default --hub=mesh-hub
-
List the contents of the NCC Hub's default routing table. NCC Hub's route table will be empty until NCC hybrid spokes or VPC spokes are defined.
gcloud network-connectivity hubs route-tables routes list --hub=mesh-hub --route_table=default
The NCC Hub's route table should be empty.
Click Check my progress to verify the objective.
Network Connectivity Center Hub
Task 3. NCC with Hybrid and VPC Spokes
In this section, you'll configure two NCC Spoke using gCloud commands. One spoke will be a VPC spoke and the second will be a hybrid (VPN) spoke.
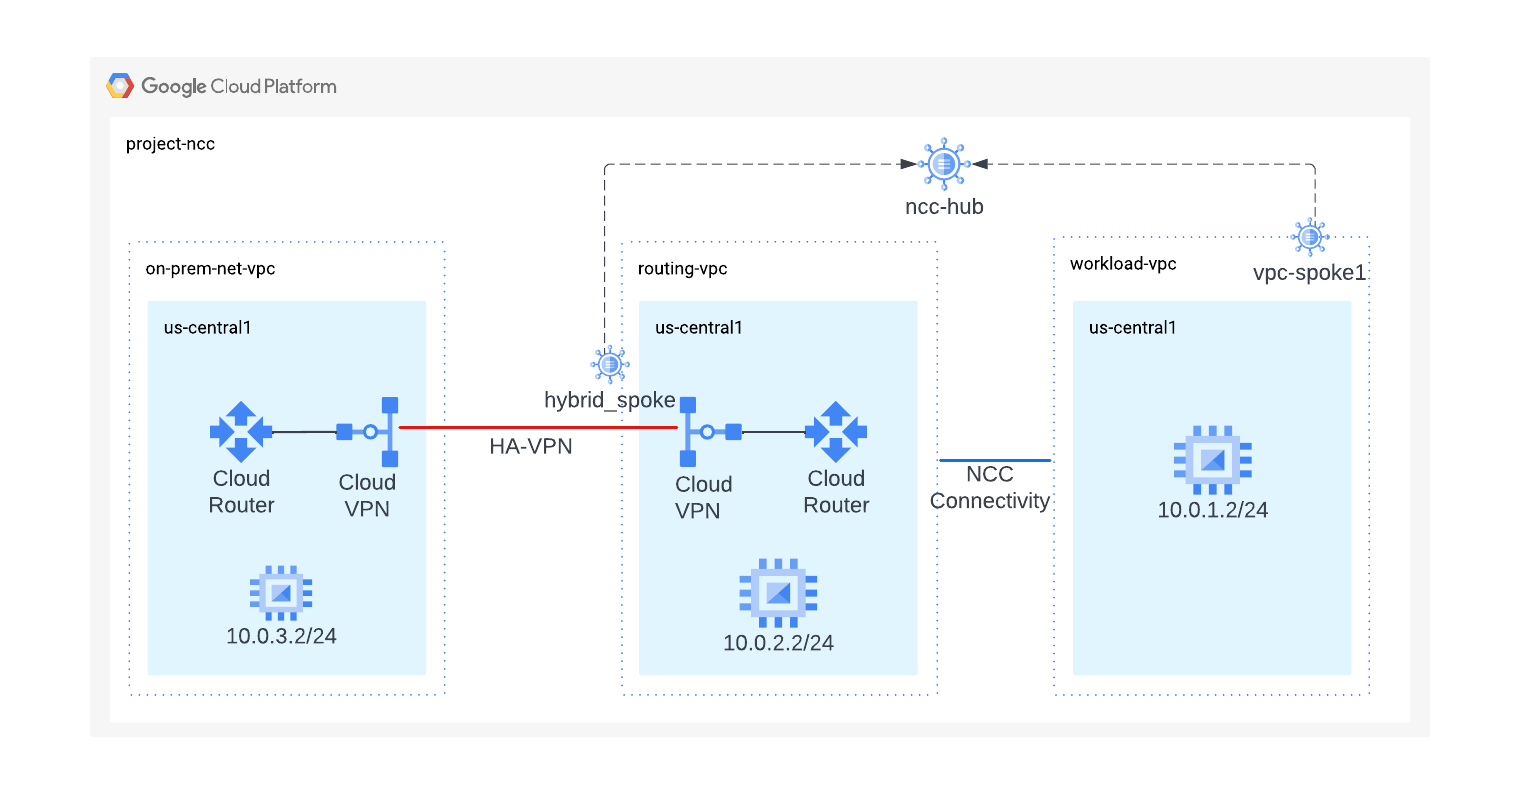
Configure Workload VPC(s) as a NCC Spoke
- Configure workload VPC as an NCC spoke and assign it to the NCC hub that was previously created.
vpc_spoke_name="workload-vpc-spoke"
vpc_spoke_network_name="workload-vpc"
gcloud network-connectivity spokes linked-vpc-network create "${vpc_spoke_name}" \
--hub="${hub_name}" \
--vpc-network="${vpc_spoke_network_name}" \
--global
The flag –global allows the user to avoid specifying a full URI path when configuring a new NCC spoke.
- Use this gcloud command to configure the VPN tunnel as a hybrid spoke to join mesh-hub.
vpn_spoke_name="hybrid-spoke"
routing_vpc_tunnel_name="routing-vpc-tunnel"
region="{{{project_0.default_region | Region}}}"
hub_name="mesh-hub"
gcloud network-connectivity spokes linked-vpn-tunnels create "${vpn_spoke_name}" \
--region="${region}" \
--hub="${hub_name}" \
--vpn-tunnels="${routing_vpc_tunnel_name}"
- Verify mesh-hub's spoke configuration by listing the contents of the NCC Hub's default routing table.
gcloud network-connectivity hubs list-spokes mesh-hub
- Analyze the mesh-hub's default routing table by listing the contents of the NCC Hub's default routing table.
gcloud network-connectivity hubs route-tables routes list --hub=mesh-hub \
--route_table=default
Cloud router-learned prefixes with BGP MED values are propagated across NCC spokes when using dynamic route exchange with NCC hybrid spokes.
- Use the gcloud command to view the priority value of "111."
gcloud network-connectivity hubs route-tables routes list \
--hub=mesh-hub \
--route_table=default \
--effective-location={{{project_0.default_region | Region}}} \
--filter=10.0.3.0/24
Click Check my progress to verify the objective.
NCC with Hybrid and VPC Spokes
Task 4. Verify the data path
This task validates the data path between NCC hybrid and VPC spoke.
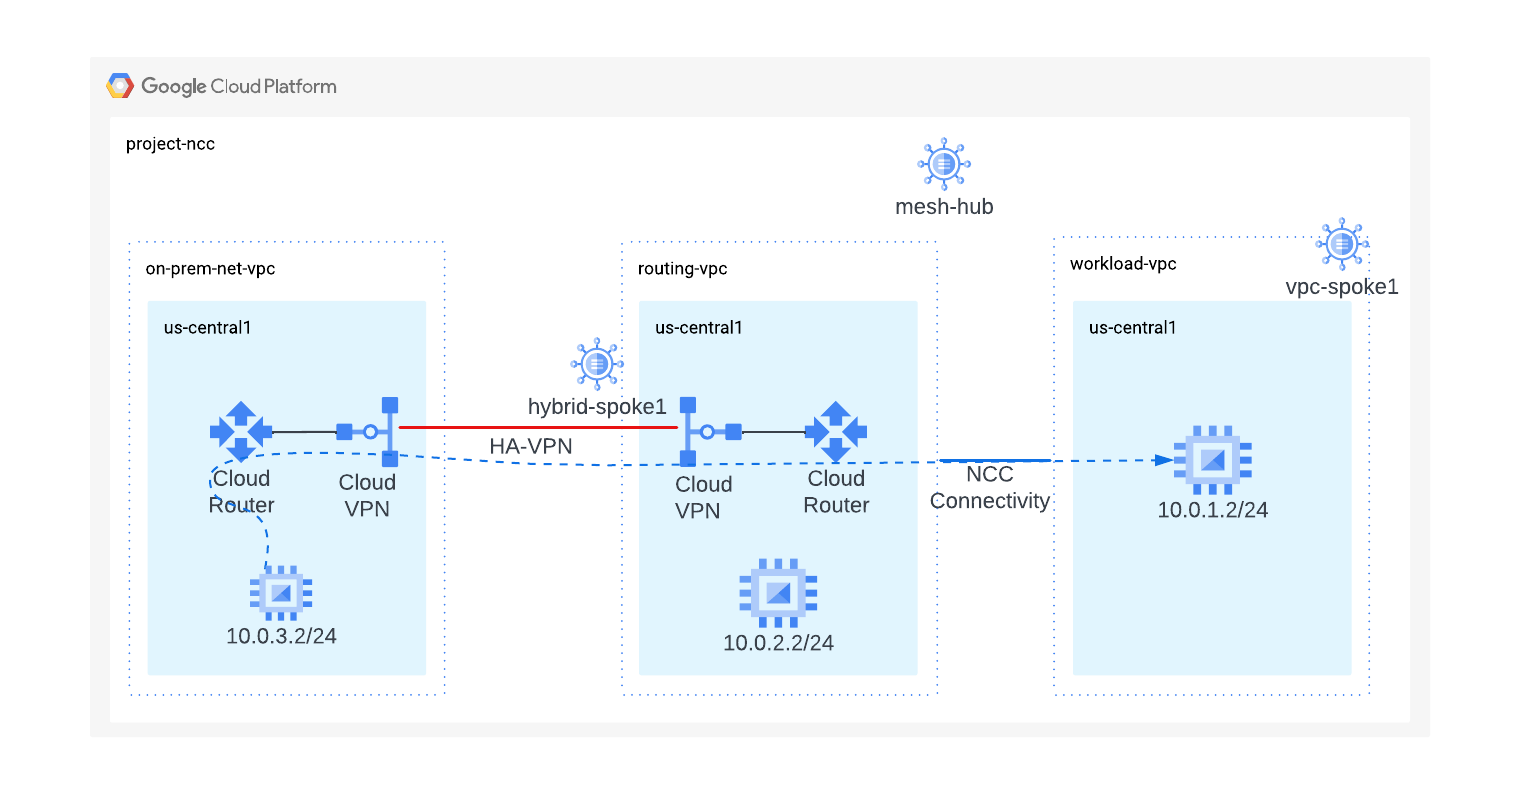
- Use the output from these gcloud commands to log on to the on prem VM:
gcloud compute instances list --filter="name=vm3-onprem"
- Log on to the VM instance residing in the on-prem network:
gcloud compute ssh vm3-onprem --zone={{{project_0.default_zone | Zone}}}
-
If prompted, enter Y, and press ENTER twice for an empty passphrase.
-
On vm3-onprem's terminal, use the curl command to establish a web session to the VM hosted in workload-vpc:
curl 10.0.1.2 -v
- To return to your Cloud Shell instance, run the following command:
exit
Task 5. Delete resources
In a production environment, you need to delete resources you're not using to avoid getting charged. For this lab, learn the easy steps to remove the NCC spokes and hub:
Delete spokes
- Delete NCC spokes:
gcloud network-connectivity spokes delete workload-vpc-spoke --global \
--quiet
gcloud network-connectivity spokes delete hybrid-spoke \
--quiet \
--region {{{project_0.default_region | Region}}}
- Delete NCC hub:
gcloud network-connectivity hubs delete mesh-hub --quiet
- Delete HA-VPN tunnel:
gcloud compute vpn-tunnels delete on-prem-tunnel \
--region={{{project_0.default_region | Region}}} \
--quiet
gcloud compute vpn-tunnels delete routing-vpc-tunnel \
--region={{{project_0.default_region | Region}}} \
--quiet
- Delete cloud router:
gcloud compute routers delete routing-vpc-cr --region {{{project_0.default_region | Region}}} --quiet
gcloud compute routers delete on-prem-router --region {{{project_0.default_region | Region}}} --quiet
Congratulations!
You have learned how to use the Network Connectivity Center to build a hub and spokes to connect existing Google Cloud resources to on-prem resources, then verified that data can transfer through NCC hybrid and VPC spoke.
Next Steps / Learn more
Google Cloud training and certification
...helps you make the most of Google Cloud technologies. Our classes include technical skills and best practices to help you get up to speed quickly and continue your learning journey. We offer fundamental to advanced level training, with on-demand, live, and virtual options to suit your busy schedule. Certifications help you validate and prove your skill and expertise in Google Cloud technologies.
Manual Last Updated June 25, 2025
Lab Last Tested June 25, 2025
Copyright 2026 Google LLC. All rights reserved. Google and the Google logo are trademarks of Google LLC. All other company and product names may be trademarks of the respective companies with which they are associated.


