GSP206

Overview
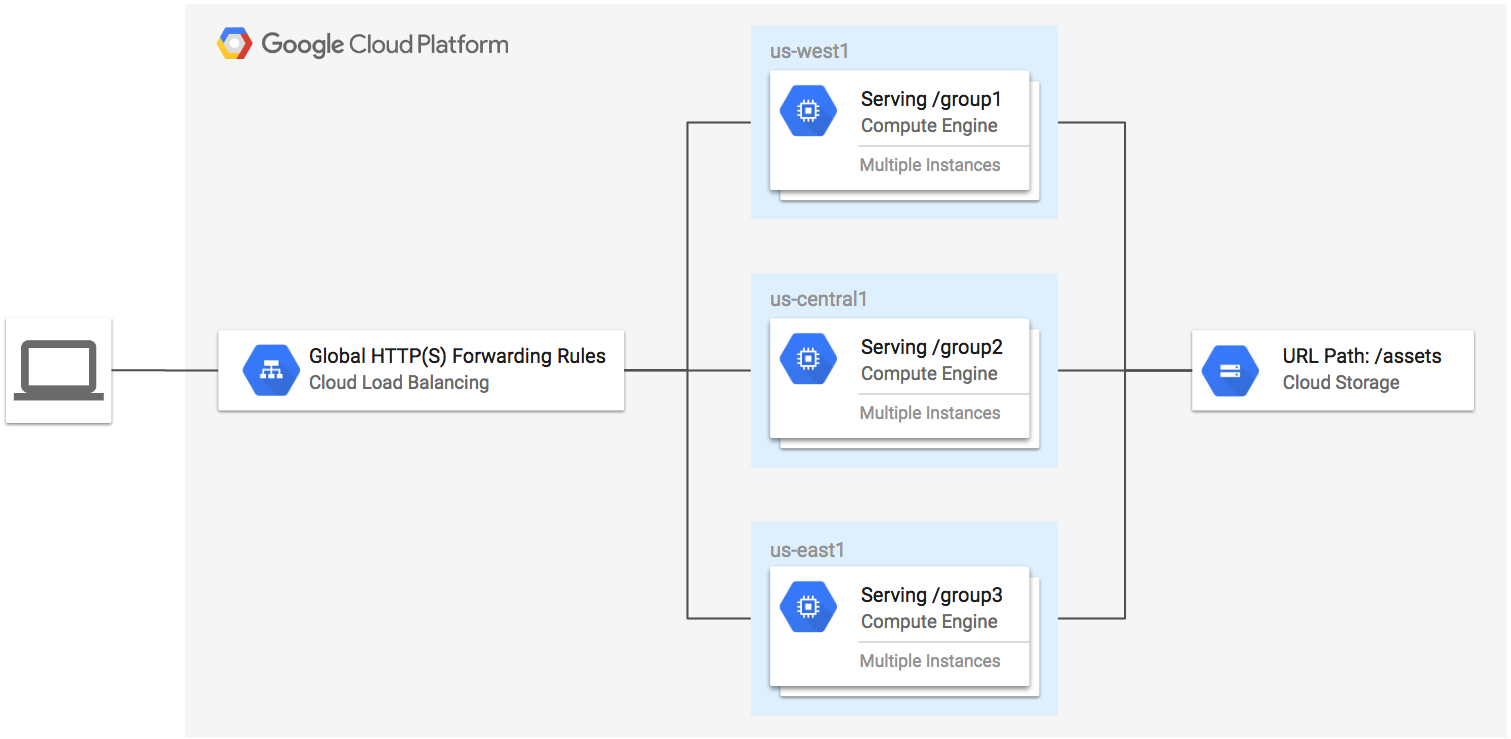
In this lab, you create an HTTPS load balancer to forward traffic to a custom URL map. The URL map sends traffic to the region closest to you with static assets being served from a Cloud Storage bucket. The TLS key and certificate is generated by Terraform using the TLS provider.
The following is a diagram of the architecture you create as part of this lab:
Objectives
In this lab, you learn how to perform the following tasks:
- Explore the load balancing modules for Terraform.
- Configure Terraform in the Google Cloud environment.
- Create a global HTTPS content-based load balancer.
Setup and requirements
Before you click the Start Lab button
Read these instructions. Labs are timed and you cannot pause them. The timer, which starts when you click Start Lab, shows how long Google Cloud resources are made available to you.
This hands-on lab lets you do the lab activities in a real cloud environment, not in a simulation or demo environment. It does so by giving you new, temporary credentials you use to sign in and access Google Cloud for the duration of the lab.
To complete this lab, you need:
- Access to a standard internet browser (Chrome browser recommended).
Note: Use an Incognito (recommended) or private browser window to run this lab. This prevents conflicts between your personal account and the student account, which may cause extra charges incurred to your personal account.
- Time to complete the lab—remember, once you start, you cannot pause a lab.
Note: Use only the student account for this lab. If you use a different Google Cloud account, you may incur charges to that account.
How to start your lab and sign in to the Google Cloud console
-
Click the Start Lab button. If you need to pay for the lab, a dialog opens for you to select your payment method.
On the right is the Lab setup and access panel with the following:
- The Open Google Cloud console button
- The temporary credentials (username and password) that you must use for this lab
- Other information, if needed, to step through this lab
Note that the lab timer is located near the top of the page, showing the remaining time.
-
Click Open Google Cloud console (or right-click and select Open Link in Incognito Window if you are running the Chrome browser).
The lab spins up resources, and then opens another tab that shows the Sign in page.
Tip: Arrange the tabs in separate windows, side-by-side.
Note: If you see the Choose an account dialog, click Use Another Account.
-
If necessary, copy the Username below and paste it into the Sign in dialog.
{{{user_0.username | "Username"}}}
You can also find the Username in the Lab setup and access panel.
-
Click Next.
-
Copy the Password below and paste it into the Welcome dialog.
{{{user_0.password | "Password"}}}
You can also find the Password in the Lab setup and access panel.
-
Click Next.
Important: You must use the credentials the lab provides you. Do not use your Google Cloud account credentials.
Note: Using your own Google Cloud account for this lab may incur extra charges.
-
Click through the subsequent pages:
- Accept the terms and conditions.
- Do not add recovery options or two-factor authentication (because this is a temporary account).
- Do not sign up for free trials.
After a few moments, the Google Cloud console opens in this tab.
Note: To access Google Cloud products and services, click the Navigation menu or type the service or product name in the Search field.

Activate Cloud Shell
Cloud Shell is a virtual machine that is loaded with development tools. It offers a persistent 5GB home directory and runs on the Google Cloud. Cloud Shell provides command-line access to your Google Cloud resources.
-
Click Activate Cloud Shell  at the top of the Google Cloud console.
-
Click through the following windows:
- Continue through the Cloud Shell information window.
- Authorize Cloud Shell to use your credentials to make Google Cloud API calls.
When you are connected, you are already authenticated, and the project is set to your Project_ID, . The output contains a line that declares the Project_ID for this session:
Your Cloud Platform project in this session is set to {{{project_0.project_id | "PROJECT_ID"}}}
gcloud is the command-line tool for Google Cloud. It comes pre-installed on Cloud Shell and supports tab-completion.
- (Optional) You can list the active account name with this command:
gcloud auth list
- Click Authorize.
Output:
ACTIVE: *
ACCOUNT: {{{user_0.username | "ACCOUNT"}}}
To set the active account, run:
$ gcloud config set account `ACCOUNT`
- (Optional) You can list the project ID with this command:
gcloud config list project
Output:
[core]
project = {{{project_0.project_id | "PROJECT_ID"}}}
Note: For full documentation of gcloud, in Google Cloud, refer to the gcloud CLI overview guide.
Install Terraform
Terraform is not pre-installed in Cloud Shell. You must install the Terraform CLI and configure it to persist across your Cloud Shell sessions.
- To configure the HashiCorp repository and install Terraform, and to ensure that this installation persists across future sessions, run the following commands in the Cloud Shell terminal:
cat <<'EOF' > ~/.customize_environment
# Set up HashiCorp repository and install Terraform
wget -O - https://apt.releases.hashicorp.com/gpg | sudo gpg --dearmor -o /usr/share/keyrings/hashicorp-archive-keyring.gpg
echo "deb [arch=$(dpkg --print-architecture) signed-by=/usr/share/keyrings/hashicorp-archive-keyring.gpg] https://apt.releases.hashicorp.com $(grep -oP '(?<=UBUNTU_CODENAME=).*' /etc/os-release || lsb_release -cs) main" | sudo tee /etc/apt/sources.list.d/hashicorp.list
sudo apt update && sudo apt install -y terraform
EOF
bash ~/.customize_environment
- To verify that Terraform has been installed correctly, run:
terraform --version
The output should show the installed version (v1.5.7 or later):
Terraform v1.9.0
Task 1. Clone the sample repository
Clone the repository and update the files
- In the Cloud Shell terminal, clone the
terraform-google-lb-http repository:
git clone https://github.com/terraform-google-modules/terraform-google-lb-http.git
- Navigate to the
multi-backend-multi-mig-bucket-https-lb directory:
cd ~/terraform-google-lb-http/examples/multi-backend-multi-mig-bucket-https-lb
-
On the Cloud Shell toolbar, click the Open Editor icon.
-
Open the file examples/multi-backend-multi-mig-bucket-https-lb/main.tf.
-
On line 133, inside the gce-lb-https module, add the following lines:
create_ssl_certificate = true
managed_ssl_certificate_domains = ["example.com"]
- In the
examples/multi-backend-multi-mig-bucket-https-lb/variables.tf file, update the region definitions to the following:
-
group1_region =
-
group2_region =
-
group3_region =
Task 2. Run Terraform
Initialize a working directory
The terraform init command is used to initialize a working directory containing Terraform configuration files. This command performs several different initialization steps to prepare a working directory for use. This command is always safe to run multiple times, to bring the working directory up to date with changes in the configuration.
terraform init
Example output:
...
Terraform has been successfully initialized!
Create an execution plan
The terraform plan command is used to create an execution plan. Terraform performs a refresh, unless explicitly disabled, and then determines what actions are necessary to achieve the desired state specified in the configuration files.
This command is a convenient way to check whether the execution plan for a set of changes matches your expectations without making any changes to real resources or the state. For example, terraform plan might be run before committing a change to version control, to create confidence that it will behave as expected.
- Run the following command to create an execution plan:
terraform plan -out=tfplan -var 'project={{{project_0.project_id | Project ID}}}'
Example output:
...
Plan: 43 to add, 0 to change, 0 to destroy.
The optional -out argument can be used to save the generated plan to a file for later execution with terraform apply.
- Run the following command to list out the current directory content:
ls
Example output:
diagram.png gceme.sh.tpl gcp-logo.svg main.tf mig.tf outputs.tf README.md test.sh tfplan tls.tf variables.tf
Take note of the saved Terraform plan (tfplan).
Apply the changes
The terraform apply command is used to apply the changes required to reach the desired state of the configuration, or the pre-determined set of actions generated by a terraform plan execution plan.
- Run the following command to apply the Terraform plan:
terraform apply tfplan
Example output (yours will differ):
...
Apply complete! Resources: 43 added, 0 changed, 0 destroyed.
...
Outputs:
asset-url = https://34.96.112.153/assets/gcp-logo.svg group1_region = us-west1 group2_region = us-central1 group3_region = us-east1 load-balancer-ip = 34.96.112.153
Verify the resources created by Terraform:
-
In the Cloud console, from the Navigation menu ( ), click View All Products.
-
Under Networking, click Network services > Load Balancing.
-
Wait until you see the green checkmark in the Backends column.
-
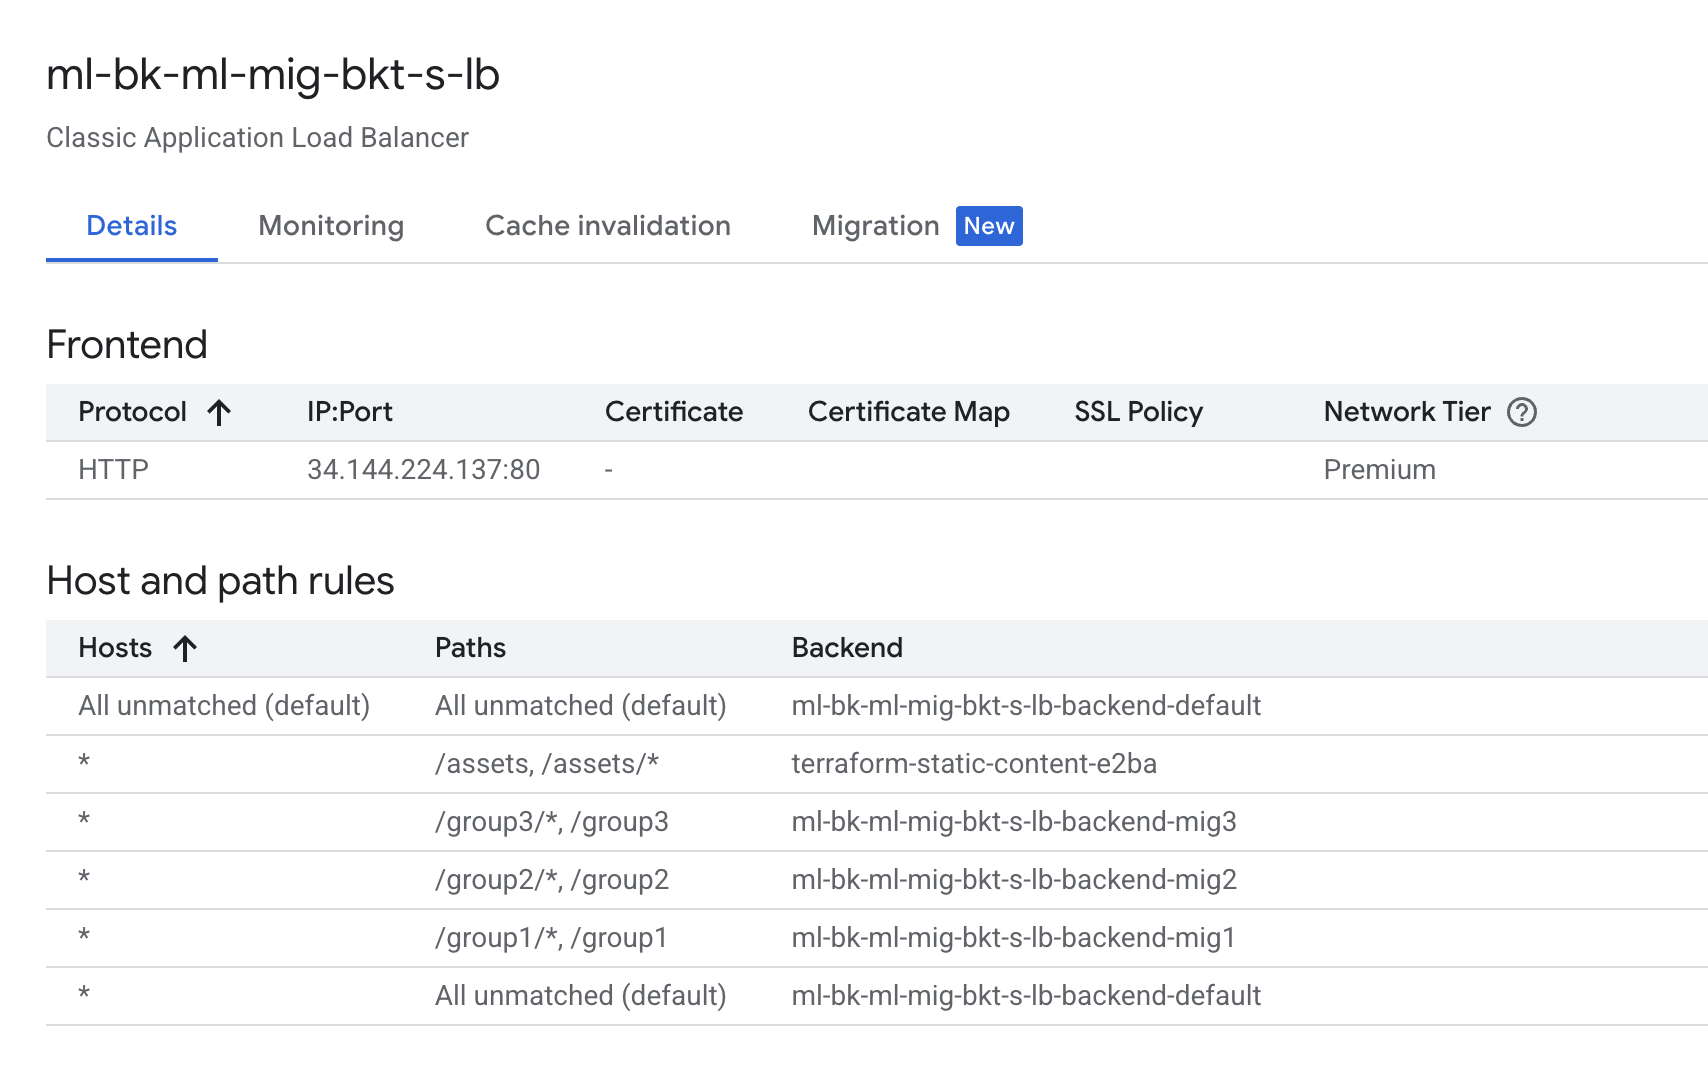
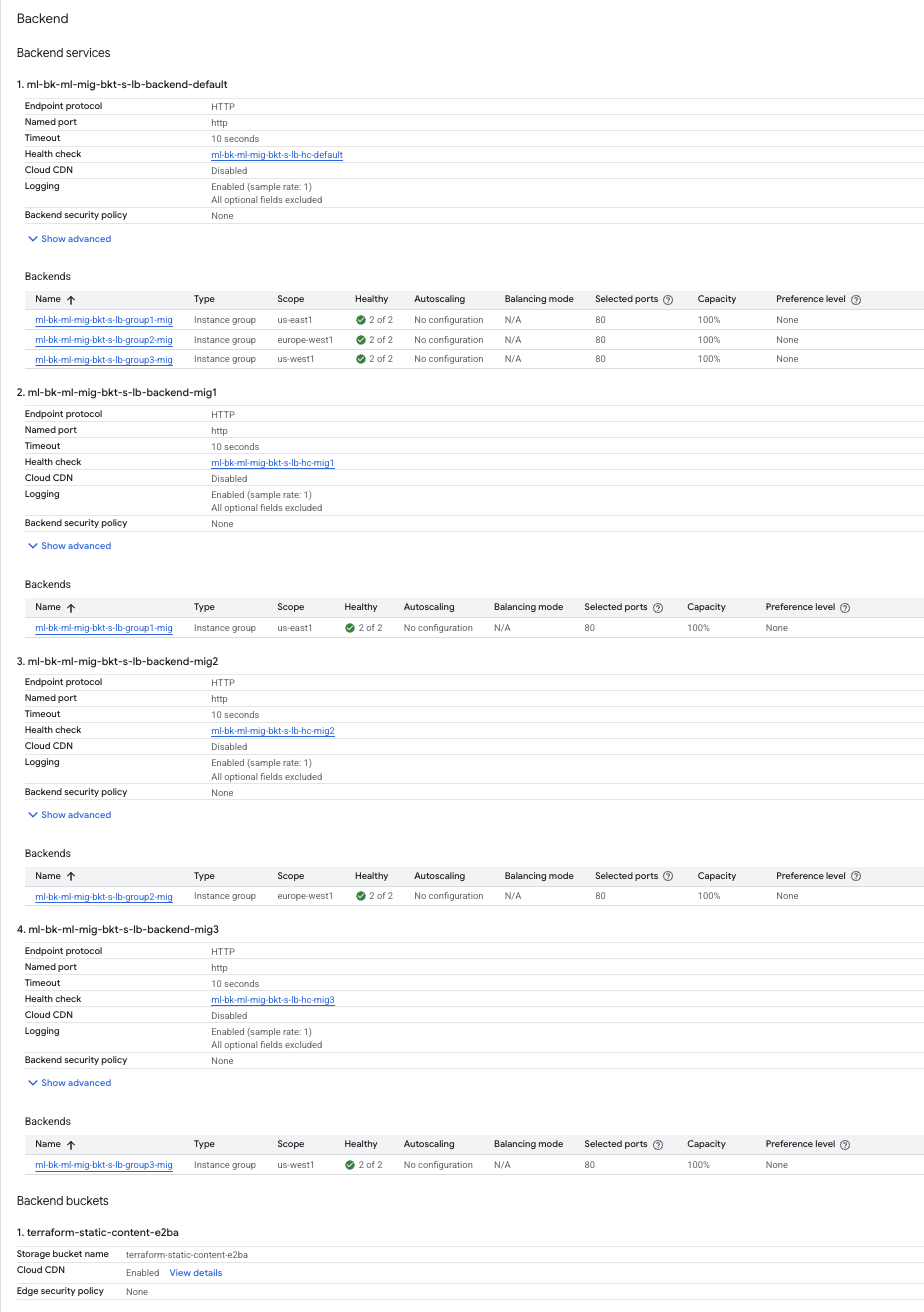
Click on the ml-bk-ml-mig-bkt-s-lb load balancer and check its details.
- Run the following to get the external URL:
EXTERNAL_IP=$(terraform output | grep load-balancer-ip | cut -d = -f2 | xargs echo -n)
echo https://${EXTERNAL_IP}
- Click on the
EXTERNAL_IP link that is returned to open the load balancer URL in a new browser tab. It takes a few minutes to load.
Note: If you don't get the expected output in the browser, make sure your load balancer details panel is the same as the above screenshot and wait for a few minutes.
Note: If you get a privacy error, click on Advanced and then proceed.
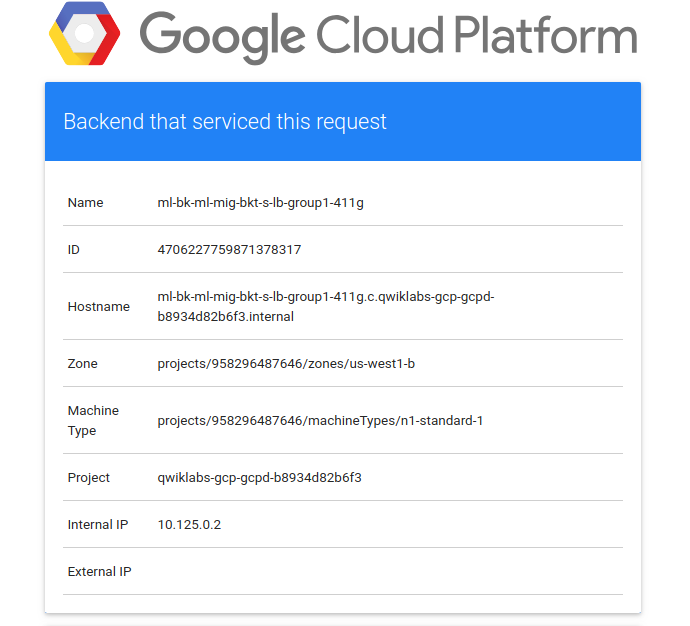
You should see the Google Cloud logo and instance details from the group closest to your geographical region.
Click Check my progress to verify the objective. Apply the changes in Terraform
- Now append the URL with
group1, group2 and group3.
Your final URLs should look as follows (make sure to replace EXTERNAL_IP with your load balancer IP): https://EXTERNAL_IP/group1.
- For
group1: You should see the Google Cloud logo and instance details from the group in .
https://EXTERNAL_IP/group2
- For
group2: You should see the Google Cloud logo and instance details from the group in
https://EXTERNAL_IP/group3
- For
group3: You should see the Google Cloud logo and instance details from the group in
Congratulations!
In this lab, you learned how to configure load balancing modules in Terraform. You then used the modules to create a global HTTPS Content-Based Load Balancer, and used it to test its response to the group closest to your geographical region.
Next steps / Learn more
Google Cloud training and certification
...helps you make the most of Google Cloud technologies. Our classes include technical skills and best practices to help you get up to speed quickly and continue your learning journey. We offer fundamental to advanced level training, with on-demand, live, and virtual options to suit your busy schedule. Certifications help you validate and prove your skill and expertise in Google Cloud technologies.
Manual Last Updated February 10, 2026
Lab Last Tested February 10, 2026
Copyright 2026 Google LLC. All rights reserved. Google and the Google logo are trademarks of Google LLC. All other company and product names may be trademarks of the respective companies with which they are associated.







