
准备工作
- 实验会创建一个 Google Cloud 项目和一些资源,供您使用限定的一段时间
- 实验有时间限制,并且没有暂停功能。如果您中途结束实验,则必须重新开始。
- 在屏幕左上角,点击开始实验即可开始
Create a discovery scan configuration for BigQuery in paused mode
/ 20
Create a sensitivity level tag in IAM
/ 20
Grant role to service account for discovery scan
/ 20
Update the paused discovery scan with automated tagging and start scan
/ 20
Explore conditional access for BigQuery using tags
/ 20
Create a discovery scan configuration for BigQuery in paused mode
/ 20
Create a sensitivity level tag in IAM
/ 20
Grant role to service account for discovery scan
/ 20
Update the paused discovery scan with automated tagging and start scan
/ 20
Explore conditional access for BigQuery using tags
/ 20

Sensitive Data Protection 是一项全托管式服务,旨在帮助发现、分类和保护敏感信息。主要选项包括:敏感数据发现,用于持续分析敏感数据;敏感数据去标识化,包括隐去;Cloud Data Loss Prevention (DLP) API,用于将发现、检查和去标识化功能内置到自定义工作负载和应用中。
您可以在 Google Cloud 中利用 Sensitive Data Protection 和 Identity and Access Management (IAM),在发现扫描期间自动为敏感数据添加标记,并为组织中的用户授予对 BigQuery 数据的有条件访问权限,从而保护 BigQuery 中的敏感数据。
在本实验中,您首先要创建处于暂停模式的 BigQuery 发现扫描配置。然后,您将创建一个标记,用于标记 BigQuery 中的敏感数据,并更新发现扫描配置,针对创建的标记进行自动扫描。最后,您将使用创建的标记向其他用户授予对 BigQuery 数据的有条件访问权限。
在本实验中,您将学习如何完成以下操作:
请阅读以下说明。实验是计时的,并且您无法暂停实验。计时器在您点击开始实验后即开始计时,显示 Google Cloud 资源可供您使用多长时间。
此实操实验可让您在真实的云环境中开展实验活动,免受模拟或演示环境的局限。为此,我们会向您提供新的临时凭据,您可以在该实验的规定时间内通过此凭据登录和访问 Google Cloud。
为完成此实验,您需要:
点击开始实验按钮。如果该实验需要付费,系统会打开一个对话框供您选择支付方式。左侧是“实验详细信息”窗格,其中包含以下各项:
点击打开 Google Cloud 控制台(如果您使用的是 Chrome 浏览器,请右键点击并选择在无痕式窗口中打开链接)。
该实验会启动资源并打开另一个标签页,显示“登录”页面。
提示:将这些标签页安排在不同的窗口中,并排显示。
如有必要,请复制下方的用户名,然后将其粘贴到登录对话框中。
您也可以在“实验详细信息”窗格中找到“用户名”。
点击下一步。
复制下面的密码,然后将其粘贴到欢迎对话框中。
您也可以在“实验详细信息”窗格中找到“密码”。
点击下一步。
继续在后续页面中点击以完成相应操作:
片刻之后,系统会在此标签页中打开 Google Cloud 控制台。

Sensitive Data Protection 中的发现服务可帮助您识别组织中敏感数据和高风险数据所在的位置。创建发现扫描配置后,Sensitive Data Protection 会扫描您选择进行审核的资源,并生成数据分析文件,其中包含有关识别出的 infoType(敏感数据类型)和元数据(数据风险和敏感度级别)的一系列分析洞见。
在此任务中,您将创建发现扫描,以自动分析 BigQuery 中的数据。生成完整的发现结果可能需要一些时间,因此,本实验的最后一项任务中提供了关键结果的要点和摘要。
在 Google Cloud 控制台中,依次点击导航菜单 (
在数据保护下,点击 Sensitive Data Protection。
点击名为发现的标签页。
在 BigQuery 下,点击启用。
在选择发现类型部分,保留 BigQuery 选项处于启用状态,然后点击继续。
在选择范围部分,保留扫描所选项目选项处于启用状态,然后点击继续。
对于托管式时间表,保留默认值,点击继续。
在本实验中,您将安排在创建后立即运行发现扫描,但您也可以选择按周期(例如每天或每周)或在特定事件发生后(例如在更新检查模板后)运行扫描。
对于选择检查模板,请将创建新的检查模板选项保持启用状态。
保留所有其他默认值,然后点击继续。
默认情况下,新的检查模板包含所有现有的 infoType。
对于置信度阈值,最低可能性的默认值为可能,这意味着您只会获得评估结果为可能、很可能和极有可能的发现结果。
在后面的任务中,您将修改此检查模板,以探索 infoType 和置信度阈值的其他选项。
对于添加操作,启用发布到 Security Command Center。
对于添加操作,还要启用将数据分析文件副本保存到 BigQuery,并提供数据集和表(在本实验中已预先创建),以便将结果保存到 BigQuery。
| 属性 | 值 |
|---|---|
| 项目 ID |
|
| 数据集 ID | bq_discovery |
| 表 ID | data_profiles |
请注意标记资源操作下方的消息,其中说明了服务代理需要特定角色才能进行自动标记。
在下一个任务中,您将创建标记,并向服务账号授予必要的角色,以便在发现扫描期间自动添加标记。
保留所有其他默认值,然后点击继续。
对于设置存储配置的位置,将该选项保留为启用状态,并选择 us(美国的多个区域),然后点击继续。
为此配置提供显示名称:BigQuery Discovery
启用在暂停模式下创建扫描作业。
此命令会创建发现扫描配置,但不会立即开始扫描,以便您可以创建标记并向发现扫描的服务代理 ID 授予适当的 IAM 角色。
点击“检查我的进度”,验证已完成以下目标:
在 IAM 中,您可以创建一个敏感度级别标记,在发现扫描期间使用该标记自动标记资源,并授予或拒绝对带有该敏感度级别标记的特定资源的访问权限。
在此任务中,您将在 IAM 中创建一个敏感度级别标记,其中包含四个标记值,分别代表不同的敏感度级别:低、中、高和未知。
在 Google Cloud 控制台中,依次点击导航菜单 (
点击 + 创建。
在标记键部分,输入标记的显示名称:sensitivity-level
在标记说明中,输入此标记的说明:敏感度级别标记为低、中、高和未知
点击 + 添加值。
在标记值中,输入第一个标记值的显示名:low
在标记值说明中,输入此标记值的说明:用于附加到低敏感度数据的标记值
重复第 5-7 步,创建另外三个标记值:
| 标记值 | 标记说明 |
|---|---|
moderate |
要附加到中等敏感度数据的标记值 |
high |
要附加到高敏感度数据的标记值 |
unknown |
要附加到敏感度级别未知的资源的标记值 |
创建标记键可能需要一分钟时间。
请注意,标记键具有标记键路径 (high、low、moderate、unknown
将标记键路径与标记值相结合,即可得到标记值路径,您将在下一个任务中使用该路径。例如:
点击“检查我的进度”,验证已完成以下目标:
若要自动标记资源,服务代理需要 resourcemanager.tagUser 角色。
在本部分中,您将按照文档根据数据敏感度控制 IAM 访问权限中提供的步骤授予此角色。
 。
。
如果出现提示,点击继续。
如果出现提示,请点击授权。
点击“检查我的进度”,验证已完成以下目标:
现在,您已向服务账号授予了自动标记所需的适当角色,接下来可以在发现扫描中启用“标记资源”选项。
返回 Sensitive Data Protection 概览页面。
在发现 > 扫描配置标签页下,找到名为 BigQuery 发现的行。点击该行中的查看操作(三个竖点的图标),然后选择修改。
在添加操作下,启用为资源添加标记和以下相关选项:
| 属性 | 值 |
|---|---|
| 对高敏感度资源添加标记 |
启用并提供标记值: |
| 对中敏感度资源添加标记 |
启用并提供标记值: |
| 对低敏感度资源添加标记 |
启用并提供标记值: |
| 对敏感度未知的资源添加标记 |
启用并提供标记值: |
另外,还要启用以下两个选项:
点击保存,然后点击确认修改。
最后,点击继续扫描以开始发现扫描。
点击“检查我的进度”,验证已完成以下目标:
注意:配置扫描开始后,可能需要一段时间才能获得完整的结果。
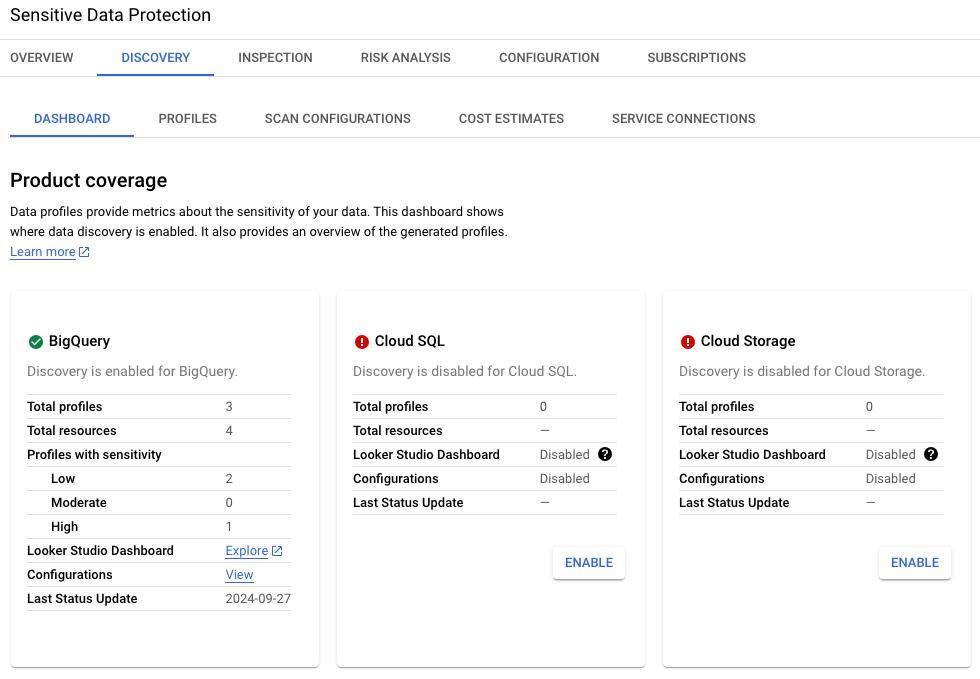
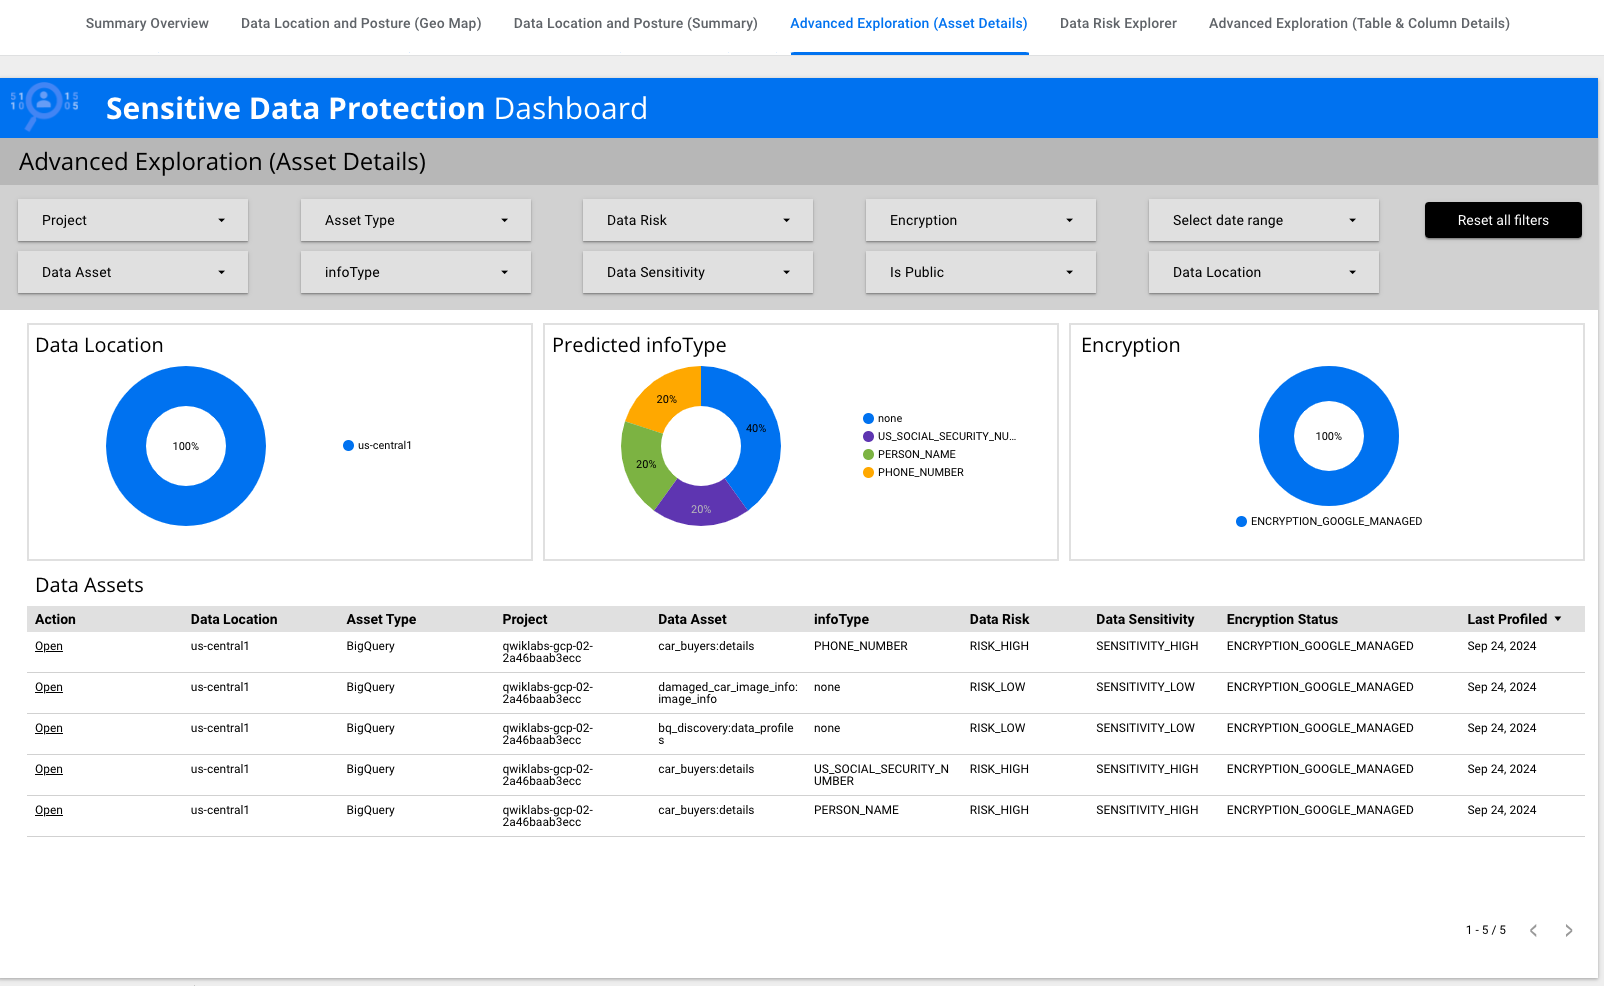
下图显示了在本实验环境中为 BigQuery 启用发现功能后的主要结果。对于此实验环境中包含的 BigQuery 数据,结果标记出可能存在几种 infoType,包括美国社会保障号码,这些都是高度敏感的数据。
已为 BigQuery 确定了三个数据分析:两个具有低敏感度(一个数据集用于发现结果,一个数据集用于损坏的汽车图片元数据),一个具有高敏感度(包含汽车买家详细信息的数据集)。
结果的这一部分提供了三个数据分析文件的全球位置。在本例中,两者都位于
us-central1 区域。
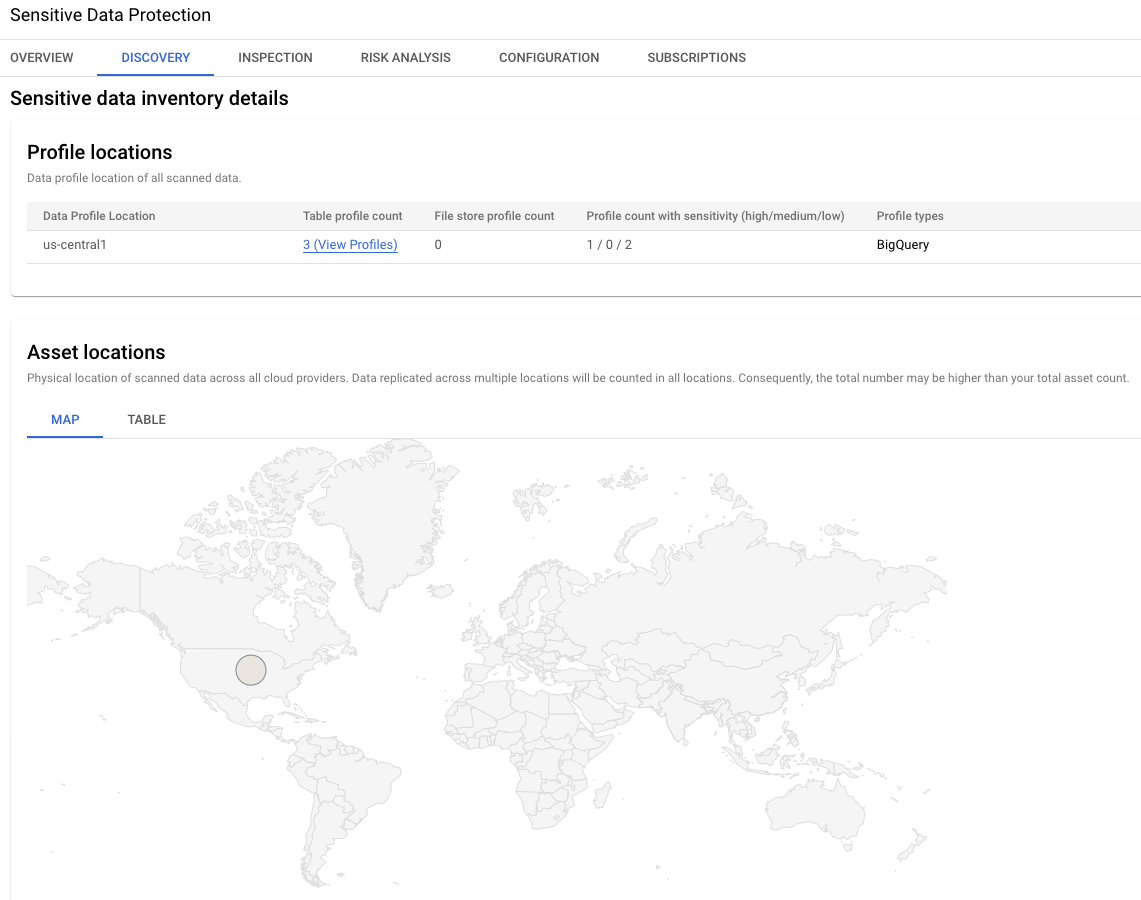
发现结果还提供了在 BigQuery 中发现的关键 infoType:美国社会安全号码、电子邮件地址、姓名等。

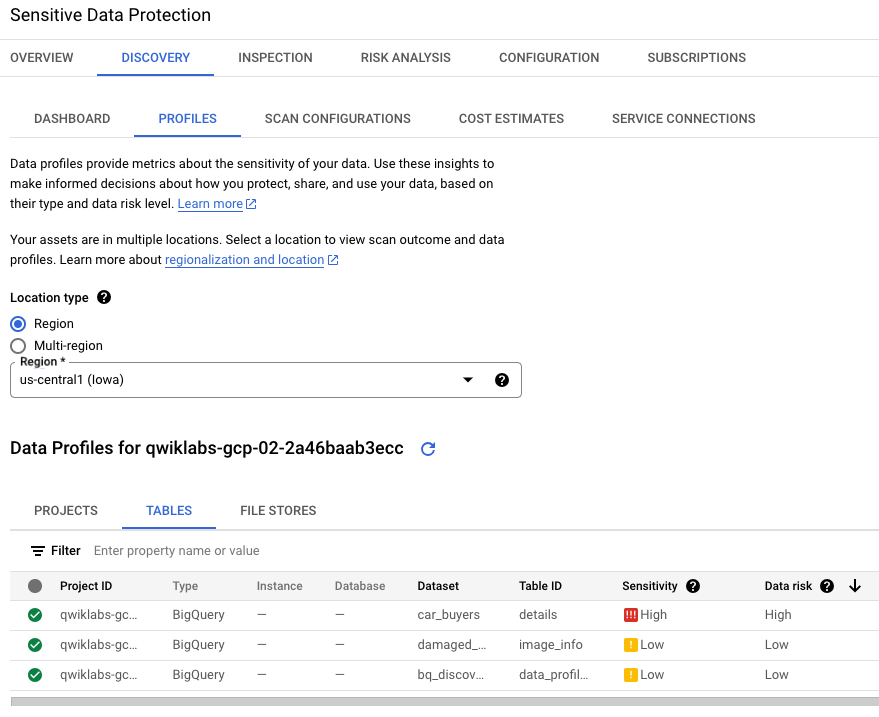
Profiles(分析)标签页会识别每个特定 BigQuery 数据集名称的敏感度和风险级别:一个数据集的敏感度较低(用于接收作业输出的空存储桶),另一个数据集的敏感度较高(包含原始数据的存储桶,包括美国社会保障号码)。
在本实验环境中,请务必将位置类型选择为区域 >
使用 IAM,您可以根据附加到特定资源的敏感度标记,使用有条件角色绑定向用户授予角色。例如,您可以授予用户仅访问标记为低敏感度的 BigQuery 数据的权限。用户将无法再访问任何没有该标记的 BigQuery,包括未标记的 BigQuery。
在此任务中,您首先要查看已授予本实验环境中的 Username 2 的现有 BigQuery 访问权限。然后,您将 Username 2 的访问权限更新为基于低敏感度数据标记的有条件访问权限,并手动将该低敏感度标记分配给其中一个 BigQuery 数据集。最后,您测试 Username 2 的更新后的 BigQuery 访问权限,以验证其有条件访问权限。
在本部分中,首先以 Username 2 (
完整解决方案(展开即可查看所有步骤!)
以 Username 2 的身份完成以下步骤,检查已授予 Username 2 的现有 BigQuery 访问权限。
在 Google Cloud 控制台中,依次点击导航菜单 (
在“探索器”面板中,展开项目 ID (
请注意,这里有四个 BigQuery 数据集:
在本部分中,首先以 Username 1 (
完整解决方案(展开即可查看所有步骤!)
在 Google Cloud 控制台中,依次点击导航菜单 (
找到 Username 2 (
找到名为 Viewer 的角色所在的行,然后点击删除角色(垃圾桶图标)。
点击添加其他角色。
在选择角色部分,依次选择基本 > Browser。
找到名为 BigQuery Data Viewer 的角色对应的行,然后点击添加 IAM 条件。
在标题字段中,输入:Low Sensitivity Data Access Only
在条件构建器下,为条件类型 1 选择标记,并为运算符选择包含值。
对于值路径,提供您在任务 3 中使用的低敏感度资源标记值。
展开提示,查看标记值,以防您忘记!
在本部分中,保持以 Username 1 (
请注意,完整的发现扫描需要一段时间才能完成,因此目前还没有任何 BigQuery 数据集被标记为敏感级别。
为了测试有条件访问,您需要手动将低敏感度标记分配给名为 damaged_car_image_info 的 BigQuery 数据集,该数据集不包含敏感数据。
在 Google Cloud 控制台中,依次点击导航菜单 (
在“探索器”面板中,展开项目 ID (
点击 damaged_car_image_info 打开数据集信息标签页,然后点击修改详细信息(铅笔图标)。
在标记下,点击选择范围 > 选择当前项目。
选择以下详细信息。
| 属性 | 值 |
|---|---|
| 键 1 | 敏感度级层 |
| 值 1 | 低 |
在本部分中,请最后一次以 Username 2 (
完整解决方案(展开即可查看所有步骤!)
以 Username 2 的身份完成以下步骤,检查已授予 Username 2 的有条件 BigQuery 访问权限。
点击导航菜单 (
在数据探索器面板中,展开项目 ID (
在 IAM 角色更新为适当的条件后,只会列出一个 BigQuery 数据集,因为它是唯一具有低敏感度标记的数据集:
点击“检查我的进度”,验证已完成以下目标:
注意:如前所述,配置扫描开始后,可能需要一段时间才能获得完整的结果。
您已向另一位用户授予并测试了条件访问权限,现在已经过了一段时间,发现扫描生成的 Looker 信息中心中将提供一些结果。
在本部分中,首先以 Username 1 (
展开下面的提示,了解如何切换到新用户。
完整解决方案(展开即可查看所有步骤!)
返回 Sensitive Data Protection 概览页面。
在发现 > 扫描配置标签页下,找到名为 BigQuery 发现的行。在 Data Studio 下,点击该行对应的 Looker。
在请求授权部分,点击授权。
在从 qwiklabs.net 中选择账号对话框中,选择
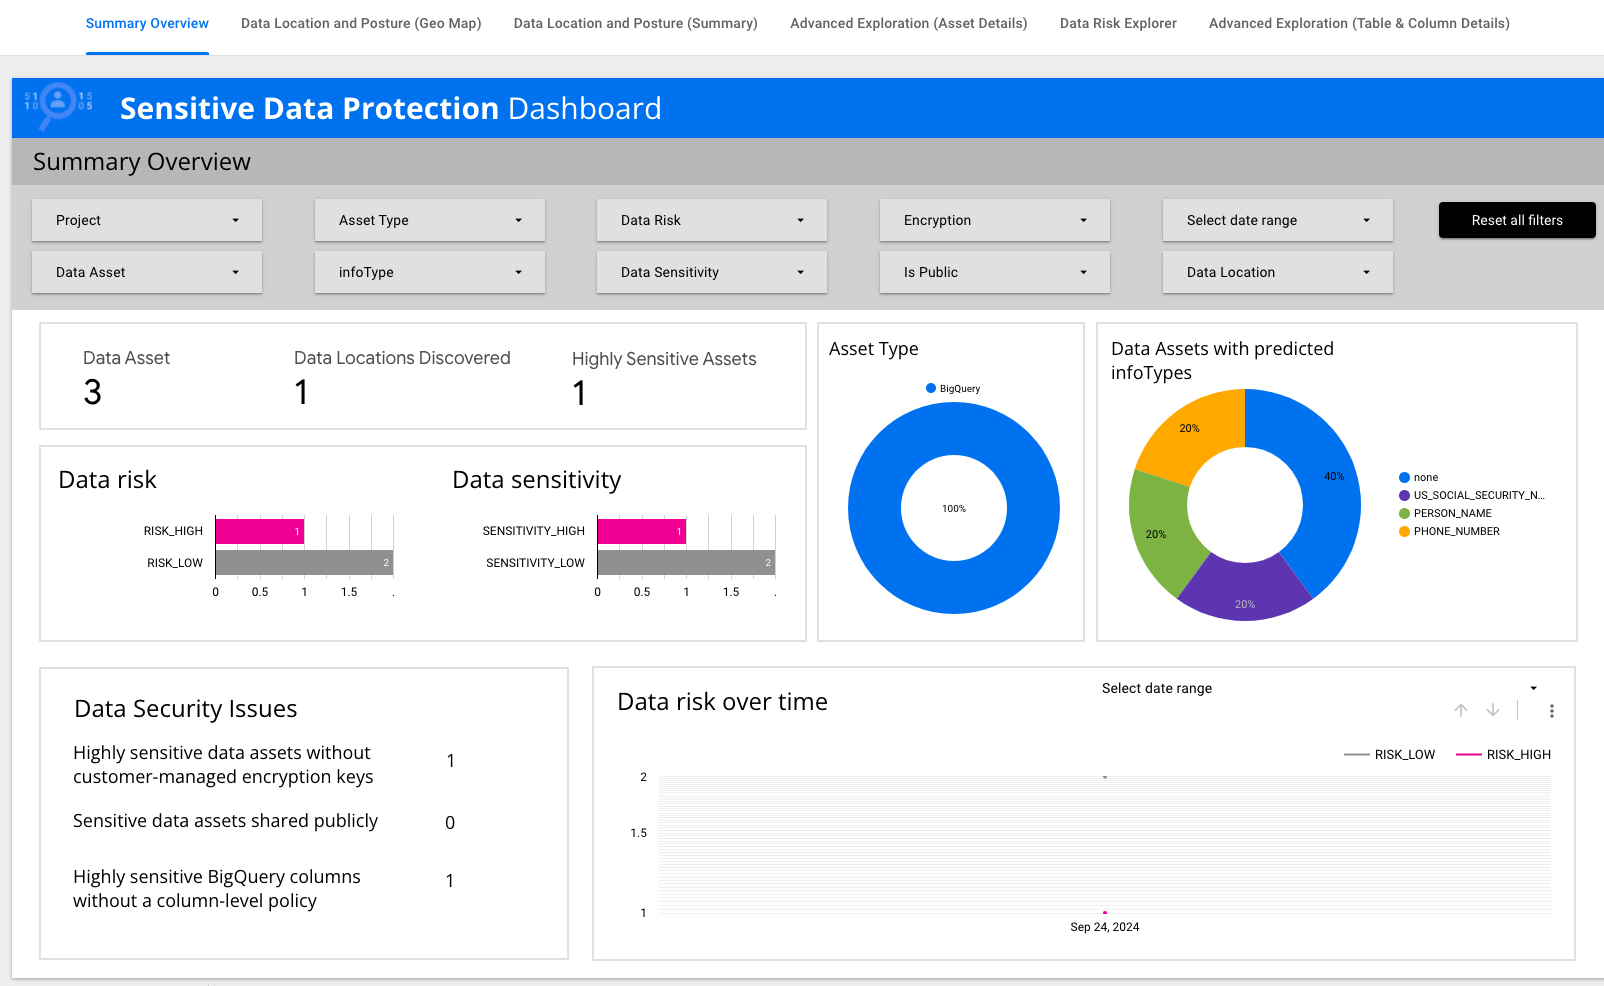
查看摘要概览。
请注意,这里有一些数据图块,其中汇总了数据风险、数据敏感度和资产类型等关键信息。
点击高级探索(资产详情)。
找到 infoType 为
US_SOCIAL_SECURITY_NUMBER
的行。在“操作”下,点击该行对应的打开。
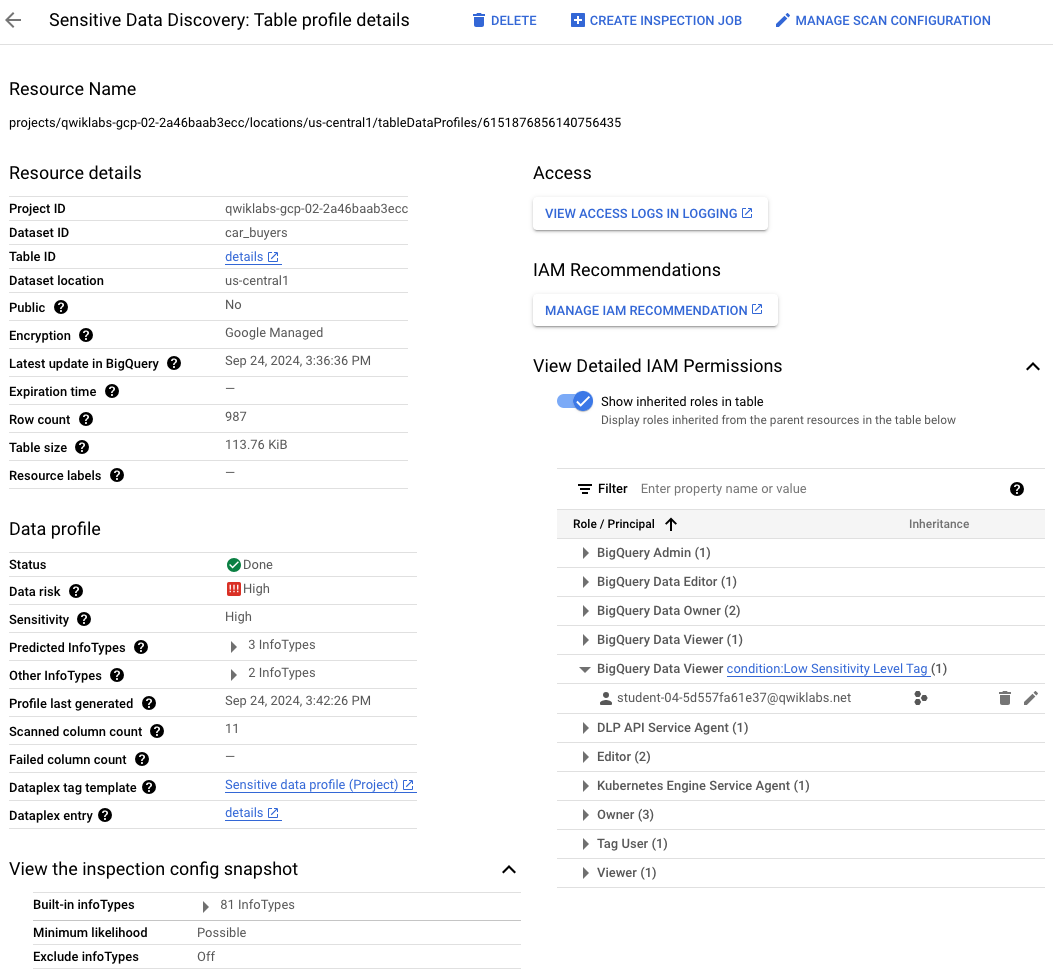
查看打开的页面,该页面名为敏感数据发现:文件存储区分析文件详情。
请注意,扫描的资源提供了许多详细信息,包括 IAM 权限。
展开查看详细的 IAM 权限旁边的箭头。
展开 BigQuery Viewer 旁边的箭头。
请注意,另一个用户 (
在本实验中,您创建了一个处于暂停模式的 BigQuery 发现扫描配置。然后,您创建了一个标记,用于标记 BigQuery 中的敏感数据,并更新了发现扫描配置,针对创建的标记进行自动扫描。最后,您使用创建的标记向其他用户授予对 BigQuery 数据的条件访问权限。
请查看以下资源,详细了解 BigQuery 的 Sensitive Data Protection:
…可帮助您充分利用 Google Cloud 技术。我们的课程会讲解各项技能与最佳实践,可帮助您迅速上手使用并继续学习更深入的知识。我们提供从基础到高级的全方位培训,并有点播、直播和虚拟三种方式选择,让您可以按照自己的日程安排学习时间。各项认证可以帮助您核实并证明您在 Google Cloud 技术方面的技能与专业知识。
上次更新手册的时间:2024 年 11 月 18 日
上次测试实验的时间:2024 年 11 月 18 日
版权所有 2026 Google LLC 保留所有权利。Google 和 Google 徽标是 Google LLC 的商标。其他所有公司名和产品名可能是其各自相关公司的商标。


此内容目前不可用
一旦可用,我们会通过电子邮件告知您

太好了!
一旦可用,我们会通过电子邮件告知您

一次一个实验
确认结束所有现有实验并开始此实验
完成此快速步骤即可开始实验。